Spec
- CPU: Ryzen 9 5950X
- Motherboard: Gigabyte AORUS X570 Pro (Bios Revision - F37b) (overclock)
- RAM: Corsair Pro Vengeance 32GB (16GB * 2) DDR4 3600Mhz
- Graphics: Sapphire RX 6800 XT
- Case : Lian Li PC-O11DW Dynamic
- SSD:
- Samsung 990 PRO SSD PCIe 4.0
WD SN850 1TB PCIE4(m.2 slot 1) - macOS Samsung 970 EVO PLUS 1T (m.2 slot 2) - storage- WD SN770 2TB PCIE4 (m.2 slot 2) - storage
- Samsung 990 PRO SSD PCIe 4.0
- PSU: Corsair RM1000x 80 Plus Gold 1000W
- WiFi-Bluetooth: Fenvi T919 BCM94360CD 802.11AC WI-FI With Bluetooth 4.0 PCIe
- Cooling : Thermaltake TH 360 ARGB AIO
- Network Card:
Comfast Aquantia AQC107Intel x520-DA1 (with RJ45 adaptor) - Installed Operating Systems: Ventura 13.3.1(内核 22.x)
- Bootloader: OpenCore 0.9.1
Note
- If I insert WD SN850 1TB PCIE4 into m.2 slot 2,and insert WD SN770 2TB PCIE4 into m.2 slot 2,the speed of SN850 PCIE4 decreases. Considering WD SN850 1TB PCIE4 is the system disk, SN850 should be inserted into slot 1(refer to the detailed benchmark)
Works and Not-works
Things that don’t work
- Sound including the case’s front and back headphones 3.5mm port
Things that work
- Airdrop
- WiFi / Bluetooth
- iCloud
- Hardware Acceleration
- Facetime
- Handoff
BIOS Setting
Bios Settings
-
Enter BIOS -> Press Delete -> Enter Setup
-
Save & Exit -> Load Optimized Defaults
-
Boot -> CSM Support -> Disabled
- Must be off, GPU errors like
gIOare common when this option in enabled
- Must be off, GPU errors like
-
Boot -> Fast boot -> Disabled
-
Boot -> Secure boot -> Disabled
-
Tweaker - Advanced CPU Settings - SVM Mode Enable
-
Settings -> IO Ports -> Above 4G Decoding -> Disabled
-
Settings - IO Ports - Onboard LAN Controller Disable
-
Settings -> IO Ports - Disable onboard network adapter
-
Settings -> IO Ports -> USB Configuration -> Legacy USB Support -> Auto
-
Settings -> IO Ports -> USB Configuration -> XHCI Hand-off: enable
Disable
- Serial/COM Port
- Parallel Port
Enable
-
Above 4G decoding(This must be on, if you can’t find the option then add
npci=0x2000to boot-args. Do not have both this option and npci enabled at the same time.)- If you are on a Gigabyte/Aorus or an AsRock motherboard, enabling this option may break certain drivers(ie. Ethernet) and/or boot failures on other OSes, if it does happen then disable this option and opt for npci instead
-
2020+ BIOS Notes: When enabling Above4G, Resizable BAR Support may become an available on some X570 and newer motherboards. Please ensure this is Disabled instead of set to Auto.
-
EHCI/XHCI Hand-off
-
OS type: Windows 8.1/10 UEFI Mode (my motherboard doesn’t have this setting)
-
SATA Mode: AHCI
Download OpenCore
- https://github.com/acidanthera/OpenCorePkg/releases
- https://beta.apple.com/sp/betaprogram/enroll
- https://dortania.github.io/OpenCore-Install-Guide/installer-guide/winblows-install.html
Base OpenCore Files
Summary
Things that I use
- ACPI
- SSDT-USBX - USB power tables
- SSDT-PLUG - CPU power management
- SSDT-SBRG - Correcting EC, RTC memory & IRQ conflicts
- SSDT-SBUS-MCHC - SMBus Support
SSDT-XHC (USB rename’s)
- Drivers
- HfsPlus.efi (must required)
- OpenCanopy.efi
- OpenRuntime.efi (must required)
- ResetNvramEntry.efi (optional)
- 如果不load 这个.efi,在开机时,就不会有 reset nvram选项
- Kexts
- Lilu1.6.4 (must required)
- VirtualSMC 1.3.1 (must required)
- WhateverGreen 1.6.4(must required)
- AppleALC 1.8.1(optional)
- for ALC1220-VB
SmallTreeIntel82576.kext SmallTree I211-AT patch 1.3.0(optional)for Intel I211-AT如果不使用板载网卡,其实就不需要了- 如果用 Intel x520-DA1,则一定要移除该kext
- AMDRyzenCPUPowerManagement 0.7.1
- for all power management features. This kext is also required if you would like to use AMD Power Gadget.
- Bootloaders like
OpenCorewill link each kext in the order they present in config file, so make sureAMDRyzenCPUPowerManagement.kextcomes beforeSMCAMDProcessor.kextas it serves as a dependency.
- SMCAMDProcessor 0.6.6 (optional)
- If you’re using VirtualSMC you can also load
SMCAMDProcessor.kextto publish sensor data.
- If you’re using VirtualSMC you can also load
- USBMap(must required)
- RestrictEvents 1.1.0 (must required)
- AppleMCEReporterDisabler (must required)
- If you want to use MacOS 12.3 or higher with an AMD processor, you need this
- Tools
- 直接随着Opencore的更新直接更新即可
Firmware Drivers (.efi)
- Needed for seeing HFS volumes(ie. macOS Installers and Recovery partitions/images). Do not mix other HFS drivers
- Replacement for AptioMemoryFix.efi (opens new window), used as an extension for OpenCore to help with patching boot.efi for NVRAM fixes and better memory management.
OpenCanopy.efi
Kexts (.kext)
Must haves
Without the below 2, no system is bootable:
- VirtualSMC
- mulates the SMC chip found on real macs, without this macOS will not boot
- Alternative is FakeSMC which can have better or worse support, most commonly used on legacy hardware.
- Lilu
- A kext to patch many processes, required for AppleALC, WhateverGreen, VirtualSMC and many other kexts. Without Lilu, they will not work.
- Note that Lilu and plugins requires OS X 10.8 or newer to function
Graphics
- WhateverGreen (must required)
- Used for graphics patching DRM, boardID, framebuffer fixes, etc, all GPUs benefit from this kext.
- Note the SSDT-PNLF.dsl file included is only required for laptops and AIOs, see Getting started with ACPI (opens new window)for more info
- Used for graphics patching DRM, boardID, framebuffer fixes, etc, all GPUs benefit from this kext.
Audio
- AppleALC
- Used for AppleHDA patching, allowing support for the majority of on-board sound controllers
- AMD 15h/16h may have issues with this and Ryzen/Threadripper systems rarely have mic support
- ALC1220-VB
- ALC1220 is supported, known from https://github.com/acidanthera/AppleALC/wiki/Supported-codecs
How to debug: https://github.com/acidanthera/AppleALC/wiki/Installation-and-usage
Ethernet
Intel I211-AT
- SmallTreeIntel82576.kext
- Required for Intel I211 NICs, based off of the SmallTree kext but patched to support I211
- Required for most AMD boards running Intel NICs
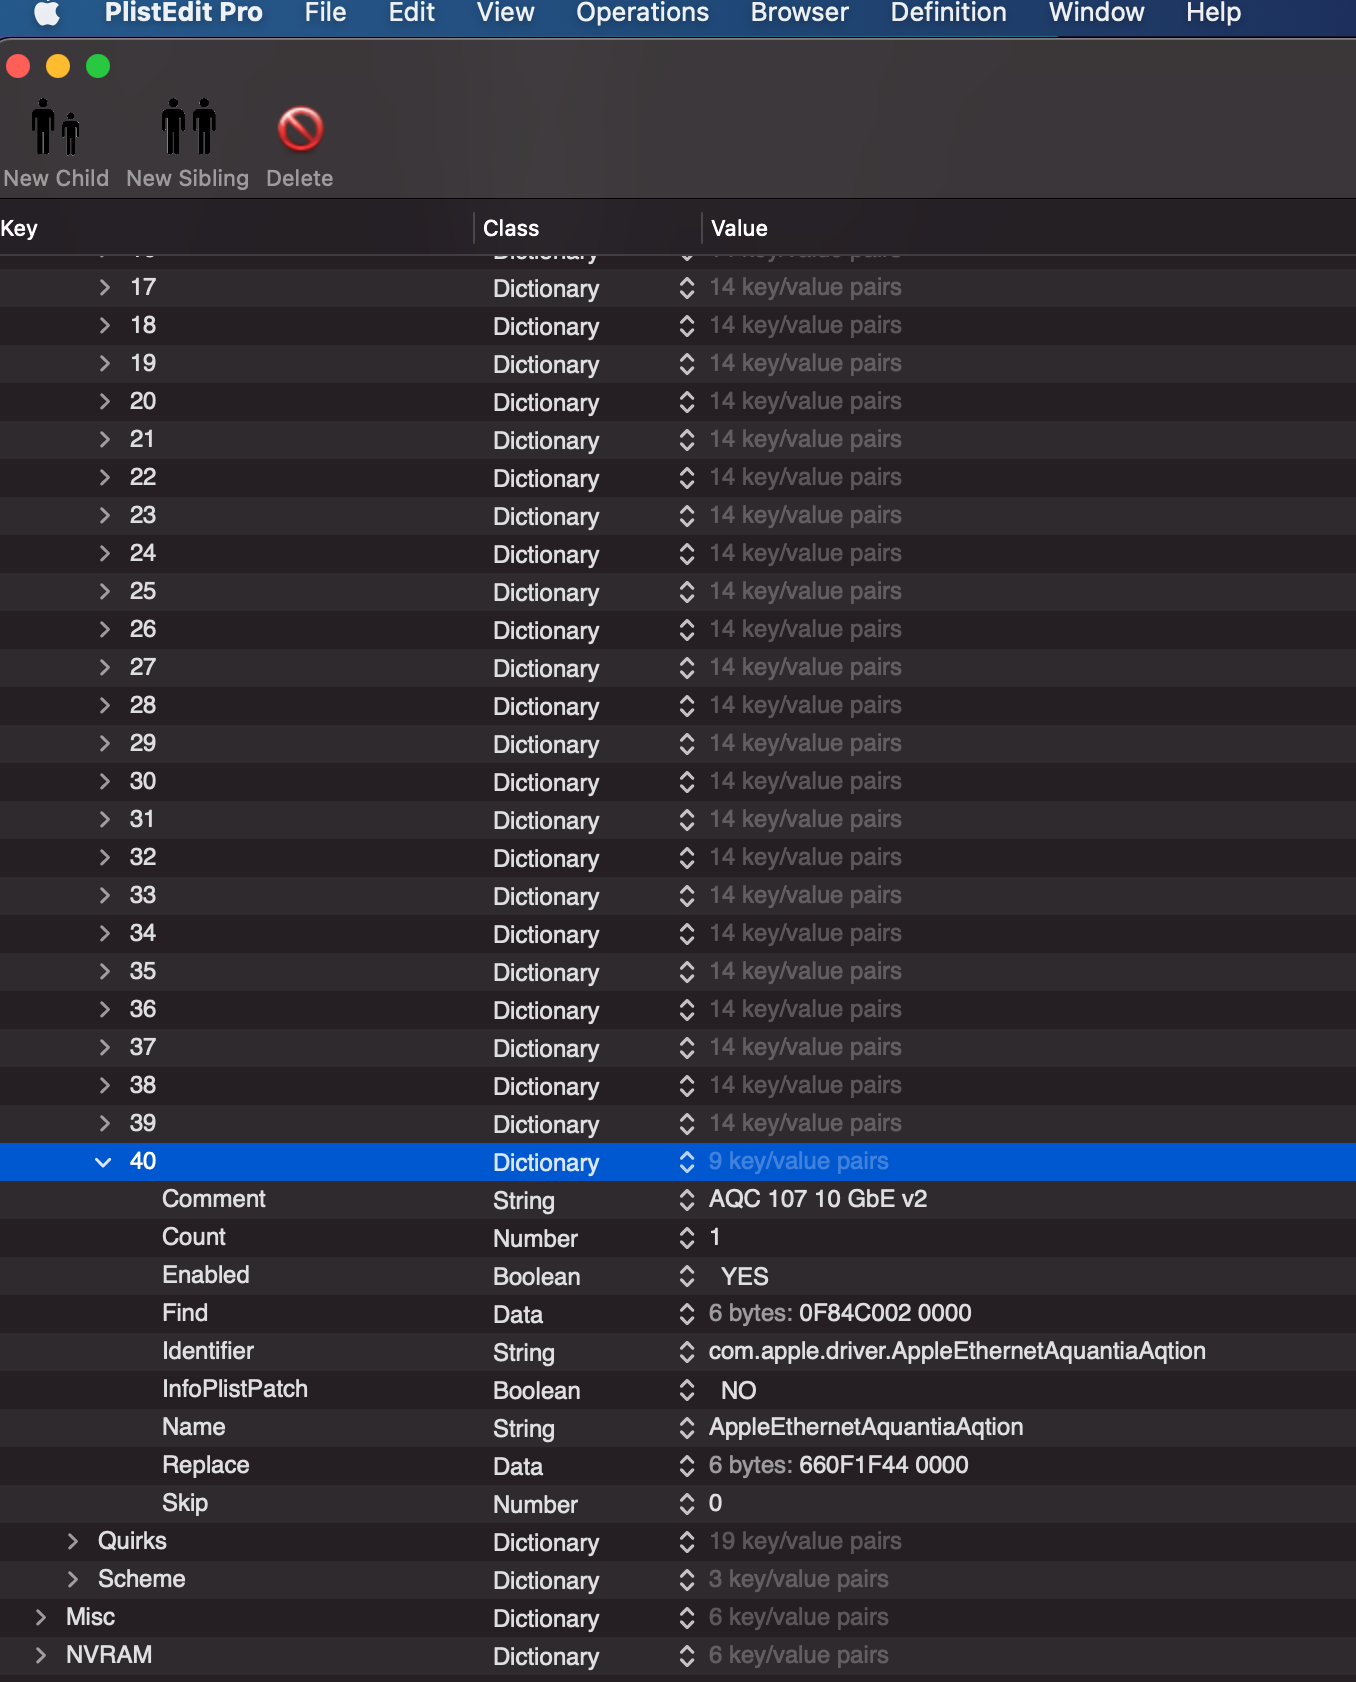
Comfast Aquantia AQC107
For Aquantia AQC107, it is natively supported in macOS.
For Big Sur, we need a patch under Kernel-Patch in OpenCore Config:
   		<dict>
				<key>Comment</key>
				<string>AQC 107 10 GbE v2</string>
 				<key>Count</key>
				 <integer>1</integer>
				 <key>Enabled</key>
				 <true/>
				 <key>Find</key>
				 <data>
				 D4TAAgAA
				 </data>
				 <key>Identifier</key>
				 <string>com.apple.driver.AppleEthernetAquantiaAqtion</string>
				 <key>InfoPlistPatch</key>
				 <false/>
				 <key>Name</key>
				 <string>AppleEthernetAquantiaAqtion</string>
				 <key>Replace</key>
				 <data>
				 Zg8fRAAA
				 </data>
				 <key>Skip</key>
				 <integer>0</integer>
			</dict>
Ref
-
https://www.tonymacx86.com/threads/how-to-fix-aquantia-10-gb-ethernet-for-big-sur.305261/
-
https://www.tonymacx86.com/threads/aquantia-lan-port-support.252381/
-
https://www.tonymacx86.com/threads/high-sierra-native-support-for-10gb-ethernet.239690/
USB
USBMap
Bluetooth
X570 WIFI Pro BLUETOOTH
https://github.com/OpenIntelWireless/IntelBluetoothFirmware
- Supported Devices: 0x8087, 0x0029
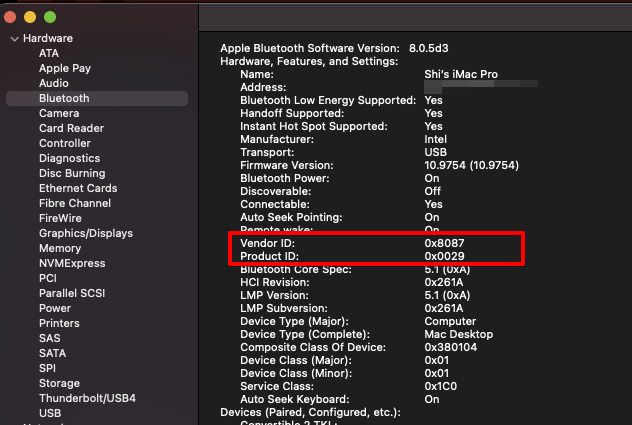
Download the latest release, inject the Kext files into the Bootloader and then restart.
Do not inject the Kext files to /Library/Extensions or /System/Library/Extensions as it may likely break your system.
-
IntelBluetoothFirmware.kext
Driver to upload the firmware.
-
IntelBluetoothInjector.kext
Codeless Kext that enables
On/Offswitch on the Bluetooth settings panel, not necessary to install.
Troubleshooting
In case there is something wrong with the driver, please run the following command in Terminal:
$ log show --last boot | grep IntelFirmware
WiFi
- Intel(R) Wi-Fi 6
CPU
AMDRyzenCPUPowerManagement - for all power management features. This kext is also required if you would like to use AMD Power Gadget.
- Bootloaders like
OpenCorewill link each kext in the order they present in config file, so make sureAMDRyzenCPUPowerManagement.kextcomes beforeSMCAMDProcessor.kextas it serves as a dependency.
SMCAMDProcessor
- If you’re using VirtualSMC you can also load
SMCAMDProcessor.kextto publish sensor data.
SSDTs (.aml)
-
SSDT-USBX (USB power tables)
-
SSDT-PLUG (CPU power management)
-
SSDT-SBRG (Correcting EC, RTC memory & IRQ conflicts)
- Changes Device/Vendor IDs of SBRG
-
SSDT-SBUS-MCHC
- Fix SMBus support
-
SSDT-XHC (USB rename’s)
See https://dortania.github.io/Getting-Started-With-ACPI/ssdt-methods/ssdt-easy.html
config.plist Setup
Highlight
GPU
If your not using a RX 6800 or any other Navi or Big Navi GPU then remove agdpmod=ignore from the boot arguments.
agdpmod=pikera- Renames
board-idtoboard-ixeffectively disabling boardID checks, this is based off of Pike.R.A’s work here(opens new window) - This is also required for all Navi GPUs due to the difference in framework with the x6000 drivers
- Renames
-> if 6800, use either agdpmod=pikera or agdpmod=ignore
- 我很长时间都在用
npci=0x2000 agdpmod=ignore,没碰到什么问题
自定义值
- MLB
- ROM
- SystemSerialNumber
- SystemUUID
PATCH INFO FOR SETTING THE CORRECT CORE COUNT FOR YOUR CPU
Core Count patch needs to be modified to boot your system. Find the three algrey - Force cpuid_cores_per_package patches and alter the Replace value only.
Changing B8000000 0000/BA000000 0000/BA000000 0090* to B8 0000 0000/BA 0000 0000/BA 0000 0090* substituting with the hexadeciamal value matching your physical core count.
Note: The three different values reflect the patch for different versions of macOS. Be sure to change all three if you boot macOS 10.13 to macOS 12
See the table below for the values matching your CPU Core Count.
| CoreCount | Hexadecimal |
|---|---|
| 6 Core | 06 |
| 8 Core | 08 |
| 12 Core | 0C |
| 16 Core | 10 |
| 32 Core | 20 |
So for example a 6 Core 5600X Replace value would result in these replace values, B8 06 0000 0000/BA 06 0000 0000/BA 06 0000 0090 Or a 12 Core 5900X that I have it setup as standard would result in these replace values, B8 0C 0000 0000/BA 0C 0000 0000/BA 0C 0000 0090
Ref
ACPI
- SSDT-USBX (USB power tables)
- SSDT-PLUG (CPU power management)
- SSDT-SBRG (Correcting EC, RTC memory & IRQ conflicts)
- Changes Device/Vendor IDs of SBRG
- SSDT-SBUS-MCHC (SMBus Support)
- Fixing SMBus support
SSDT-XHC (USB rename’s)Aorus X570 USB Renames
Booter
Quirks
Settings relating to boot.efi patching and firmware fixes, for us, we need to change the following:
| Quirk | Enabled | Comment |
|---|---|---|
| DevirtualizeMmio | NO | Note TRx40 requires this flag |
| EnableWriteUnprotector | NO | |
| RebuildAppleMemoryMap | YES | |
| SetupVirtualMap | YES | - Note B550, A520 and TRx40 boards should disable this. Newer BIOS versions of X570 also require this off - X470 and B450 with late 2020 BIOS updates also require this disabled |
| SyncRuntimePermissions | YES |
DeviceProperties

Kernel
Misc
NVRAM
Platforminfo
The following parts are needed to be updated by generating one via GenSMBIOS tool:
- MLB
- ROM: MAC Address
- SystemSerialNumber
- SystemUUID
Download from https://github.com/corpnewt/GenSMBIOS
$ git clone https://github.com/corpnewt/GenSMBIOS
$ cd GenSMBIOS
$ chmod +x GenSMBIOS.command
$ ./GenSMBIOS.command
  #######################################################
 #                     GenSMBIOS                       #
#######################################################

MacSerial v2.1.8
Current plist: None
Plist type:    Unknown

1. Install/Update MacSerial
2. Select config.plist
3. Generate SMBIOS
4. Generate UUID
5. Generate ROM
6. List Current SMBIOS
7. Generate ROM With SMBIOS (Currently Enabled)

Q. Quit

Please select an option:3
  #######################################################
 #                  Generate SMBIOS                    #
#######################################################

M. Main Menu
Q. Quit

Please type the SMBIOS to gen and the number
of times to generate [max 20] (i.e. iMac18,3 5):MacPro7,1
  #######################################################
 #               MacPro7,1 SMBIOS Info                 #
#######################################################

Type:         MacPro7,1
Serial:       F5KY309MP7QM
Board Serial: F5K902104QXK3F7A8
SmUUID:       8BDCC3A0-9251-4222-AA16-D344B673C48C
Apple ROM:    04489AAB6E63

Press [enter] to return...
- copy
Typepart toGeneric -> SystemProductName. - copy
Serialpart toGeneric -> SystemSerialNumber. - copy
Board Serialpart toGeneric -> MLB. - copy
SmUUIDpart toGeneric -> SystemUUID. - We set
Generic -> ROMto either an Apple ROM (dumped from a real Mac), your NIC MAC address, or any random MAC address (could be just 6 random bytes, e.g.,11223300 0000.- For me, I just https://miniwebtool.com/mac-address-generator/ to generate a random one
- E.g., I got
A2-66-82-35-EA-73, thus inputA2668235EA73intoGeneric -> ROM
- E.g., I got
- For me, I just https://miniwebtool.com/mac-address-generator/ to generate a random one
Reference
- https://github.com/corpnewt/GenSMBIOS
- https://dortania.github.io/OpenCore-Install-Guide/AMD/zen.html#platforminfo
Install macOS
Booting the OpenCore USB
So you’re now ready to finally put the USB stick into your computer and boot off of it. Remember that most laptops and some desktops will still default to the internal drive with Windows, and you’ll need to manually select OpenCore in the BIOS boot options. You’ll need to check in the user manual or use a bit of google to find out what Fn key accesses the BIOS and boot menu(ie. Esc, F2, F10 or F12)
Once you boot the USB, you’ll likely be greeted to the following boot options:
- Windows
- macOS Big Sur
- OpenShell.efi
- Reset NVRAM
For us, Option 2. is the one we want.
macOS Installer
So you’ve finally got the installer booted, got through the verbose and hit the installer! Now that you’ve gotten this far, the main things to keep in mind:
- Drives you wish to install macOS on must be both of GUID partition Scheme and APFS
- High Sierra on HDD and all Sierra users will need to use macOS Journaled(HFS+)
- The drive must also have a 200MB partition
- By default, macOS will setup freshly formatted drives with 200MB
Once you start the installation, you will want to wait until the system restarts. You will once again want to boot into OpenCore, but rather than selecting your USB installer/recovery - you will want to select the macOS installer on the hard drive to continue installation. You should get an apple logo, and after a few minutes you should get a timer at the bottom saying “x minutes remaining”. This may be a good time to get a drink or snack as this will take a while. It may restart a couple more times, but if all goes well, it should finally plop you at the “Setup your Mac screen”
You’re in! 🎉 You will want to go through the Post-Installation pages to finish setting up your system.
Post-Install
拷贝 EFI 引导到 disk
$ diskutil list

# disk1s1 需要根据实际情况来修改
$ sudo diskutil mount disk1s1

# 把引导U盘的引导分区也 mount,拷贝 EFI folder

# 注意,如果需要修改EFI中的内容(比如 kext),先在U盘中修改,保证能引导后,再把change copy 到硬盘中的EFI中
Screenshot
CPU OverClock
- ratio: 45.55
- Calibration: HIGH
- Voltage: 1.3625V
Benchmark
CPU
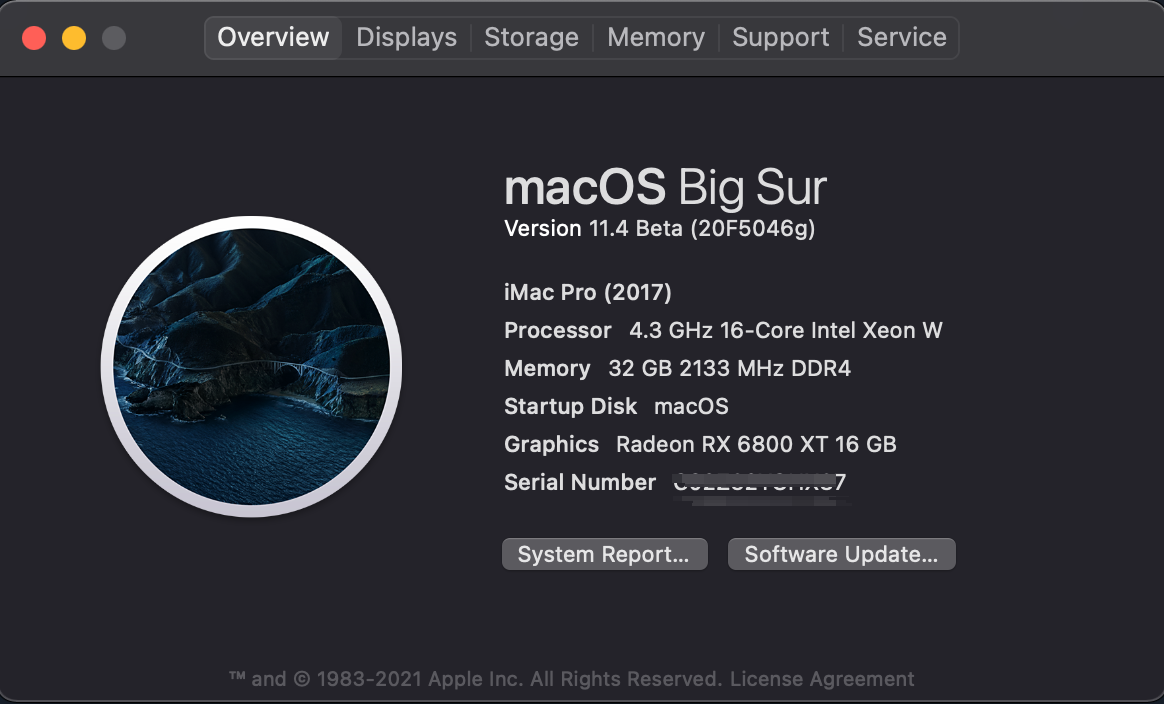
Big Sur 11.6.7
GeekBench 5 Auto PBO
- 1485 singlei-core
- 12237 multi-cores
https://browser.geekbench.com/v5/cpu/20999123
GeekBench 6
Auto PBO
- 1804 singlei-core
- 9870 multi-cores
https://browser.geekbench.com/v6/cpu/790357
Cinebench R23
Overclock profile:
-
Profile
-
ratio: 45.55
-
Calibration: HIGH
-
Voltage: 1.3625V
-
-
Benchmark
- 27724 multi-cores
- NA singlei-core
Auto PBO
- 26011 multi-cores
- 1405 singlei-core
Ventura 13.2
GeekBench 5
https://browser.geekbench.com/v5/cpu/21049429
Auto PBO
- 12478 multi-cores
- 1479 singlei-core
GeekBench 6
https://browser.geekbench.com/v6/cpu/895463
Auto PBO
- 9829 multi-cores
- 1807 singlei-core
Cinebench R23
Overclock profile:
-
Profile
-
ratio: 45.55
-
Calibration: HIGH
-
Voltage: 1.3625V
-
-
Benchmark
- NA multi-cores
- NA singlei-core
Auto PBO
- 25066 single-core
- 1365 multi-cores
Graphic Card
Geekbench
-
OpenCL
- CPU PCIe 通道被显卡和SSD共享 74849 https://browser.geekbench.com/v5/compute/6511306
- CPU PCIe 通道被显卡独享 75981https://browser.geekbench.com/v5/compute/6511327
-
Metal
- CPU PCIe 通道被显卡和SSD共享 173529 https://browser.geekbench.com/v5/compute/6511312
- CPU PCIe 通道被显卡独享 175271https://browser.geekbench.com/v5/compute/6511326
GFXBench
SSD
Refer to https://swsmile.info/post/hackintosh-support-pcie-m2-ssd/#conclusion
Update Notes
-
[2023-4-10] tried to upgrade to macOS Monterey 12.6.4
- failed,because Monterey requires OC 0.7.4 or newer, from https://forum.amd-osx.com/threads/audiogods-gigabyte-aorus-x570-pro-pro-wifi-ultra-master-big-sur-monterey-beta-opencore-0-7-4-efi.1344/page-55
-
[2023-4-12] upgrade to Ventura 13.3.1
- Don’t forget to update
cpuid_cores_per_packageas per https://github.com/AMD-OSX/AMD_Vanilla , since for >=13.3,a newcpuid_cores_per_packageis added
- Don’t forget to update
Troubleshooting
乱码 CPU/CPUID 初始化
2025.12.2
 - 				<string>-v keepsyms=1 debug=0x12a msgbuf=1048576 npci=0x2000 agdpmod=ignore alcid=29</string>
 - 			<key>DevirtualiseMmio</key> yes

 Disable:
	•	CSM
	•	Fast Boot
	•	Secure Boot


Enable:
	•	Above 4G Decoding
	•	SVM → Enabled (optional)
	•	XHCI Hand-off
	•	UEFI boot only

出现了 ASptpalretAeCdP IcCpPuU :1 P(rloacpeiscs oirdl d0=01050 OL0o0c1a)

进行以下设置
Booter → Quirks → DevirtualiseMmio = false(true -> false)
然后还是出现类似错误(乱码 CPU/CPUID 初始化):
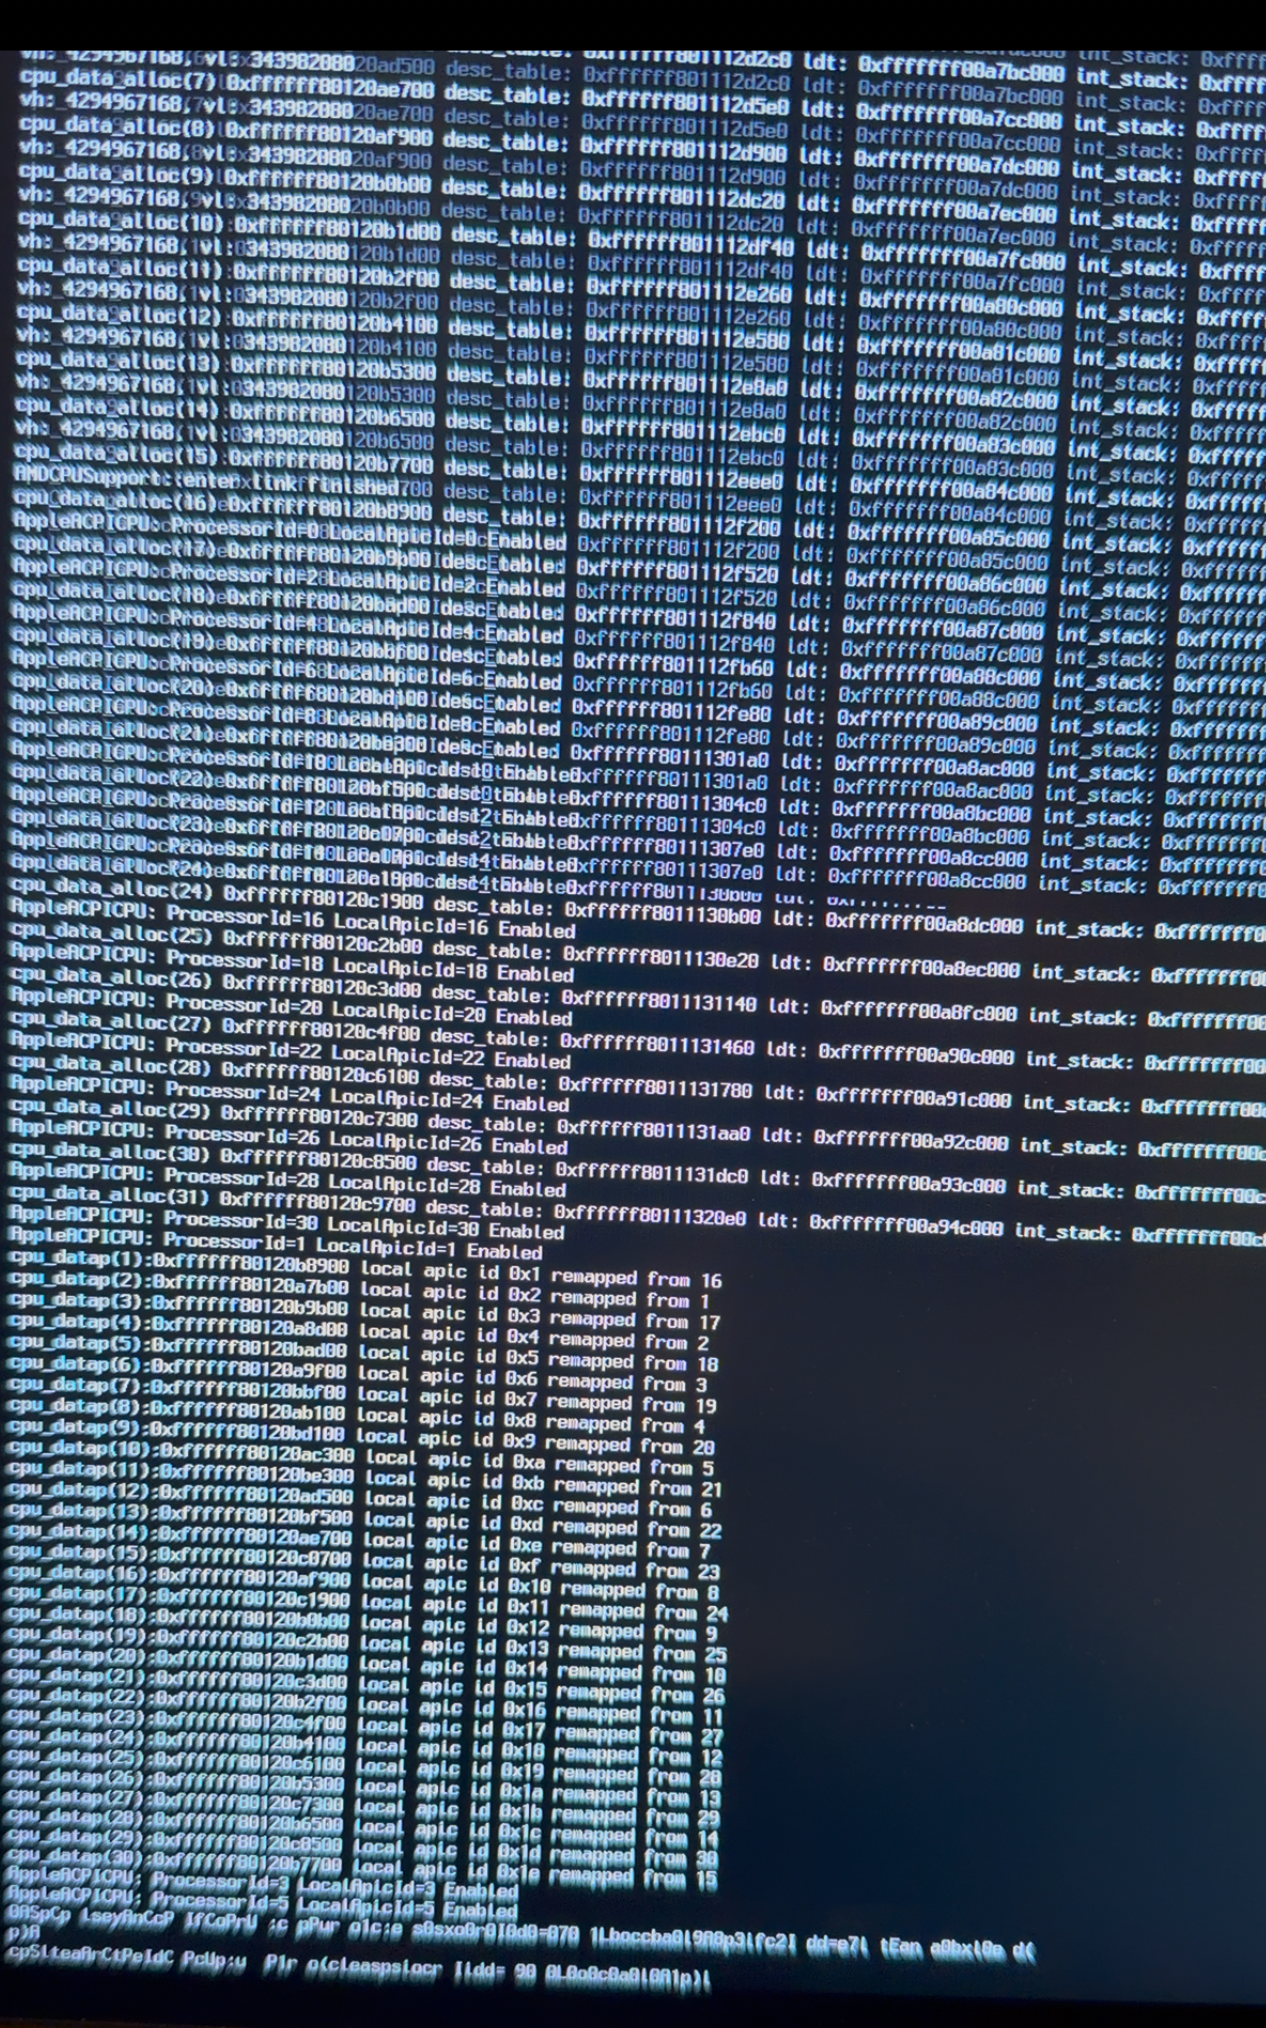
进行以下调整
SVM Mode -> enabled
Precision boost Overdrive Auto -> Enabled
调整后,还是一样的错误
进行以下调整
-				-v keepsyms=1 debug=0x12a msgbuf=1048576 npci=0x2000 agdpmod=ignore alcid=29
+				-v keepsyms=1 debug=0x100 msgbuf=1048576 agdpmod=pikera alcid=29

i.e.,
1. npci=0x2000 去掉了
2. agdpmod=ignore ->  agdpmod=pikera

- 对 Navi 卡(6800XT)通常推荐用 agdpmod=pikera
- 这是 RX 6800 XT / Navi 21 系列在 macOS 下的标准配置,否则很容易在图形初始化阶段黑屏(你看到的最后一行就会停在 trust cache / AMFI 之类)。
然后就成功进入系统了。
猜测,折腾了半天,有可能是因为加载了 SmallTreeIntel82576.kext 同时又插入了Intel x520-DA1导致的乱码CPU
Note
把 Re-Size BAR 改为 Disabled

-v keepsyms=1 debug=0x100 alcid=1
AMD 不需要加 npci=0x2000,否则可能造成设备枚举异常。

✔ agdpmod=pikera
(避免 AMD Navi GPU 被 macOS PCIe power gate)

如果你的 boot-args 没加 → 极高概率黑屏或卡 CPU init 之前。
Reference
Successful Hackintosh
- https://forum.amd-osx.com/index.php?threads/audiogods-gigabyte-aorus-x570-pro-pro-wifi-ultra-big-sur-opencore-0-6-8-efi.1344/
- https://github.com/mrdear/Ryzen-5800x-X570-AORUS-PRO-WIFI-OC0.8.X
Driver
Mics
- https://dortania.github.io/OpenCore-Install-Guide/
- https://github.com/acidanthera/OpenCorePkg/
- https://github.com/corpnewt/GenSMBIOS
- https://www.macworld.com/article/234359/how-to-install-the-macos-11-big-sur-public-beta.html
- https://en.wikipedia.org/wiki/PCI_Express