Background
XCUITest Driver
Appium’s primary support for automating iOS apps is via the XCUITest driver. (New to Appium? Read our introduction to Appium drivers). This driver leverages Apple’s XCUITest libraries under the hood in order to facilitate automation of your app . This access to XCUITest is mediated by the WebDriverAgent server.
WebDriverAgent
WebDriverAgent (also referred to as “WDA”) is a project managed by Facebook, to which the Appium core team contributes heavily. WDA is a WebDriver-compatible server that runs in the context of an iOS simulator or device and exposes the XCUITest API. Appium’s XCUITest driver manages WDA as a subprocess opaque to the Appium user, proxies commands to/from WDA, and provides a host of additional functionality (like simulator management and other methods, for example).
WebDriver Protocol
When all is said and done, Appium is just an HTTP server. It sits and waits for connections from a client, which then instructs Appium what kind of session to start and what kind of automation behaviors to enact once a session is started. This means that you never use Appium just by itself. You always have to use it with a client library of some kind (or, if you’re adventurous, cURL!).
Luckily, Appium speaks the same protocol as Selenium, called the WebDriver Protocol. You can do a lot of things with Appium just by using one of the standard Selenium clients. You may even have one of these on your system already. It’s enough to get started, especially if you’re using Appium for the purpose of testing web browsers on mobile platforms.
介绍
http://appium.io/docs/en/about-appium/intro/?lang=en
Appium 安装
Appium can be installed in one of two ways: via NPM or by downloading Appium Desktop, which is a graphical, desktop-based way to launch the Appium server.
Installation via NPM
If you want to run Appium via an npm install, hack with Appium, or contribute to Appium, you will need Node.js and NPM (use nvm, n, or brew install node to install Node.js. Make sure you have not installed Node or Appium with sudo, otherwise you’ll run into problems). We recommend the latest stable version, though Appium supports Node 10+.
The actual installation is as simple as:
npm install -g appium
Installation via Desktop App Download
Simply download the latest version of Appium Desktop from the releases page.
Dependency
$ brew install carthage

$ brew install libimobiledevice

$ brew install ios-deploy
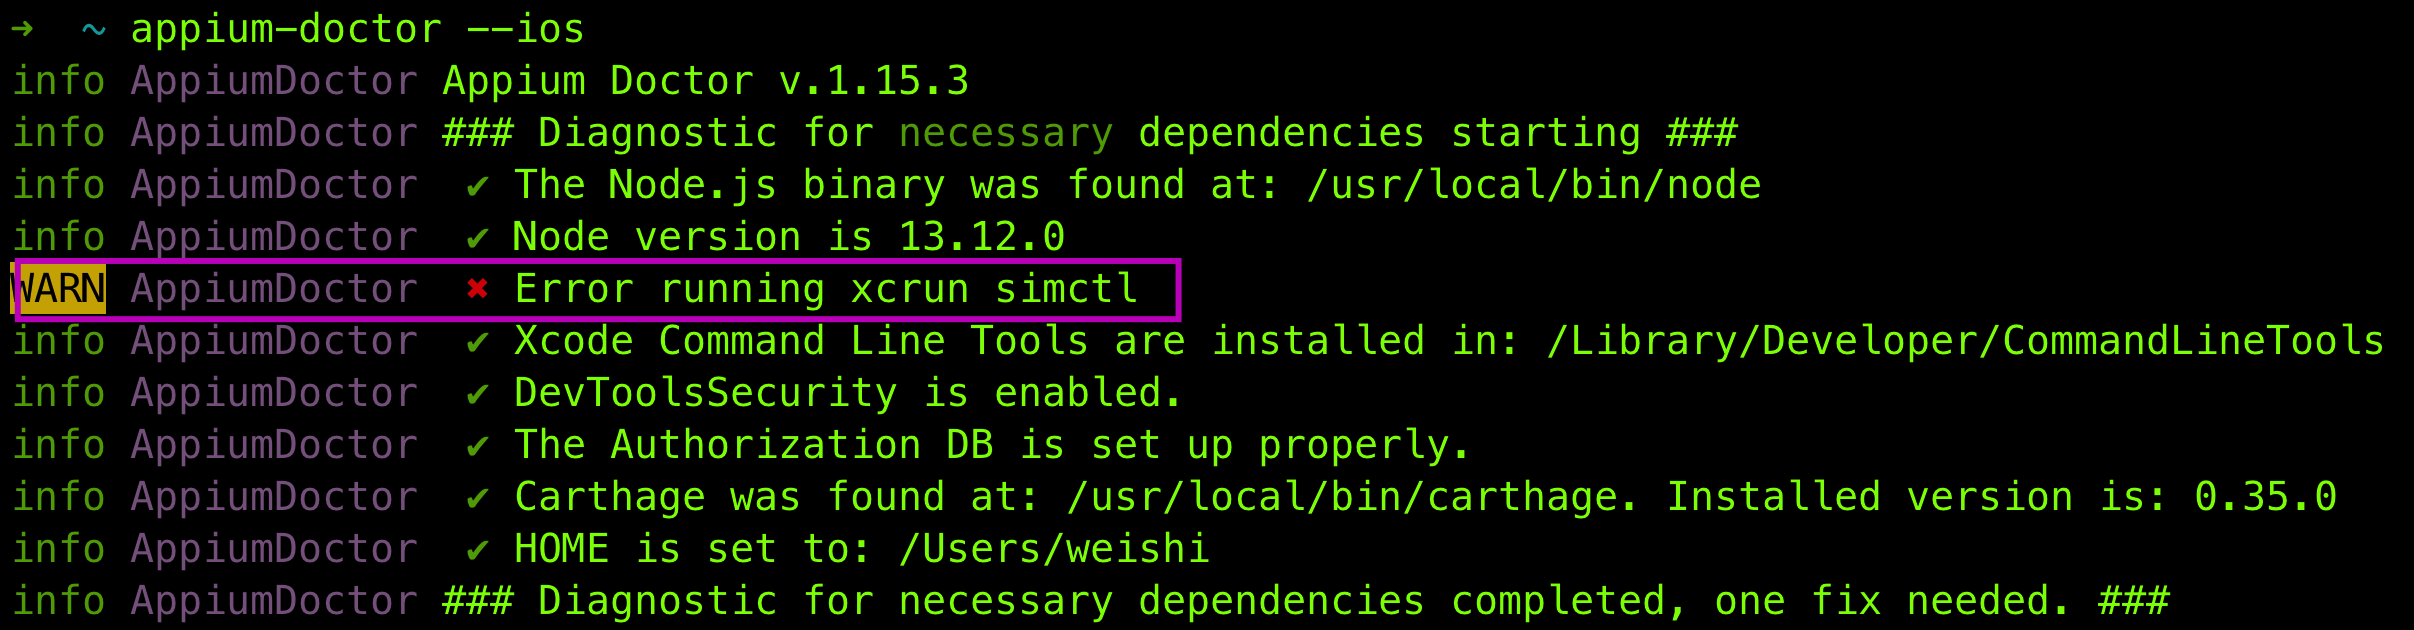
报错:Error running xcrun simctl
解决方案:
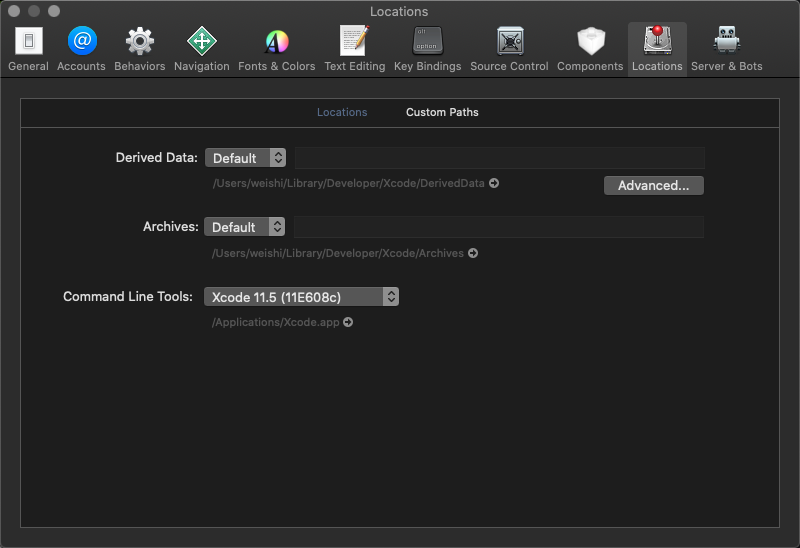
这个是Xcode的问题,Xcode安装之后,simctl可以用xcrun命令来执行;
打开Xcode–>Preferences–>Locations–>Command Line Tools 选择版本号就可以了
验证安装
确保所有的依赖包都安装成功,通过appium-doctor验证
# 安装appium-doctor
$ npm install -g appium-doctor

# 验证
$ appium-doctor --ios
启动 Appium
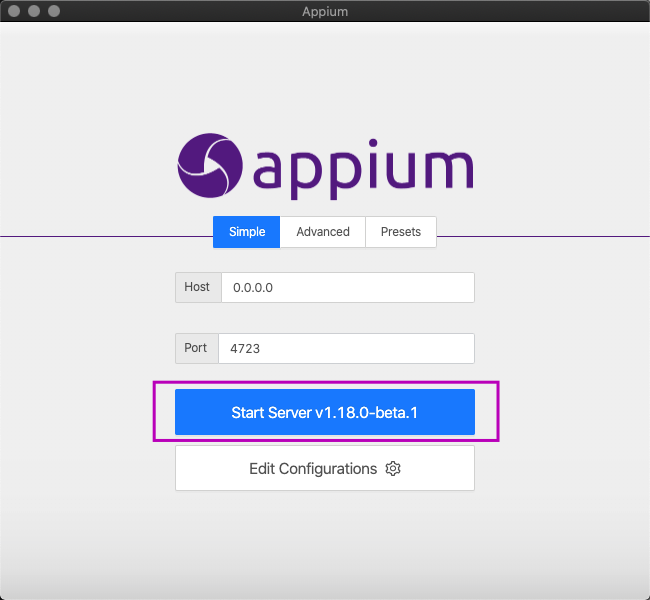
点击搜索图标,启动一个session:
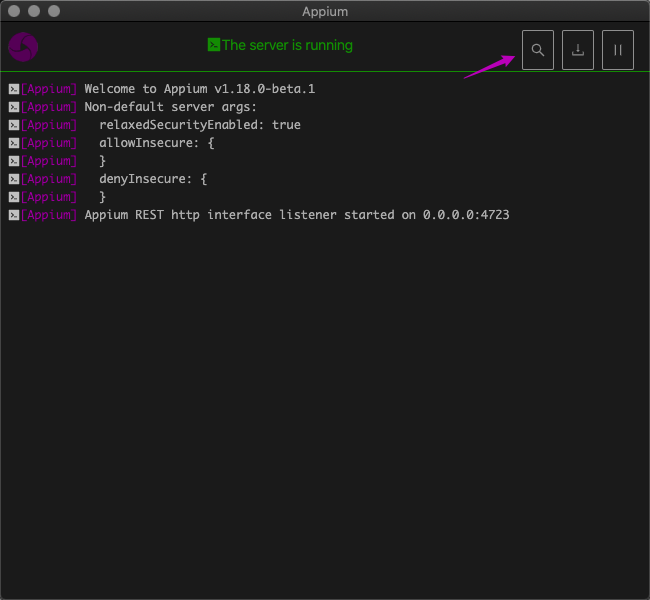
启动后进入编辑页面:
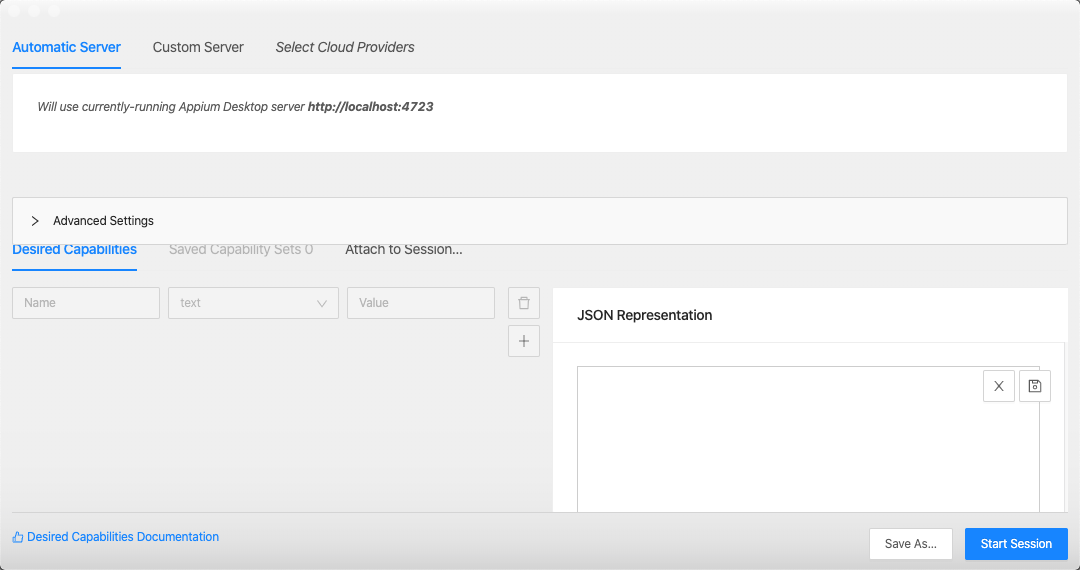
编辑JSON:
{
  "platformName": "ios",
  "platformVersion": "12.4",
  "udid": "设备的udid",
  "deviceName": "iPhone",
  "automationName": "XCUITest",
  "bundleId": "所测app bundle Identifier",
  "xcodeOrgId": "所测app用的开发者账号",
  "xcodeSigningId": "iPhone Developer"
}
参考 https://github.com/appium/appium/blob/master/docs/en/writing-running-appium/caps.md。
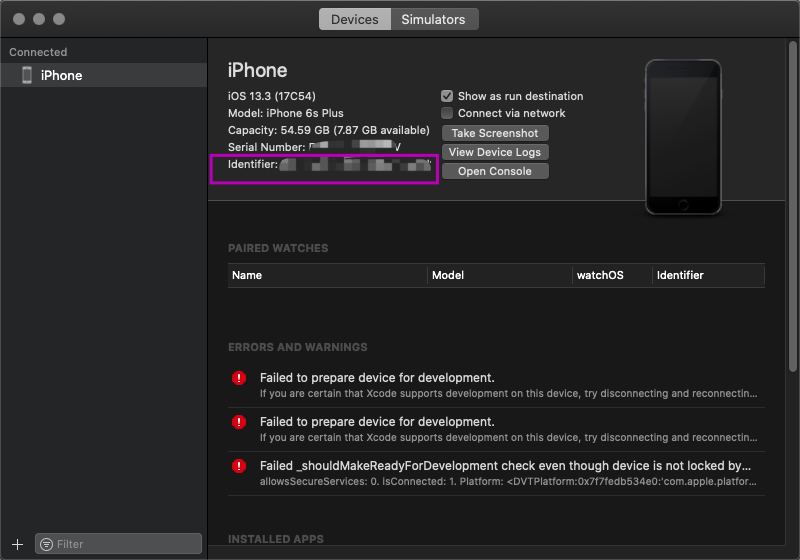
查看UDID方法
-
iPhone连接电脑
-
打开XCode,Window - Devices and Simulators
获取 deviceName
$ instruments -s devices
获取 app bundle Identifier
If your app is in the App Store.
- Find the app online (Google for the iTunes link). For this example we use Apple Pages: https://itunes.apple.com/app/pages/id361309726?mt=8.
- Copy the number after the id in the URL. (Here: 361309726).
- Open https://itunes.apple.com/lookup?id=361309726 where you replace the ID with the one you looked up.
- Search the output for “bundleID”. In this example it looks like this (next to a bunch of other data): “bundleId”:“com.apple.Pages”. So for Apple, the bundle ID is
com.apple.Pages.
配置WDA
 $ git clone git@github.com:facebookarchive/WebDriverAgent.git

 $ ./Scripts/bootstrap.sh
After it is finished you can simply open WebDriverAgent.xcodeproj and start WebDriverAgentRunner test and start sending requests.
Before you try run again on the device, in iOS, go to Settings > General > Device Management and trust the certificate first
Error
Recovery Suggestion: To run on this device, please update to a version of Xcode that supports iOS 13.6. You can download Xcode from the Mac App Store or the Apple Developer website.
Solution:在 Mac App Store 升级 XCode。
错误 - Signing for “XXXXXX” requires a development team. Select a development team in the project editor.
Solution: https://github.com/appium/appium-xcuitest-driver/blob/master/docs/real-device-config.md
错误:
Failed to register bundle identifier. The app identifier "com.facebook.WebDriverAgentRunner.xctrunner" cannot be registered to your development team because it is not available. Change your bundle identifier to a unique string to try again.

No profiles for 'com.facebook.WebDriverAgentRunner.xctrunner' were found: Xcode couldn't find any iOS App Development provisioning profiles matching 'com.facebook.WebDriverAgentRunner.xctrunner'.
因为我安装的是 Appium 桌面版,
cd /Applications/Appium.app/Contents/Resources/app/node_modules/appium-webdriveragent

执行 ./Scripts/bootstrap.sh -d
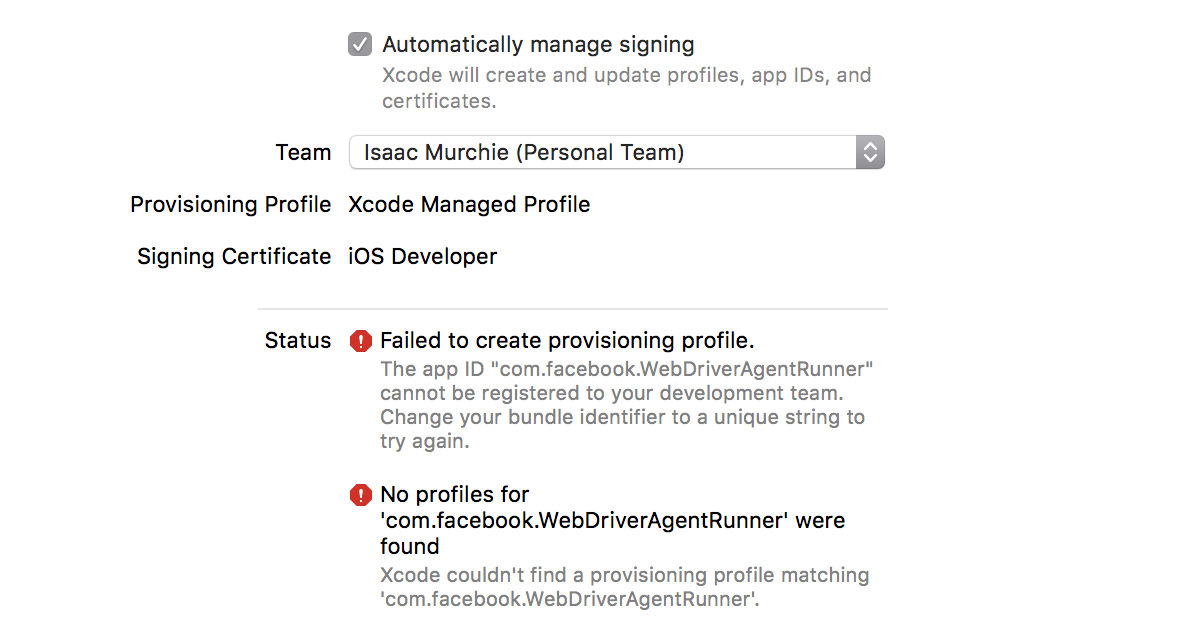
Open WebDriverAgent.xcodeproj in Xcode. For both the WebDriverAgentLib and WebDriverAgentRunner targets, select “Automatically manage signing” in the “General” tab, and then select your Development Team. This should also auto select Signing Ceritificate. The outcome should look as shown below:

Xcode may fail to create a provisioning profile for the WebDriverAgentRunner target:

This necessitates manually changing the bundle id for the target by going into the “Build Settings” tab, and changing the “Product Bundle Identifier” from com.facebook.WebDriverAgentRunner to something that Xcode will accept:

Going back to the “General” tab for the WebDriverAgentRunner target, you should now see that it has created a provisioning profile and all is well:

Finally, you can verify that everything works. Build the project:
$ xcodebuild -project WebDriverAgent.xcodeproj -scheme WebDriverAgentRunner -destination 'id=<udid>' test
If this was successful, the output should end with something like:
    Test Suite 'All tests' started at 2017-01-23 15:49:12.585
    Test Suite 'WebDriverAgentRunner.xctest' started at 2017-01-23 15:49:12.586
    Test Suite 'UITestingUITests' started at 2017-01-23 15:49:12.587
    Test Case '-[UITestingUITests testRunner]' started.
        t =     0.00s     Start Test at 2017-01-23 15:49:12.588
        t =     0.00s     Set Up
在以上操作完成后,通过XCode构建了appium-desk版的WDA,并安装到了真机上。
点击start session
- 运行成功后,会弹出一个控制界面,在该界面中可以控制手机上正在运行的程序
- 点击界面上方中心的录制按钮,可以将你对手机端的操作代码化
To completely verify, you can try accessing the WebDriverAgent server status (note: you must be on the same network as the device, and know its IP address, from Settings => Wi-Fi => Current Network):
    export DEVICE_URL='http://<device IP>:8100'
    export JSON_HEADER='-H "Content-Type: application/json;charset=UTF-8, accept: application/json"'
    curl -X GET $JSON_HEADER $DEVICE_URL/status
You ought to get back output something like this:
    {
      "value" : {
        "state" : "success",
        "os" : {
          "name" : "iOS",
          "version" : "10.2"
        },
        "ios" : {
          "simulatorVersion" : "10.2",
          "ip" : "192.168.0.7"
        },
        "build" : {
          "time" : "Jan 23 2017 14:59:57"
        }
      },
      "sessionId" : "8951A6DD-F3AD-410E-A5DB-D042F42F68A7",
      "status" : 0
    }
appium-python-client
appium-python-client 是让 python 连接 appium 服务的一个驱动,也就是一个 python 语言封装和 appium api 通讯的一个库。 安装方法:
$ pip install Appium-Python-Client
# coding=utf-8

from appium import webdriver
import time

class Appium:
    # 启动app
    def __init__(self):
        desired_caps = {}
        desired_caps['platformName'] = 'iOS'  # 设备系统
        desired_caps['platformVersion'] = '12.3.1'  # 设备系统版本
        desired_caps['deviceName'] = 'WANG的 iPhone'  # 设备名称
        desired_caps['bundleId'] = 'com.xxx.xxx'  # 测试app包名
        desired_caps['udid'] = 'xxxxxx-xxxxxxxx' #设备id
        desired_caps['automationName'] = 'XCUITest'  # 测试框架
        desired_caps['noReset']='true' # 保留app的登录状态
        desired_caps['xcodeSigningId']='iOS Developer'
        desired_caps['xcodeOrgId']='aaaaa' # 团队id
        desired_caps['newCommandTimeout']=3600
        self.driver = webdriver.Remote('http://127.0.0.1:4723/wd/hub', desired_caps)  # 保持端口号和appium服务端口一致
        # 使用隐式等待或者显示等待,尽量减少time.sleep强制等待的使用提高脚本执行速度。
        self.driver.implicitly_wait(5)

    def test(self):
        # 点击一个id定位的元素
        self.driver.find_element_by_accessibility_id("").click()
        # 此处使用time.sleep是为了能让肉眼区分操作。
        time.sleep(1)
        # 点击一个xpath定位的元素
        self.driver.find_element_by_xpath("").click()
        time.sleep(1)
        # 给输入id定位的输入框传值
        self.driver.find_element_by_accessibility_id("").set_value("iostest")
        time.sleep(1)
        # 截图保存到当前文件
        self.driver.save_screenshot('./1.png')
        time.sleep(2)
        # 关闭app
        self.driver.close_app()


if __name__ == '__main__':
    a =Appium()
    a.test()
See https://github.com/appium/appium/tree/master/sample-code/python/test for more example.
Reference
- http://appium.io/docs/en/about-appium/getting-started/index.html
- http://appium.io/docs/en/drivers/ios-xcuitest/index.html
- http://appium.io/docs/en/drivers/ios-xcuitest-real-devices/
- https://pypi.org/project/Appium-Python-Client/
- https://www.jianshu.com/p/e9706a2ebdbb
- https://juejin.im/post/5d7ef540f265da03bb4ada00
- https://www.jianshu.com/p/ae0959d19665
- https://stackoverflow.com/questions/27509838/how-to-get-bundle-id-of-ios-app-either-using-ipa-file-or-app-installed-on-iph
- https://github.com/appium/appium-xcuitest-driver/blob/master/docs/real-device-config.md