Workflow
当客户端发出一个 HTTP 请求后,是如何转到我们的应用程序处理并返回的呢?
我根据其架构组成的不同将这个过程的实现分为两种情况:
两级结构
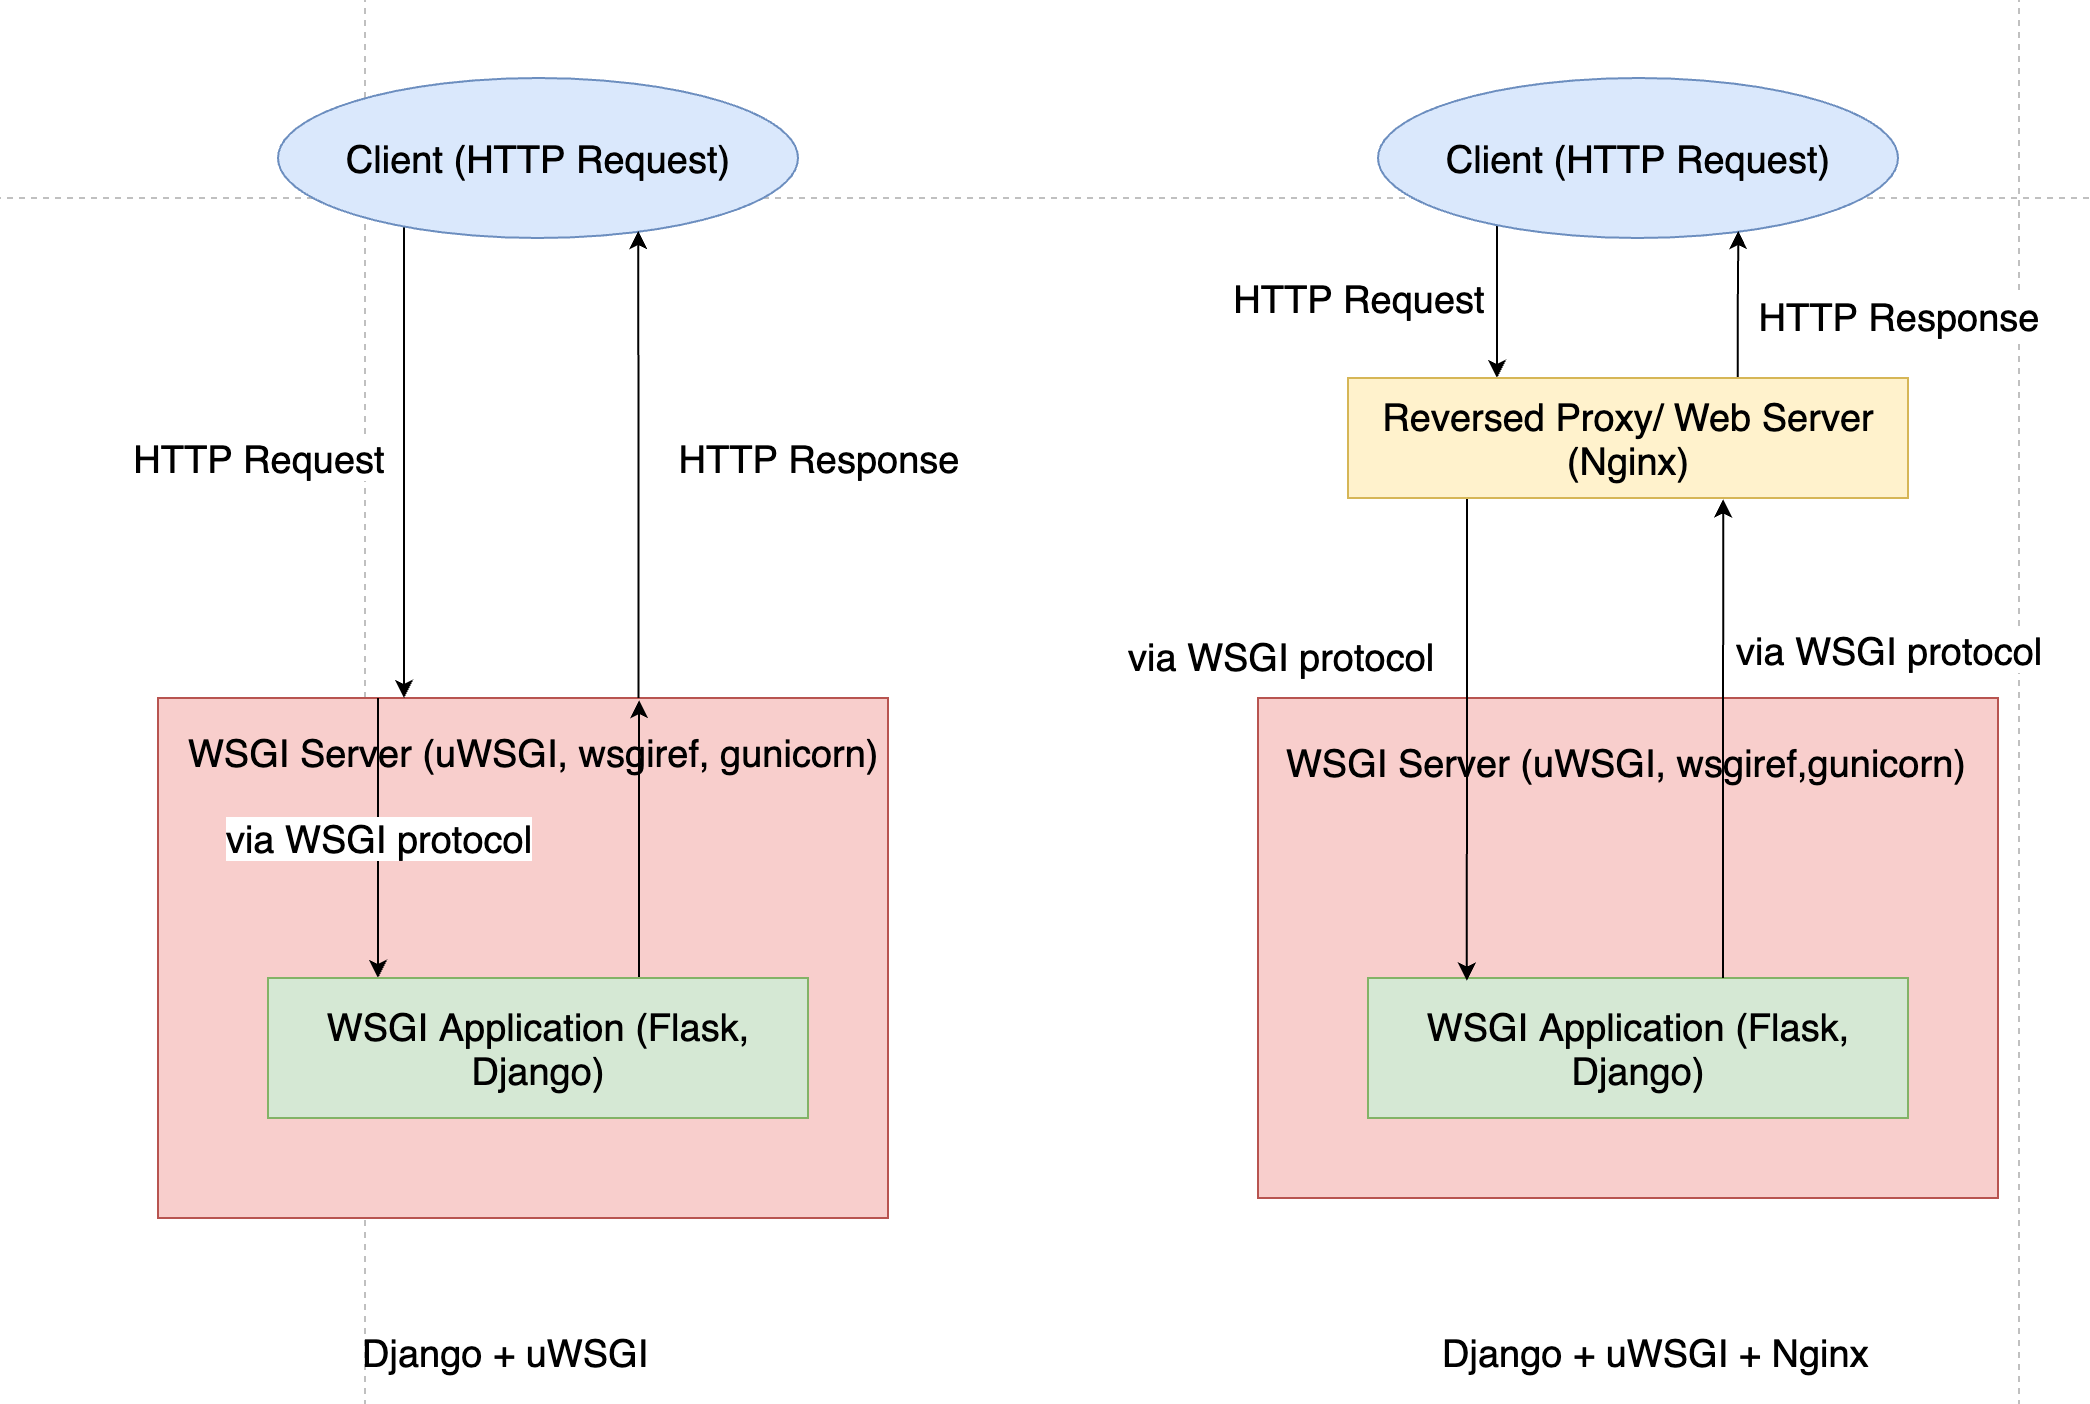
在两级结构中:
- uWSGI可以作为WSGI Server(WSGI 服务器),它基于了 HTTP 协议、 WSGI(Web Server Gateway Interface) 协议和 usgi 协议;
- Flask应用可以作为 WSGI Application,基于 WSGI 协议实现。
当有客户端发来请求,uWSGI接受请求,调用 WSGI Application (或者说Flask应用)。当WSGI Application处理完成后,将结果返回给uWSGI,uWSGI构造相应的 HTTP Response,最终将结果返回给客户端。
通常来说,Flask等Web框架会自己附带一个 WSGI 服务器(这就是 Flask 应用可以直接启动的原因),但是这只是在开发阶段被用到而言。在生产环境中,仍然需要将 Flask 部署到一个高性能的 WSGI Server 中,比如 uWSGI,alternative 还有 gunicorn (Green Unicorn), wsgiref。
三级结构
在三级结构中:
- uWSGI Server 作为中间件,它基于WSGI 协议与Nginx通信,同时与实现了 WSGI 协议的 WSGI Application(比如一个 Flask Application)进行通信
当有客户端发来请求,Nginx(Web Server)先做处理静态资源(静态资源是Nginx的强项),无法处理的动态请求以 WSGI 协议的格式转发给 WSGI Application(比如一个 Flask Application)。
这里,我们多了一层反向代理有什么好处?
- 提高Web server性能(uWSGI处理静态资源不如nginx)nginx会在收到一个完整的http请求后再转发给wWSGI)
- Nginx可以做负载均衡(客户端是和Nginx交互而不是uWSGI),以提升高可用
Django 项目中
设置settings.py
# settings.py
DEBUG = False
ALLOWED_HOSTS = ['*',]
List all dependencies
$ pip freeze > plist.txt
处理静态文件
修改settings.py文件
STATIC_ROOT='/var/www/dailyfresh/static/'
收集所有静态文件到static_root指定目录
python manage.py collectstatic
生产环境中安装依赖
拷贝源代码至生产环境
Create a virtual environment
$ virtualenv task2
$ source bin/activate
在生产环境安装 Dependencies
$ pip install -r plist.txt
安装 uWSGI
Install uWSGI in the virtualenv
$ pip install uwsgi
安装 Nginx
配置生产环境
配置并启动 uWSGI
【方法 1】- 通过指定参数直接启动 uWSGI
配置并启动 uWSGI。此处,假定的我的django项目位置为:/Users/wei.shi/Desktop/untitled1
$ uwsgi --http :8001 --chdir /Users/wei.shi/Desktop/untitled1 --wsgi-file untitled1/wsgi.py --master --processes 4 --threads 2 --stats 127.0.0.1:9191 --socket :8002
访问127.0.0.1:8001,以测试 uWSGI 是否正常启动。
常用选项:
- http : 协议类型和端口号
- processes : 开启的进程数量
- workers : 开启的进程数量,等同于processes(官网的说法是spawn the specified number ofworkers / processes)
- chdir : Django 项目的根目录(chdir to specified directory before apps loading)
- wsgi-file :Django 项目中帮自动生成的 wsgi.py 文件的路径(在我们通过Django创建{your project name]项目时,在子目录{your project name]下已经帮我们生成的 wsgi.py文件)
- stats : 在指定的地址上,开启状态服务(enable the stats server on the specified address)
- threads : 运行线程(run each worker in prethreaded mode with the specified number of threads)
- master : 允许主进程存在(enable master process)
- daemonize : 使进程在后台运行,并将日志打到指定的日志文件或者udp服务器(daemonize uWSGI)。实际上最常用的,还是把运行记录输出到一个本地文件上。
- pidfile : 指定pid文件的位置,记录主进程的pid号。
- vacuum : 当服务器退出的时候自动清理环境,删除unix socket文件和pid文件(try to remove all of the generated file/sockets)
【方法 2】- 通过指定配置文件路径启动 uWSGI
uWSGI支持多种类型的配置文件,如xml,ini等。此处,使用ini类型的配置。
创建一个名为myweb_uwsgi.ini的文件:
# myweb_uwsgi.ini file
[uwsgi]

# Django-related settings

socket = :8001
http = :8002
# the base directory (full path)
chdir=/Users/wei.shi/Desktop/untitled1/

# Django s wsgi file
wsgi-file=untitled1/wsgi.py

# process-related settings
# master
master= true

# maximum number of worker processes
processes= 4

# ... with appropriate permissions - may be needed
# chmod-socket    = 664
# clear environment on exit
vacuum          = true
启动uwsgi:
$ uwsgi --ini myweb_uwsgi.ini
Nginx
配置 Nginx
再接下来要做的就是修改nginx.conf配置文件。打开/etc/nginx/nginx.conf文件,添加如下内容。
server {
    listen         8099;
    server_name    127.0.0.1
    charset UTF-8;
    access_log      /var/log/nginx/myweb_access.log;
    error_log       /var/log/nginx/myweb_error.log;

    client_max_body_size 75M;

    location / {
        include uwsgi_params;
        uwsgi_pass 127.0.0.1:8001;
        uwsgi_read_timeout 2;
    }
    location /static {
        expires 30d;
        autoindex on;
        add_header Cache-Control private;
        alias /Users/wei.shi/Desktop/untitled1/static/;
     }
 }
- listen 指定的是nginx代理uwsgi对外的端口号。
Nginx 操作
查看 Bginx 是否已经启动
$ ps -ef|grep nginx
启动Nginx
$ sudo nginx -c /etc/nginx/nginx.conf
访问127.0.0.1:8099。
重启Nginx
$ nginx -s reload
关闭Nginx
$ nginx -s stop
Reference
- https://www.nginx.com/blog/maximizing-python-performance-with-nginx-parti-web-serving-and-caching/
- https://docs.nginx.com/nginx/admin-guide/web-server/app-gateway-uwsgi-django/
- https://en.wikipedia.org/wiki/Gunicorn