常用工具
- hackintool
- IORegistryExplorer
- OpenCore Configurator
OS Setting
Issues
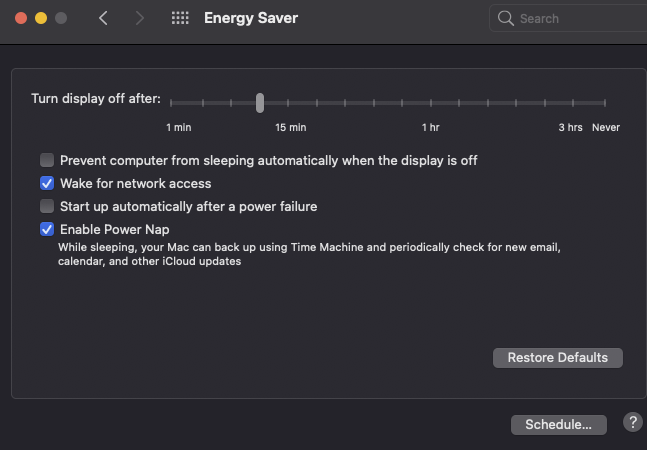
Power Management
Fixing Sleep
https://forum.amd-osx.com/index.php?resources/usbtoolbox.12/
选择系统icon更大
NVRAM - UIScale 设置为01
Debug
-boot-args 中加入 -v
- OpenCore Debugging: https://dortania.github.io/OpenCore-Install-Guide/troubleshooting/debug.html#file-swaps
boot-args
Here we get to set some variables that will help us with debug output, for us we’ll be using the following boot-args:
-v keepsyms=1 debug=0x12a msgbuf=1048576
踩坑
- 如果在安装系统的时候,加了上面这些参数,可能会导致无限重启而无法进入安装系统界面,因此在安装系统时,仍然可以使用上面参数进行debug,但是如果发生无限重启时,需要把送上面参数去掉
Now lets go over what each arg does:
- -v
- Enables verbose output
- keepsyms=1
- Ensures symbols are kept during kernel panics, which are greatly helpful for troubleshooting
- debug=0x12a
- Combination of
DB_PRT(0x2),DB_KPRT(0x8),DB_SLOG(0x20), andDB_LOG_PI_SCRN(0x100) - A full list of values for the latest version of XNU can be found here: debug.h(opens new window)
- Combination of
- msgbuf=1048576
- Sets the kernel’s message buffer size, this helps with getting proper logs during boot
- 1048576 is 1MB(/1024^2), can be larger if required
- Note not required with DebugEnhancer.kext, however for early kernel logs it’s still required
Ref
- https://dortania.github.io/OpenCore-Install-Guide/troubleshooting/kernel-debugging.html#config-plist-setup
- https://dortania.github.io/OpenCore-Post-Install/cosmetic/verbose.html#macos-decluttering
- https://dortania.github.io/OpenCore-Install-Guide/troubleshooting/debug.html#config-changes
Update
Refer to https://dortania.github.io/OpenCore-Post-Install/universal/update.html#updating-opencore-and-macos
Update OpenCore
Note
-
So first, lets mount your hard drive’s EFI and make a copy somewhere safe with MountEFI (opens new window). We won’t be updating the drive’s EFI at first, instead we’ll be grabbing a spare USB to be our crash dummy. This allows us to keep a working copy of OpenCore in case our update goes south
-
For the USB, it must be formatted as GUID. Reason for this is that GUID will automatically create an EFI partition, though this will be hidden by default so you’ll need to mount it with MountEFI.
-
partition, though this will be hidden by default so you’ll need to mount it with MountEFI.


- The important ones to update:
EFI/BOOT/BOOTx64.efiEFI/OC/OpenCore.efiEFI/OC/Drivers/OpenRuntime(Don’t forget this one, OpenCore will not boot with mismatched versions)
- You can also update other drivers you have if present, these are just the ones that must be updated in order to boot correctly

Refer to https://dortania.github.io/OpenCore-Post-Install/universal/update.html#updating-opencore
Validate Config.plist
- Use the OpenCore Utility ocvalidate: this tool will help ensure your config.plist is matching the OpenCore specification of the matching build.
# Enter your OpenCore folder
$ cd /Users/shiwei/Downloads/OpenCore-0.6.9-RELEASE
$ ./Utilities/ocvalidate/ocvalidate /Users/shiwei/Downloads/MyOpenCoreConfig/EFI/OC/Config.plist
Updating Kexts
- Updating Kexts is a similar process to updating OpenCore, make a copy of everything and update on a dummy USB in case there’s issues
- The easiest way to update your kexts is via 2 tools:
- Lilu and Friends (opens new window)to download and compile the kexts
- Kext Extractor (opens new window)to merge them into your EFI
Update macOS
Refer to https://dortania.github.io/OpenCore-Post-Install/universal/update.html#updating-macos
Troubleshooting
Cannot update to newer versions of Big Sur
- https://dortania.github.io/OpenCore-Install-Guide/extras/big-sur/#cannot-update-to-newer-versions-of-big-sur
- https://dortania.github.io/OpenCore-Install-Guide/troubleshooting/extended/post-issues.html#rolling-back-apfs-snapshots
- https://discussions.apple.com/thread/252668428
- https://eclecticlight.co/2020/11/30/is-big-surs-system-volume-sealed/
回滚macOS
我们可能会遇到这样一种情况,当升级到某个macOS版本后,发现有严重的问题,而且社区暂时也没有解决方案,我们可以这样回滚macOS
- 先用Time Machine备份当前系统
- 参考https://swsmile.info/post/make-macos-install-usb-stick/制作一个用于安装macOS的 U盘
- 重启进入U盘
- 格式化当前macOS系统disk
- 安装macOS
- 从Time Machine恢复系统
- 系统安装完成后,把合适的EFI 拷贝到新系统所在disk中的EFI中
Kext
$ kextstat
Reset NVRAM
What is NVRAM
NVRAM is the updated Mac terminology for PRAM and is short for Non-Volatile RAM. Since NVRAM is non-volatile, the settings don’t change when the computer is turned off or disconnected from power. As far as troubleshooting goes, resetting either NVRAM or PRAM on a Mac are the same thing.
On PCs, motherboards have a similar component called the CMOS. CMOS RAM also uses a small battery or power supply to store BIOS information while the computer is powered off. PC users can learn how to manage their BIOS settings by visiting the motherboard manufacturer’s website.
How to Reset
Via Terminal
- Close all apps and open Terminal (Finder > Utilities > Terminal).
- Enter sudo nvram -c and press Enter/return. Enter the Administrator password and press Enter/return.
- Enter sudo shutdown -r now and press Enter/return. The computer will now restart, that’s it!
On boot
If you’re using OpenCore as a bootloader, follow the steps below to reset the NVRAM.
- Enable Reset NVRAM Option
- Turn on your target System
- Boot into OpenCore
- When at the OC Boot picker, select the
ResetNVRAMoption and press enter to boot.

- Repeat steps 3 and 4 as you need to boot twice for the full effect.
- If you’re using
CleanNvram.efiyou need to boot from the CleanNvram option twice.
NOTE: This process will clear the NVRAM (native and emulated) variables stored. Once cleared, the system will automatically restart.
QUICK INFO: When the HideAuxiliary option is Enabled, you need to press the Space Bar Key on your Keyboard to show all the other options in the picker.
If you’re using OpenCore v0.8.1 and later, you’ll need to add ResetNvramEntry.efi entry in UEFI>Drivers section like below.
| Path* | Enabled |
|---|---|
| ResetNvramEntry.efi | YES |
Refer to https://elitemacx86.com/threads/how-to-enable-reset-nvram-option-in-opencore.938/
Troubleshooting
$ sudo nvram TestVar=HelloWorld
$ sudo nvram -p | grep 'TestVar'
TestVar HelloWorld
$ sudo nvram -c
nvram: Error clearing firmware variables: (iokit/common) not permitted
$ sudo nvram -p | grep 'TestVar'
$
$ sudo nvram -c
nvram: Error clearing firmware variable csr-active-config: (iokit/common) not permitted
nvram: Error clearing firmware variable fmm-computer-name: (iokit/common) not permitted
Although you say this error, it doesn’t mean your reset fails. Conversely you have successfully resetted your NVRAM. Since
- In addition: the CSR-data variable is a certificate, which also shouldn’t be touched.
Bluetooth 无法工作
如果连接了一个以上的bluetooth 设备,可能会导致Bluetooth 无法工作,体现为00-00-00-00-00-00 这个蓝牙地址:
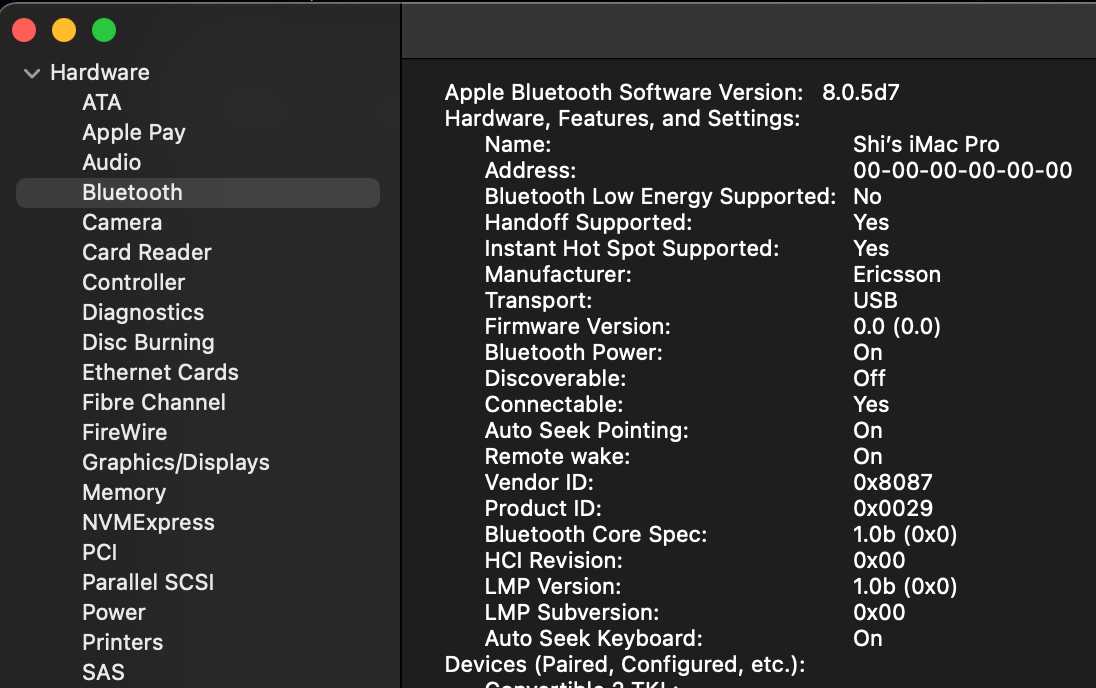
当然你也无法连接任何 bluetooth 设备。
在我的情况中,我的 Gigabyte X570 Pro WiFi 主板集成了 WIFI 6 AX200 bluetooth/WIFI,同时我还安装了 Fenvi T919 BCM94360CD 802.11AC WI-FI With Bluetooth 4.0 PCIe。
这个 bluetooth 无法正常工作的问题就出现了。
这其实是因为当 macOS 检测了连接了一个以上的 bluetooth 设备,会发生冲突。
自然地,解决思路有以下几种:
- disable Gigabyte X570 Pro WiFi onboard bluetooth/WIFI
- 我的BIOS并没有提供这个设置。因此只能在物理设备上拔线与主板分离。
- 拔掉 Fenvi T919,只使用 onboard bluetooth/WIFI
- 下面会具体描述步骤
- Block the bluetooths path that you extract from your IO Reg and create a SSDT to do it with
Ref
If use Gigabyte Aorus X570 Pro Wifi onboard Bluetooth
Download from https://github.com/OpenIntelWireless/IntelBluetoothFirmware/releases/.
Add these two kexts to the kext folder

And modify Confing.plist
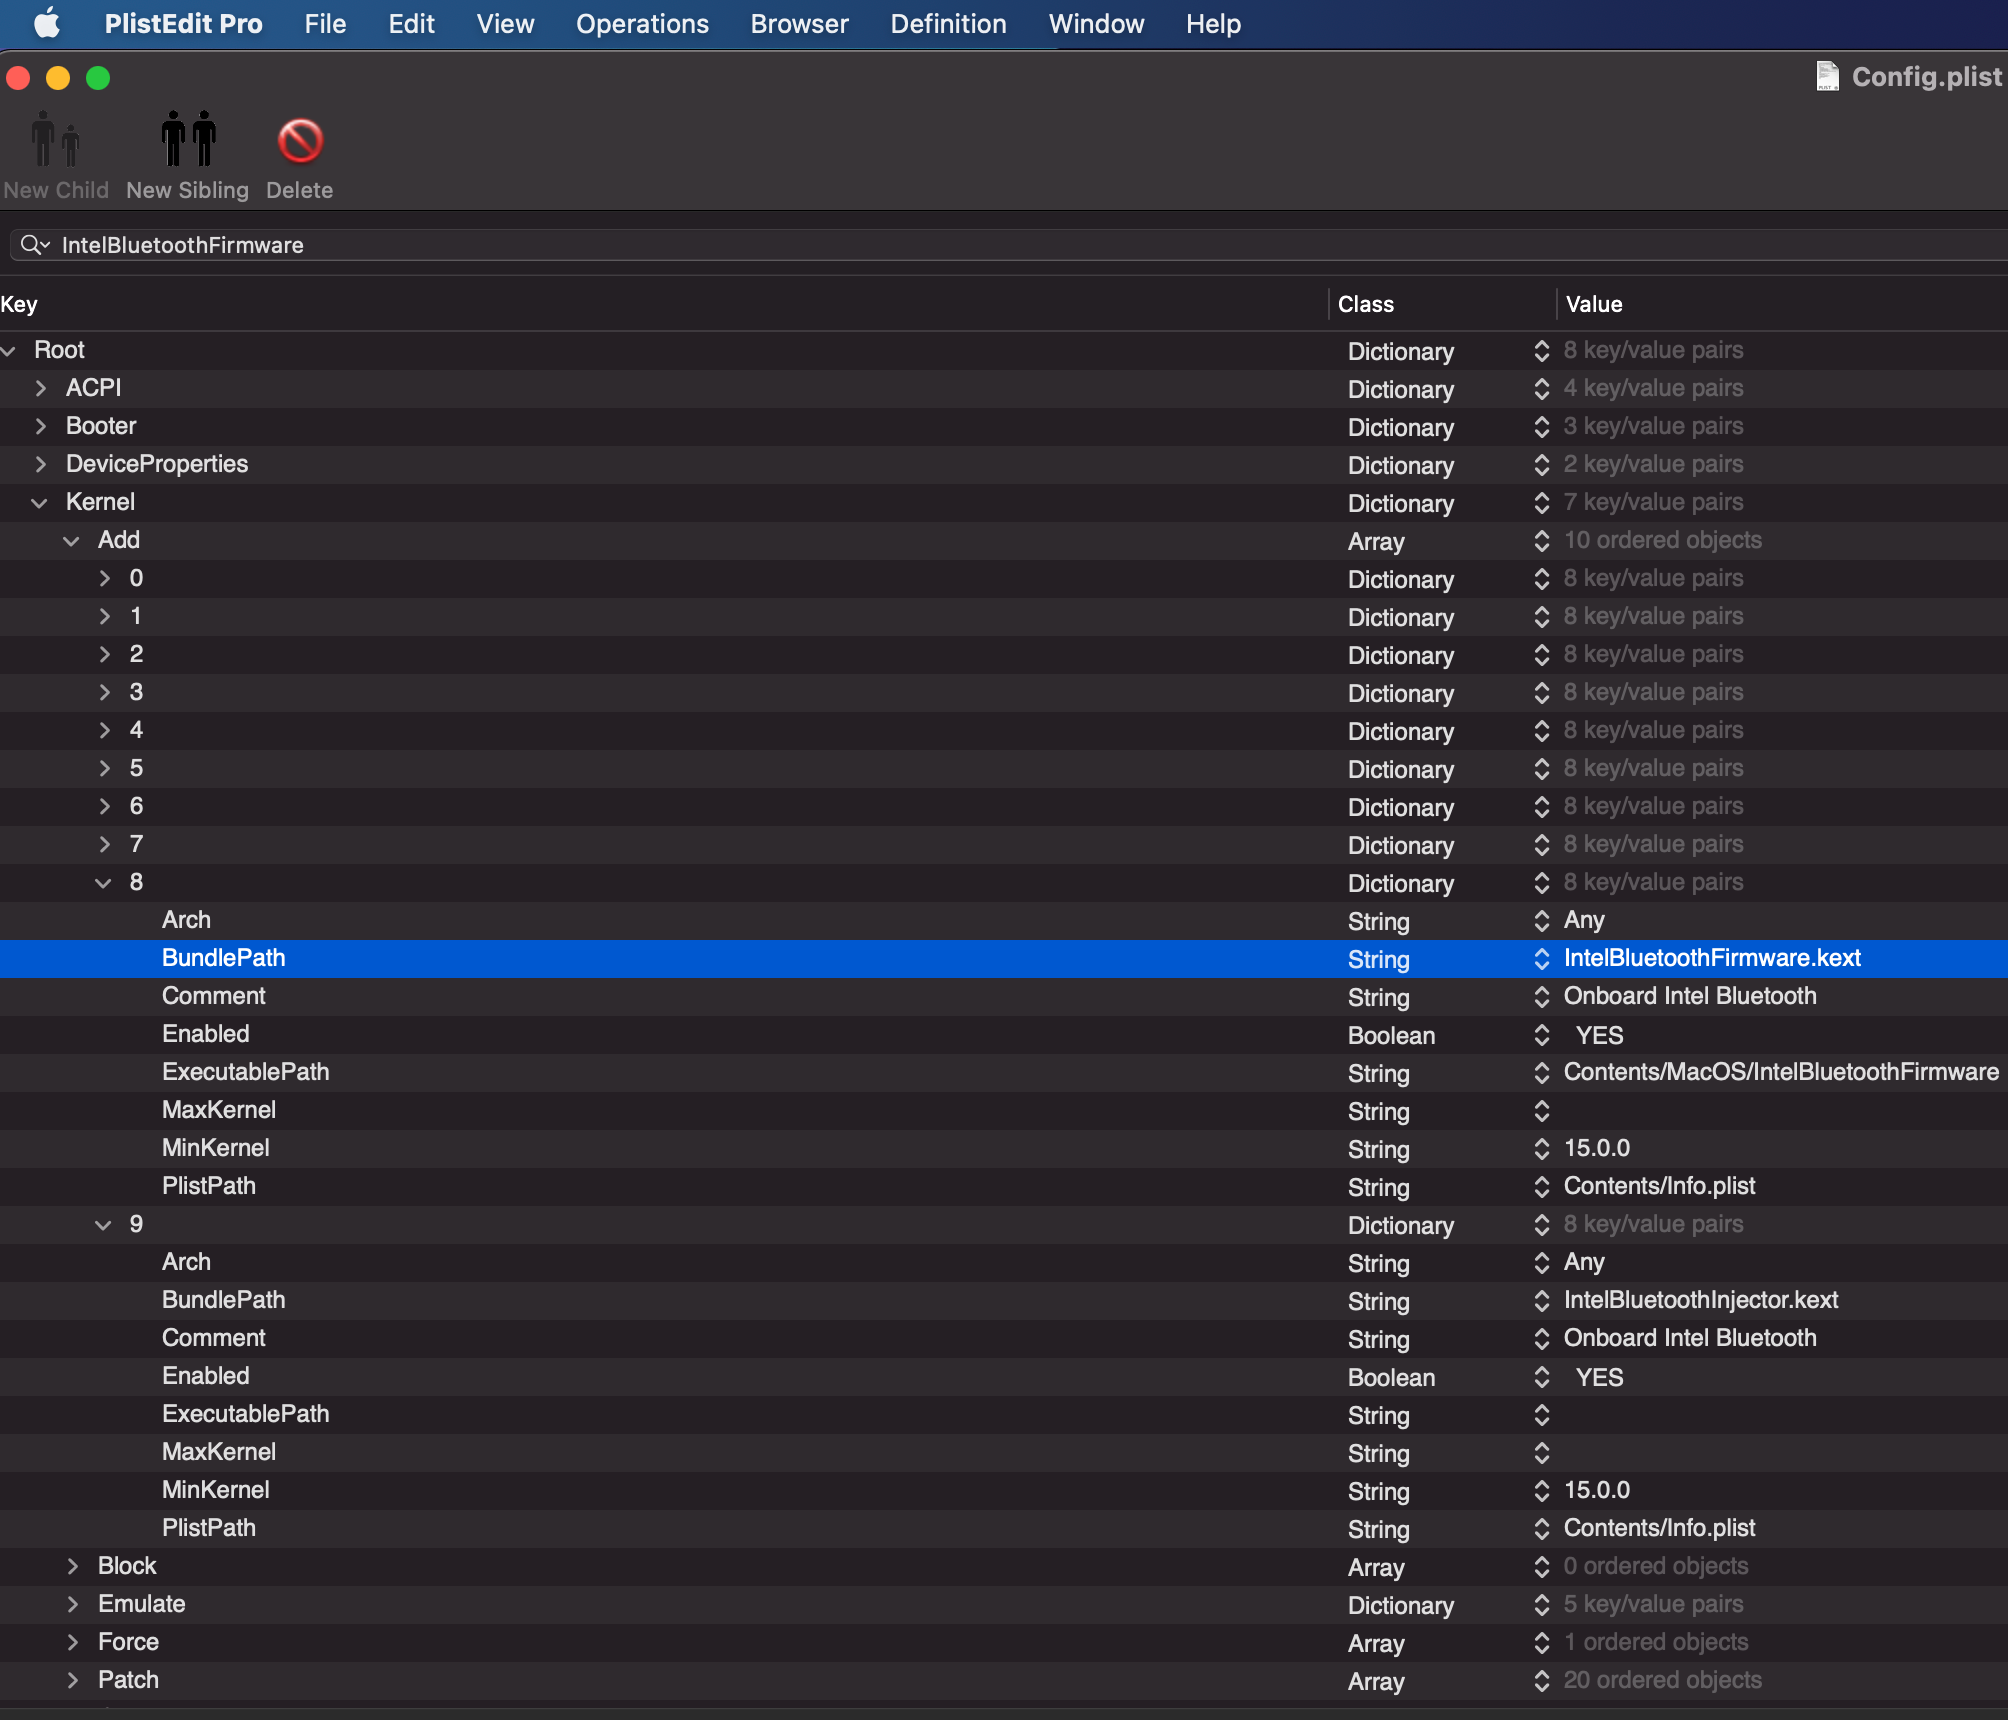
			<dict>
				<key>Arch</key>
				<string>Any</string>
				<key>BundlePath</key>
				<string>IntelBluetoothFirmware.kext</string>
				<key>Comment</key>
				<string>Onboard Intel Bluetooth</string>
				<key>Enabled</key>
				<true/>
				<key>ExecutablePath</key>
				<string>Contents/MacOS/IntelBluetoothFirmware</string>
				<key>MaxKernel</key>
				<string></string>
				<key>MinKernel</key>
				<string>15.0.0</string>
				<key>PlistPath</key>
				<string>Contents/Info.plist</string>
			</dict>
			<dict>
				<key>Arch</key>
				<string>Any</string>
				<key>BundlePath</key>
				<string>IntelBluetoothInjector.kext</string>
				<key>Comment</key>
				<string>Onboard Intel Bluetooth</string>
				<key>Enabled</key>
				<true/>
				<key>ExecutablePath</key>
				<string></string>
				<key>MaxKernel</key>
				<string></string>
				<key>MinKernel</key>
				<string>15.0.0</string>
				<key>PlistPath</key>
				<string>Contents/Info.plist</string>
			</dict>
reset NVRAM,重启。
Ref
- https://forum.amd-osx.com/index.php?threads/audiogods-gigabyte-aorus-x570-pro-pro-wifi-ultra-master-big-sur-opencore-0-7-1-efi.1344/post-11410
- https://github.com/OpenIntelWireless/IntelBluetoothFirmware/releases/
- https://openintelwireless.github.io/IntelBluetoothFirmware/Installation.html
Fenvi T919 Not Work
- 检查USB map
- https://forum.amd-osx.com/index.php?threads/fenvi-t919-bluetooth-blues.718/
- https://www.insanelymac.com/forum/topic/346058-fenvi-t919-bluetooth-in-big-sur-stopped-working-after-boot-failure/
- https://www.tonymacx86.com/threads/no-bluetooth-with-fenvi-fv-t919-on-mojave.263238/ https://www.howtogeek.com/478347/how-to-troubleshoot-bluetooth-issues-on-a-mac/
- https://www.reddit.com/r/hackintosh/comments/afzwgc/fenvi_fv_t919_bluetooth_not_working/
WIFI
If use Gigabyte Aorus X570 Pro Wifi onboard Wifi
在无法被正确识别时:
Step 1 - Copy AirportItlwm.kext into your Bootloader’s kext folder in your EFI partition
Step 2 - Make necessary adjustments to your Bootloader’s config
			<dict>
				<key>Arch</key>
				<string>Any</string>
				<key>BundlePath</key>
				<string>AirportItlwm.kext</string>
				<key>Comment</key>
				<string></string>
				<key>Enabled</key>
				<true/>
				<key>ExecutablePath</key>
				<string>Contents/MacOS/AirportItlwm</string>
				<key>MaxKernel</key>
				<string></string>
				<key>MinKernel</key>
				<string></string>
				<key>PlistPath</key>
				<string>Contents/Info.plist</string>
			</dict>
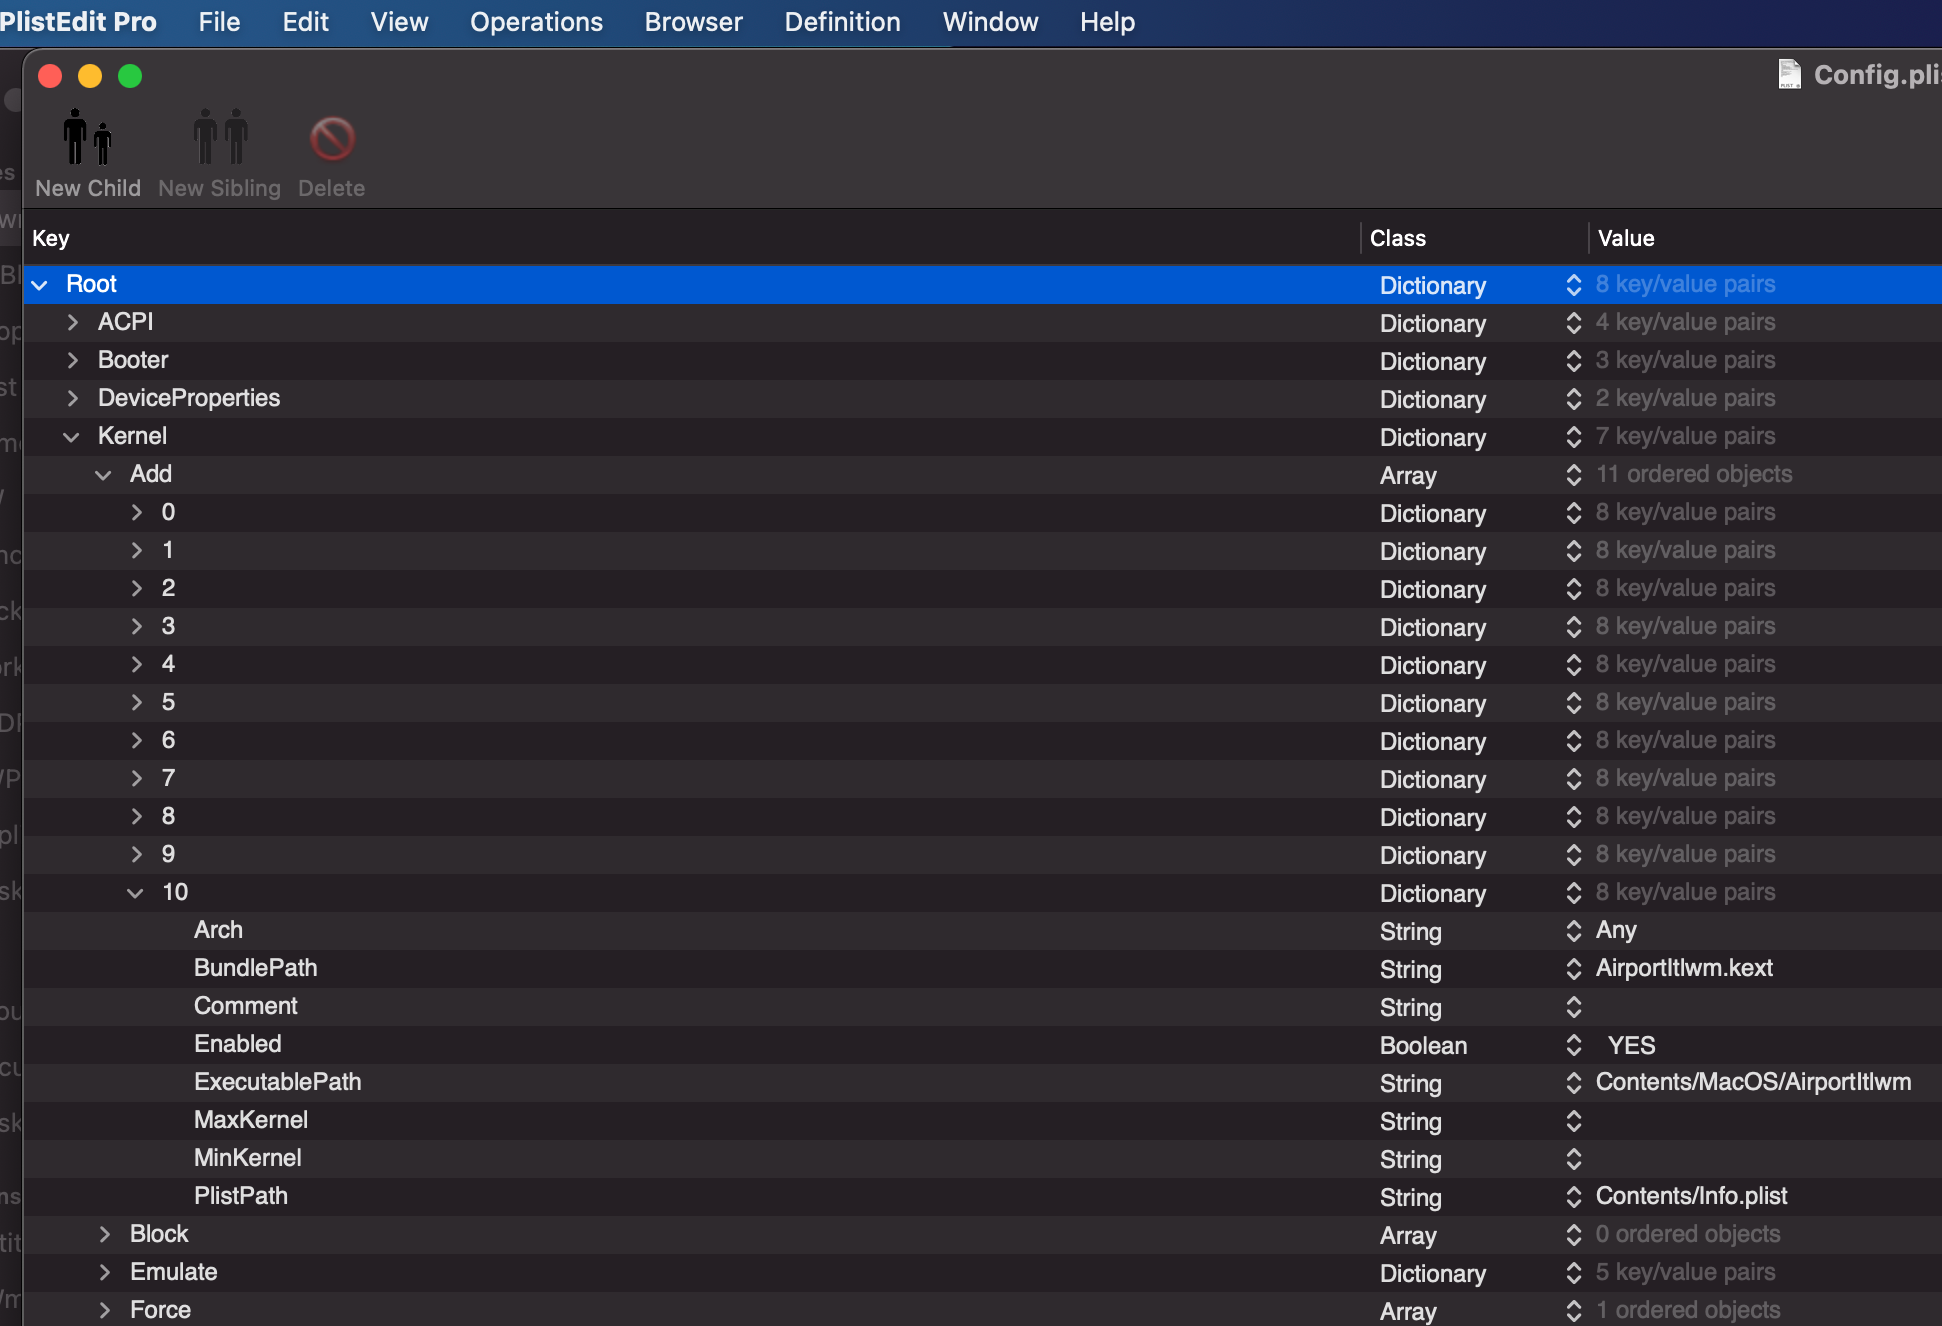
Step 3 - Reboot and enjoy!
Step 4 - one of the following steps to load IO80211Family (level of recommendation decreases):
- Enable Apple Secure Boot (Please read OpenCore’s official manual)
- 设置 Misc -> Security -> SecureBootModel 为
j160或者直接default
- 设置 Misc -> Security -> SecureBootModel 为
- Force
IO80211Familyto load. 「Supports OpenCore and Clover(not tested)」 (Read theKernel - Forcesection in OpenCore’s manual for more info) - Load AirportItlwm from Terminal (Continuity features may not work)
- Extract IO80211Family from the system, insert AirportItlwm as a Plugin, and load the bundle with a bootloader.
- Disable SIP and install AirportItlwm into
/Library/Extensions(Take your own risk)
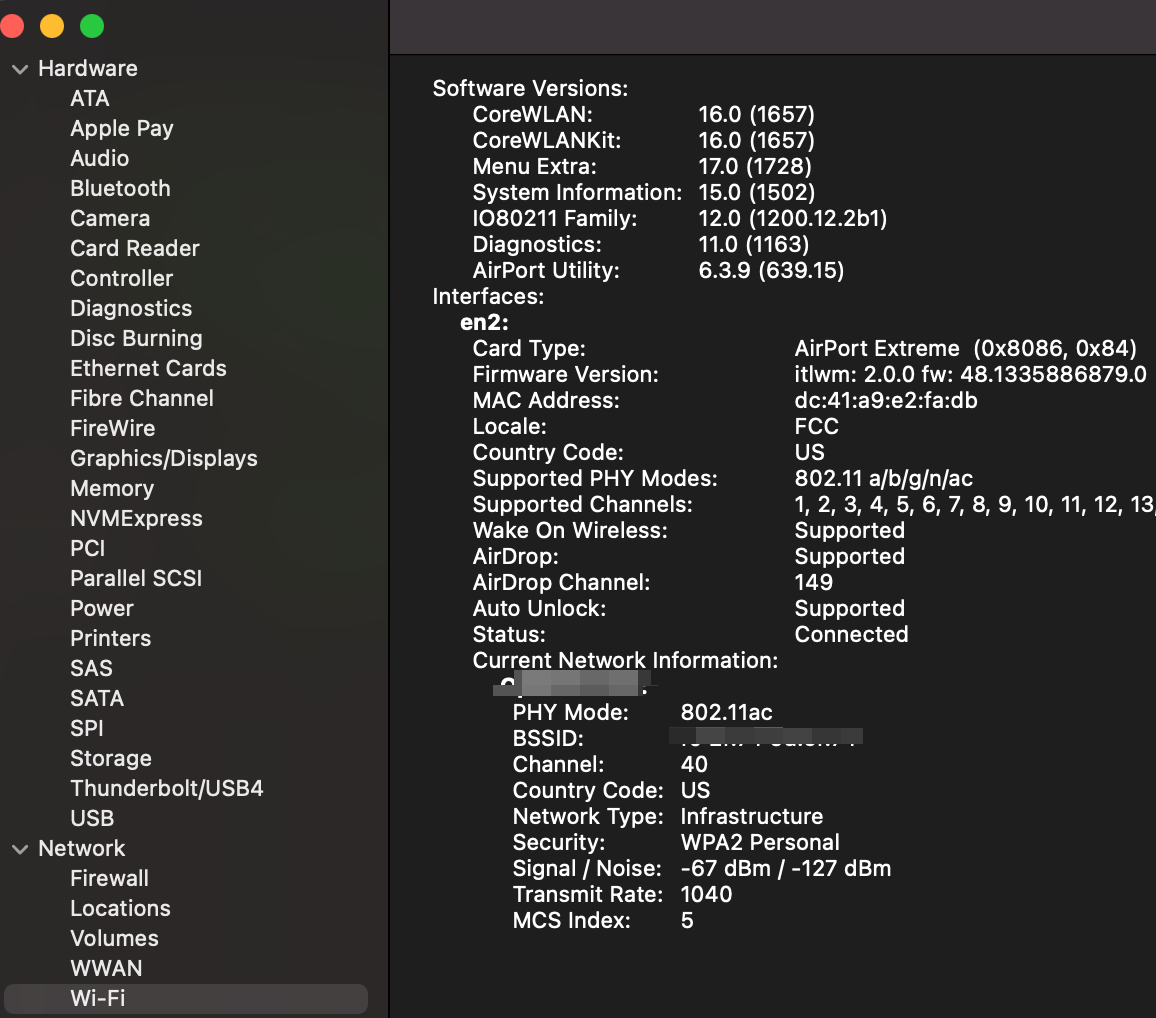
被正确识别并驱动之后:
Ref
- https://github.com/OpenIntelWireless/itlwm/releases
- https://github.com/OpenIntelWireless/itlwm
- https://openintelwireless.github.io/itlwm/
iCloud Drive 不自动同步
在我case中,以下的每一个方法都试过了,仍然无法实现自动同步。
最后发现重新生成SMBIOS后,iPhone上会要求重新登录iCloud,再重新登录之前,macOS上的iCloud Drive 都不自动同步。直到iPhone上会要求重新登录iCloud后,macOS的iCloud就一切正常了。
重新生成SMBIOS
Log out of iCloud and log in again
If you regularly experience sync problems with your iOS device(s) and you know your network is stable, then you should try logging out of your iCloud account on your iOS device or Mac, then log back in.
Turn on and turn off Desktop and Documents
Turn on Desktop and Documents on every Mac that you want to use with iCloud Drive.
- From your Mac, choose Apple menu > System Preferences. Click Apple ID, then click iCloud. In macOS Mojave or earlier, choose Apple menu > System Preferences, then click iCloud.
- Make sure that iCloud Drive is turned on.
- Next to iCloud Drive, click Options.
- Choose Desktop & Documents Folders.
注销再重新登录iCloud
- https://dortania.github.io/OpenCore-Post-Install/universal/iservices.html#fixing-imessage-and-other-services-with-opencore
- https://support.apple.com/en-us/HT206985
- https://www.computerworld.com/article/2916476/how-to-fix-icloud-sync-in-seconds.html
WIFI/Bluetooth
Support Broadcom’s WIFI/Bluetooth
屏蔽板载 WIFI/Bluetooth
Create a SSDT
You can also create a SSDT to block it out instead but disabling it is way better.
you have to block the bluetooths path that you extract from your IO Reg and create a SSDT to do it with. I might actually have one from my old Z390 Master EFI somewhere that you could easily correct. Il have to have a hunt around and see if I can find it.
You’ll have to disable it in by removing the definition for the usb port responsible for the bluetooth module within the injector. To find the correct port, check your IOReg.
DefinitionBlock ("", "SSDT", 2, "hack", "DRP08", 0x00000000)
{
    External (_SB_.PCI0.RP08, DeviceObj)

    Scope (_SB.PCI0.RP08)
    {
        OperationRegion (DE01, PCI_Config, 0x50, One)
        Field (DE01, AnyAcc, NoLock, Preserve)
        {
                ,   1,
                ,   3,
            DDDD,   1
        }
    }

    Scope (\)
    {
        If (_OSI ("Darwin"))
        {
            \_SB.PCI0.RP08.DDDD = One
        }
    }
}
Ref
- https://www.tonymacx86.com/threads/guide-creating-a-custom-ssdt-for-usbinjectall-kext.211311/
- https://www.travelertechie.com/2019/02/create-ssdt-to-fix-usb-rehabmans-way.html
- https://drauh.typepad.com/blog/2020/07/hackintosh-usb-mapping-attempt-to-fix-broken-bluetooth.html
- https://github.com/daliansky/XiaoMi-Pro-Hackintosh/issues/13
Remove from USB Map
another thing you can do thinking about it is remove the USB map for the internal Bluetooth and this should have the same effect. I say should because things don’t always work out the way you think they will…lol
- 软件方式:可在Hackintool中查看,定制屏蔽对应USB口(一般连接速度为12Mbps,我的端口为14)。
- 打开
USBMap.kext中的 info.plist 去掉bluetooth对应的dict
屏蔽设备
使用设备属性屏蔽
OpenCore 的一大功能特色,就是注入设备属性(DeviceProperties),通过向指定的 Pci 路径注入一些属性,可以达到驱动或屏蔽设备的效果。
假设我要屏蔽这个WLAN,首先从 Hackintool 获取设备的 PCI 路径:
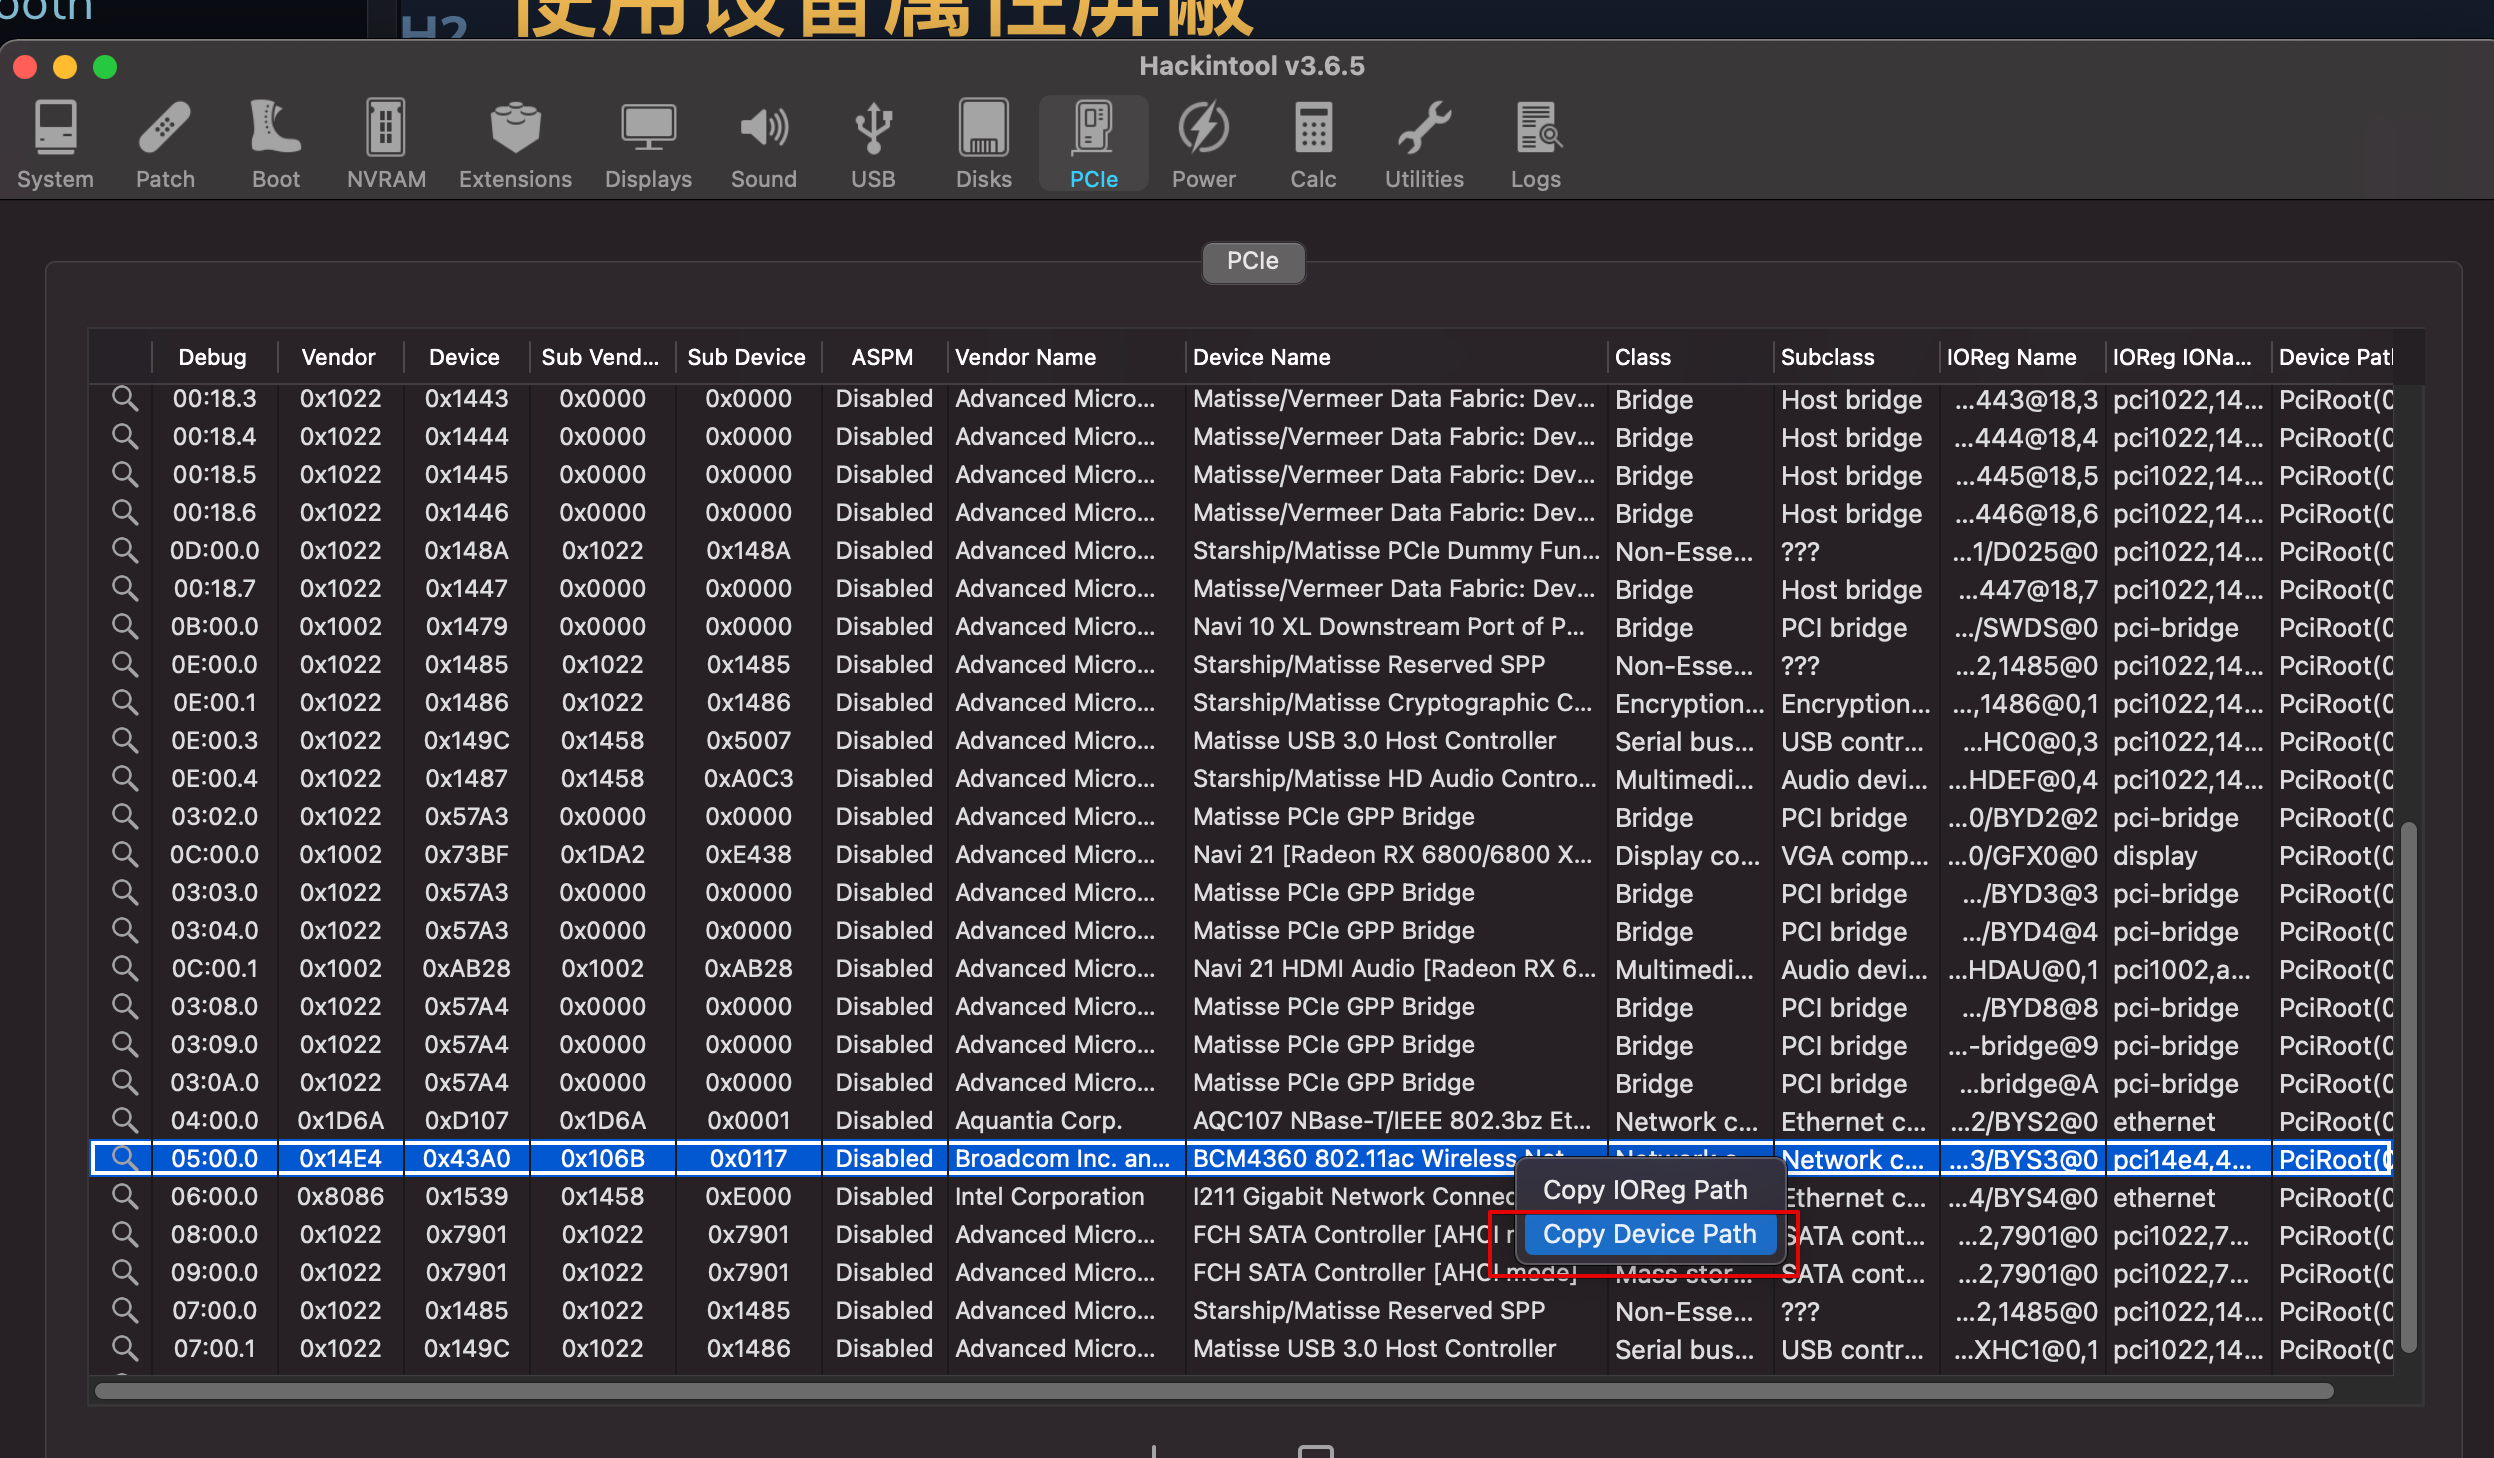
我的是:
PciRoot(0x0)/Pci(0x1,0x2)/Pci(0x0,0x0)/Pci(0x3,0x0)/Pci(0x0,0x0)
修改 Config.plist,即在 Config.plist 中添加以下内容:
<key>PciRoot(0x0)/Pci(0x1,0x2)/Pci(0x0,0x0)/Pci(0x3,0x0)/Pci(0x0,0x0)</key>
<dict>
  <key>IOName</key>
  <string>#display</string>
  <key>class-code</key>
  <data>/////w==</data>
  <key>name</key>
  <string>#display</string>
</dict>
SSDT
相比设备属性方法,SSDT 方法具有更高的执行优先级,整体稳定性和效率也要更高,但是使用起来有一点技术门槛。
首先第一步还是确定设备的路径,这里介绍 Windows 设备管理器和 IORegistryExplorer.app 两种查找方法,哪个对你来说方便,选哪个就行。
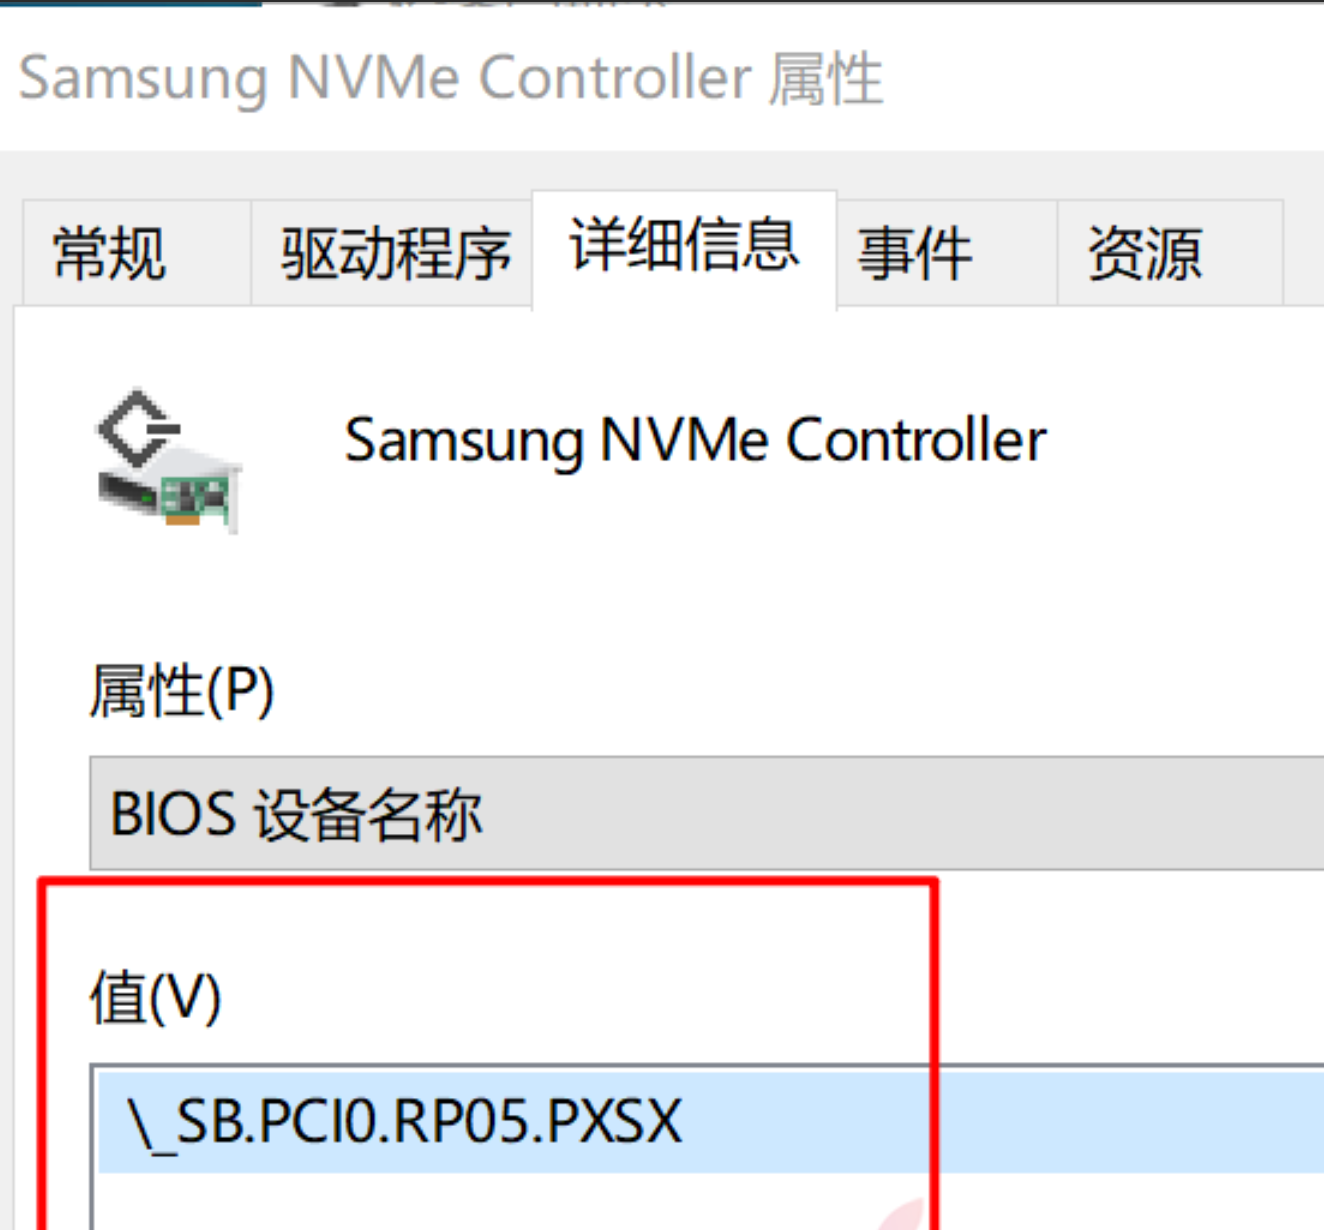
这里我们需要使用 IORegistryExplorer.app 来完成操作,由于这个软件只支持 10.14 及以上的系统,所以使用 10.13.6 的同学只能使用 Windows 方法或自行转换 Pci 路径。
运行软件后直接在搜索框搜索 GFX0(针对独显)或 NVMe(针对固态硬盘),下图以搜索 NVMe 为例:
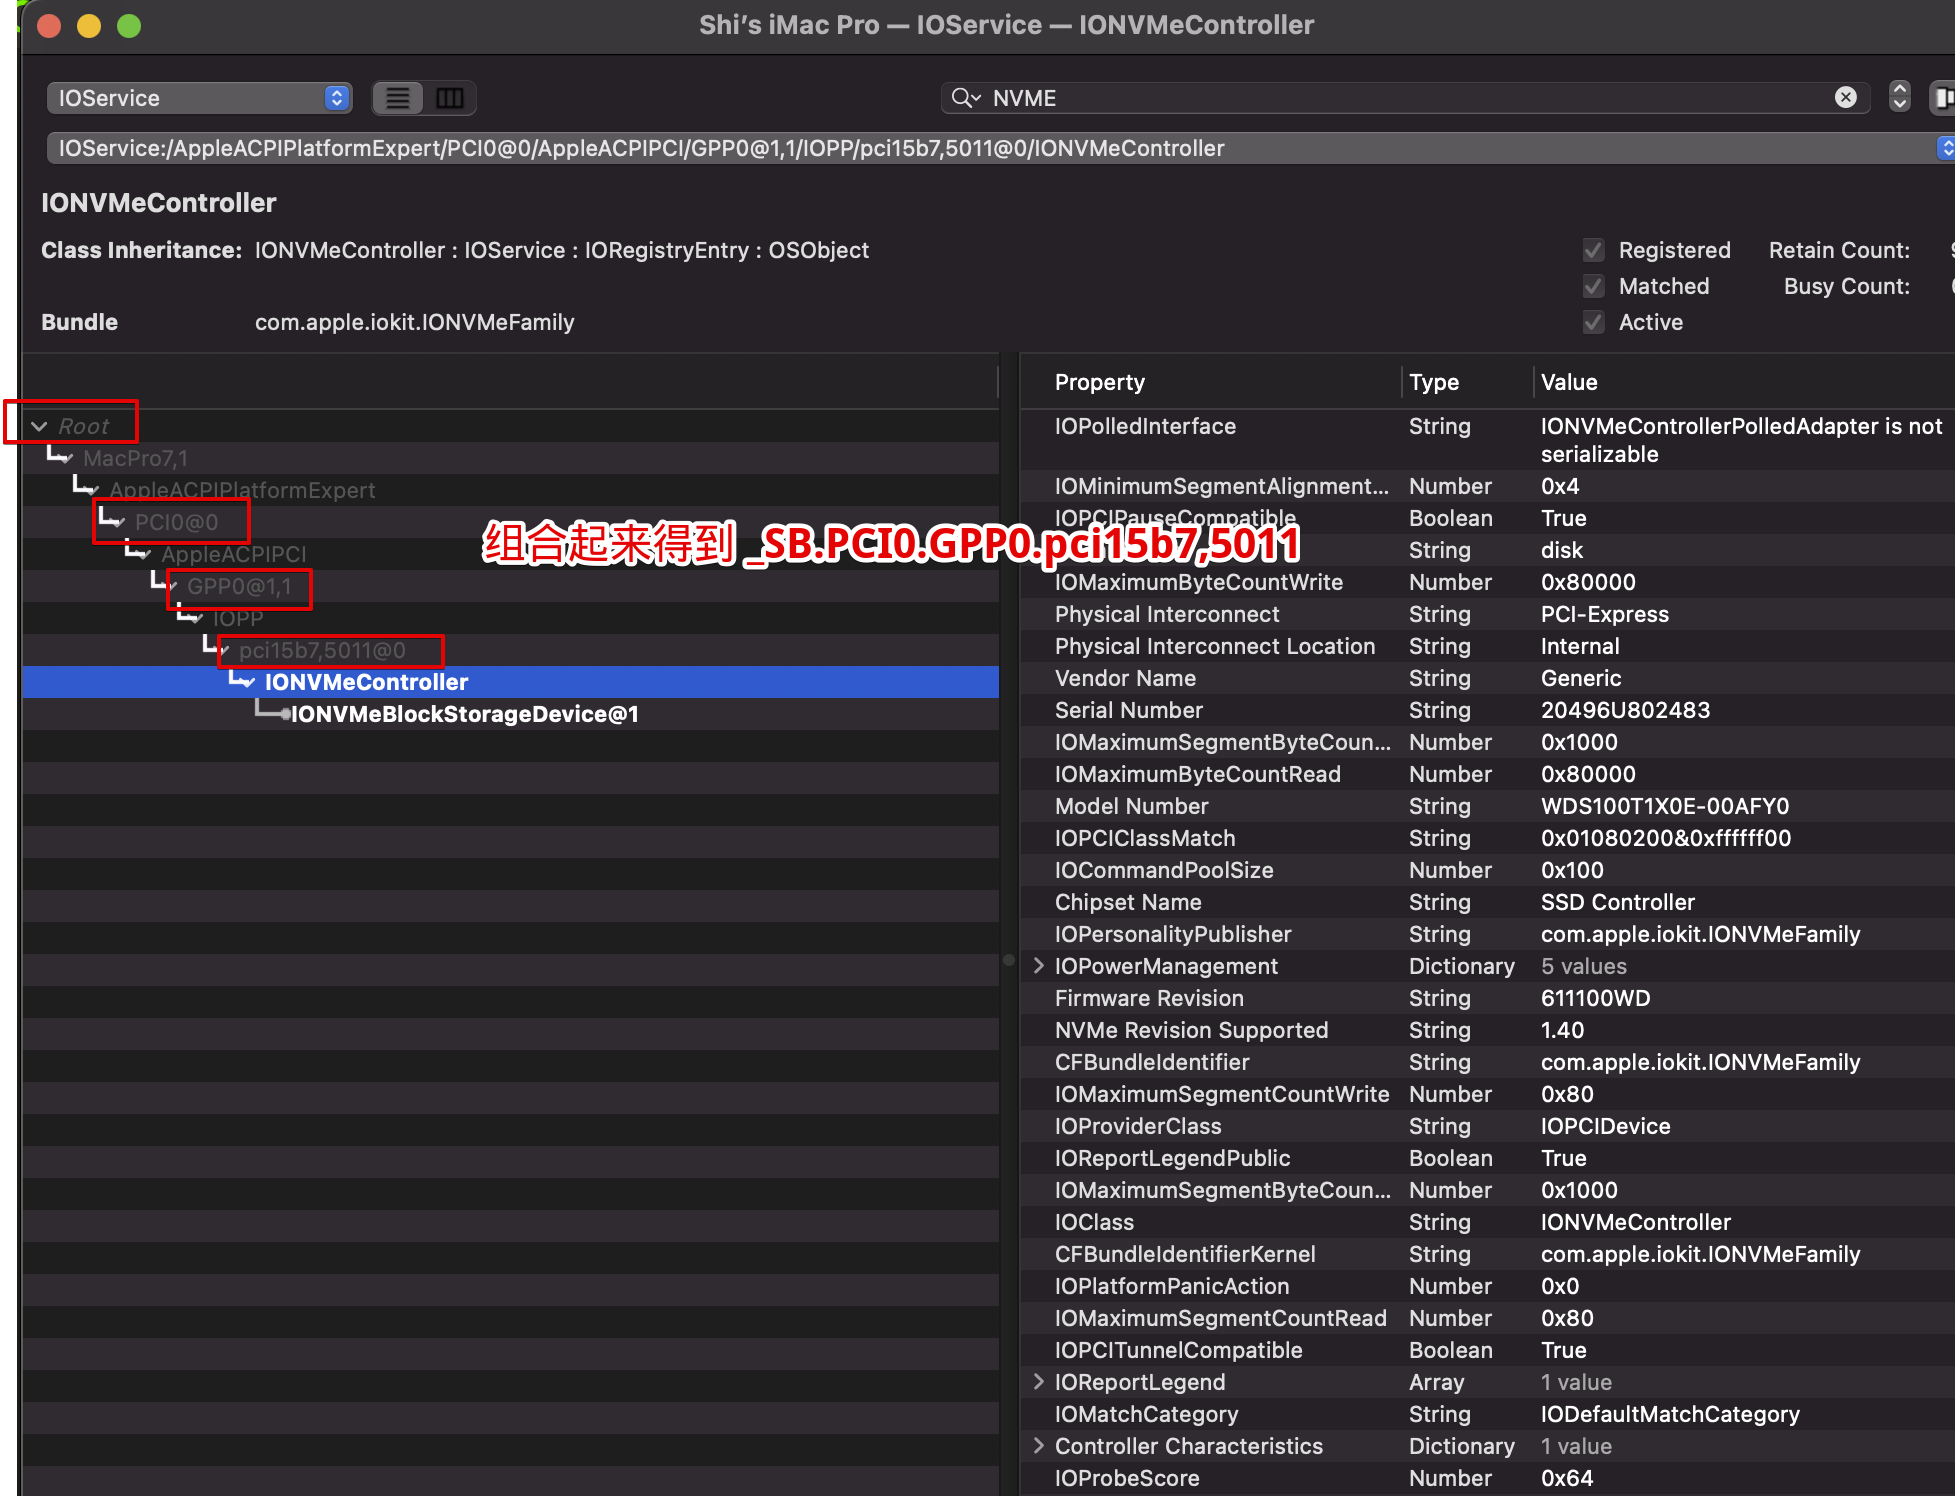
得到_SB.PCI0.GPP0.pci15b7,5011。
其它信息,如 name 和 IOName,这两个信息可以从 IORegistryExplorer.app 右侧信息区域中查找获取,不想找也可以直接填写 display(针对独显)或 disk(针对固态硬盘),也可以去掉这个部分直接不填(如果删除,注意需要清空 Package 值或重新计算)。
// Used for disabling unsupported GPUs in macOS
DefinitionBlock ("", "SSDT", 2, "DRTNIA", "spoof", 0x00000000)
{
    External (_SB_.PCI0.PEG0.PEGP, DeviceObj)

    Method (_SB.PCI0.PEG0.PEGP._DSM, 4, NotSerialized)  // _DSM: Device-Specific Method
    {
        If ((!Arg2 || (_OSI ("Darwin") == Zero)))
        {
            Return (Buffer (One)
            {
                 0x03                                             // .
            })
        }

        Return (Package (0x0A)
        {
            "name",
            Buffer (0x09)
            {
                "#display"
            },

            "IOName",
            "#display",
            "class-code",
            Buffer (0x04)
            {
                 0xFF, 0xFF, 0xFF, 0xFF                           // ....
            },

            "vendor-id",
            Buffer (0x04)
            {
                 0xFF, 0xFF, 0x00, 0x00                           // ....
            },

            "device-id",
            Buffer (0x04)
            {
                 0xFF, 0xFF, 0x00, 0x00                           // ....
            }
        })
    }
}
OpenCore 用户把文件放到以下路径:
- /EFI/OC/ACPI/
然后编辑 config 文件,把文件添加到 ACPI 部分,并启用
Ref
- https://heipg.cn/tutorial/block-nv-dgpu-or-pm981.html
- https://bbs.pcbeta.com/forum.php?mod=viewthread&tid=1808505
- https://github.com/dortania/Getting-Started-With-ACPI/blob/master/extra-files/decompiled/SSDT-GPU-DISABLE.dsl
- https://github.com/daliansky/OC-little/tree/master/20-SSDT%E5%B1%8F%E8%94%BD%E7%8B%AC%E6%98%BE%E6%96%B9%E6%B3%95
- https://github.com/daliansky/XiaoMi-Pro-Hackintosh/issues/13
系统启动
无法从Windows 启动
https://dortania.github.io/OpenCore-Multiboot/oc/win.html
- Reminder: Windows MUST be GPT/GUID based, OpenCore will not boot legacy installs
- MBR based Windows installs ARE NOT SUPPORTED by OpenCore at this time, you will need to convert it to GPT.
> I previously managed to repair broken Windows 10 boots by following the procedure below which requires a USB of DVD Windows 10 installation media:
- Insert the Media (DVD/USB) in your PC and restart.
- Boot from the media by selecting it in the BIOS
- Select Repair Your Computer.
- Select Troubleshoot.
- Choose Command Prompt from the menu:
# Once at the command prompt:
X:\Sources>diskpart
# Note which disk is your Boot drive number mine is 0
DISKPART > List disk
DISKPART > Sel disk 0

# List vol on this disk
DISKPART > List vol
# Choose the  EFI partition, mine is 1
DISKPART > Sel vol 1
DISKPART > assign letter=V:
DISKPART > Exit

# You should now be back at the command prompt, cd V partition
X:\Sources>V:

# After you have assigned a drive letter Using Diskpart, you need to recreate the Windows EFI directory structure with the command:
bcdboot C:\windows /s V: /f UEFI
Exit and reboot. Hopefully you are able to see the Windows Boot Manager in your BIOS bootloader chooser, and thus you are able to now boot into Windows.
From https://www.tonymacx86.com/threads/cant-boot-into-windows-after-using-opencore.294390/.
如果这样操作后,确实能够正常进入Windows,但是如果不插入macOS的U盘,无法进入macOS。如果插入macOS的U盘,能够正常进入macOS,且无异常。
- https://forums.macrumors.com/threads/windows-usb-installer-doesnt-show-up-in-opencore-boot-picker.2281667/
- https://www.tonymacx86.com/threads/cant-boot-into-windows-after-using-opencore.294390/
- https://www.reddit.com/r/hackintosh/comments/fzl6ru/updated_to_opencore_057_windows_not_showing_up_in/
- https://dortania.github.io/OpenCore-Post-Install/multiboot/bootcamp.html#cant-find-windowsbootcamp-drive-in-picker
Opencore启动时默认进入macOS
选择为 macOS disk。
-
在BIOS中选择第一启动项为安装了macOS的硬盘,而不是Opencore选项。
-
tick HideAuxiliary
-
system preferences -> startup disk
HideAuxiliary
- Type: plist boolean
- Failsafe: false
- Description: Set to true to hide auxiliary entries from the picker menu.
An entry is considered auxiliary when at least one of the following applies:
- Entry is macOS recovery.
- Entry is macOS Time Machine.
- Entry is explicitly marked as Auxiliary.
- Entry is system (e.g. Reset NVRAM).
To display all entries, the picker menu can be reloaded into “Extended Mode” by pressing the Spacebar key. Hiding auxiliary entries may increase boot performance on multi-disk systems.
- https://forums.macrumors.com/threads/change-default-boot-opencore-0-6-7.2289186/
- https://www.reddit.com/r/hackintosh/comments/dr0lvs/opercore_boot_entries_order_change_default/
- https://www.reddit.com/r/hackintosh/comments/eb3fle/opencore_default_boot_option_with_windows/
- https://www.tonymacx86.com/threads/solved-opencore-boot-menu-efi-entry.308150/
- https://www.reddit.com/r/hackintosh/comments/g4jn4b/how_to_remove_entries_from_opencore_boot_menu/
无法在BIOS中找到 OpenCore 启动项
无法找到macOS启动项
- 使用已经包含正确EFI的U盘引导以进入macOS
$ diskutil list

# 挂载macOS的EFI
$ sudo diskutil mount /dev/disk0s1
Volume EFI on /dev/disk0s1 mounted
# 挂载U盘的EFI
$ sudo diskutil mount /dev/disk2s1
Volume EFI on /dev/disk2s1 mounted
# 删除macOS的EFI中的 EFI 文件夹
# 把U盘的EFI中的 EFI 文件夹复制到macOS的EFI中
- 还有一种可能是,已经正确拷贝EFI文件夹后,BIOS中仍无OpenCore,这时可以尝试删除
Microsoft文件夹,只保留这两个文件夹
Ref
无法找到Windows USB drive 启动项
ScanPolicy is set to 0 (or to a setting that allows scanning USB devices)
Issues Met
Stuck on [EB|#LOG:EXITBS:START]
- https://dortania.github.io/OpenCore-Install-Guide/troubleshooting/extended/kernel-issues.html#stuck-on-eb-log-exitbs-start
- https://github.com/AMD-OSX/AMD_Vanilla
Reference
- https://www.sweetwater.com/sweetcare/articles/how-to-reset-pram-or-nvram/
- https://apple.stackexchange.com/questions/387345/nvram-error-clearing-firmware-variables-iokit-common-not-permitted
- https://www.reddit.com/r/MacOS/comments/lekks2/m1_macs_how_to_reset_the_nvram/