什么是Spring?
Spring 是个Java企业级应用的开源开发框架。Spring主要用来开发Java应用,但是有些扩展是针对构建J2EE平台的web应用。Spring框架目标是简化Java企业级应用开发,并通过POJO为基础的编程模型促进良好的编程习惯。
使用Spring框架的好处是什么?
-
轻量:Spring 是轻量的,基本的版本大约2MB。
-
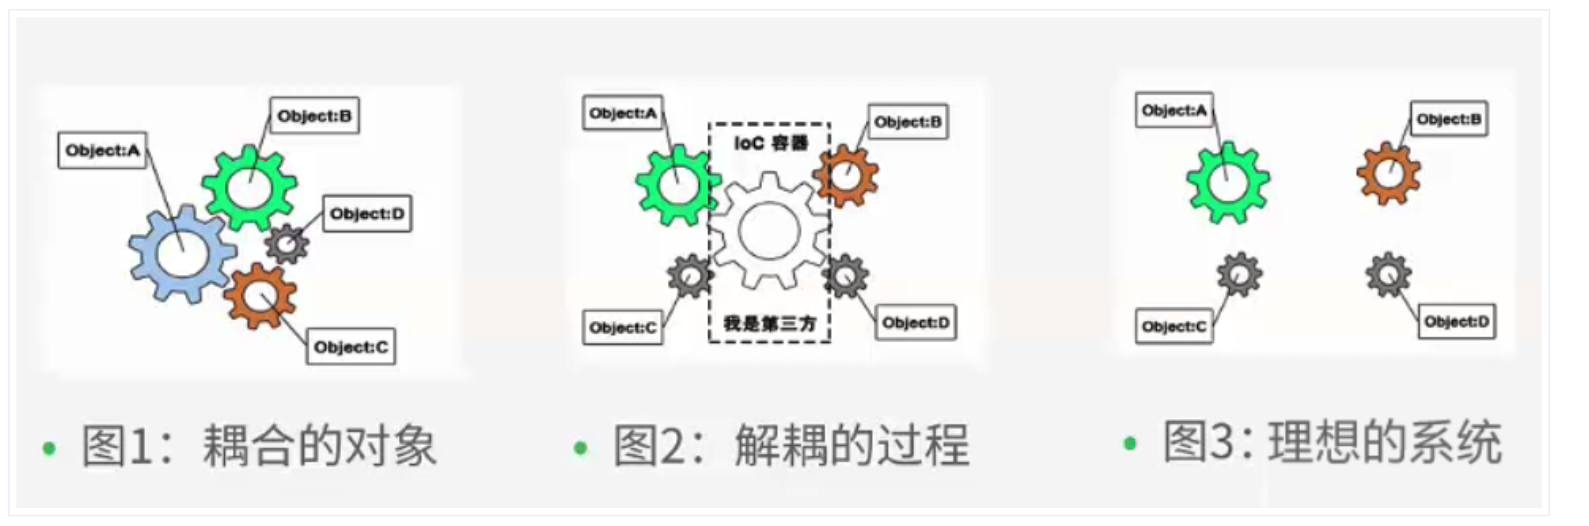
控制反转:Spring通过控制反转实现了松散耦合,对象们给出它们的依赖,而不是创建或查找依赖的对象们。
-
面向切面的编程(AOP):Spring支持面向切面的编程,并且把应用业务逻辑和系统服务分开。
-
容器:Spring 包含并管理应用中对象的生命周期和配置。
-
MVC框架:Spring的WEB框架是个精心设计的框架,是Web框架的一个很好的替代品。
-
事务管理:Spring 提供一个持续的事务管理接口,可以扩展到上至本地事务下至全局事务(JTA)。
-
异常处理:Spring 提供方便的API把具体技术相关的异常(比如由JDBC,Hibernate or JDO抛出的)转化为一致的unchecked 异常。
控制反转(Inversion of Control, IoC)
Spring的核心思想之一:(Inversion of Control, IoC)。
那么控制反转是什么意思呢?
对象的实例化创建控制交给外部容器(或者说,控制反转容器,IoC Container)完成,这个就做控制反转。Spring使用控制反转来实现对象的实例化不用在程序中写死。
那么对象的对象之间的依赖关系Spring是怎么做的呢??依赖注入(dependency injection)。
- Spring使用依赖注入来实现对象之间的依赖关系
- 在创建完对象之后,对象的关系处理就是依赖注入
上面已经说了,控制反转是通过外部容器完成的,而Spring又为我们提供了这么一个容器,我们一般将这个容器叫做:控制反转容器(IoC容器)。
无论是创建对象、处理对象之间的依赖关系、对象创建的时间还是对象的数量,我们都是在Spring为我们提供的IoC容器上配置对象的信息就好了。
IoC容器的原理
从上面就已经说了:IoC容器其实就是一个大工厂,它用来管理我们所有的对象以及依赖关系。
- 原理就是通过Java的反射技术来实现的!通过反射我们可以获取类的所有信息(成员变量、类名等等);
- 再通过配置文件(XML)或者注解来描述类与类之间的关系;
- 我们就可以通过这些配置信息和反射技术来构建出对应的对象和依赖关系了。
上面描述的技术只要学过点Java的都能说出来,这一下子可能就会被面试官问倒了,我们简单来看看实际Spring IoC容器是怎么实现对象的创建和依赖的:
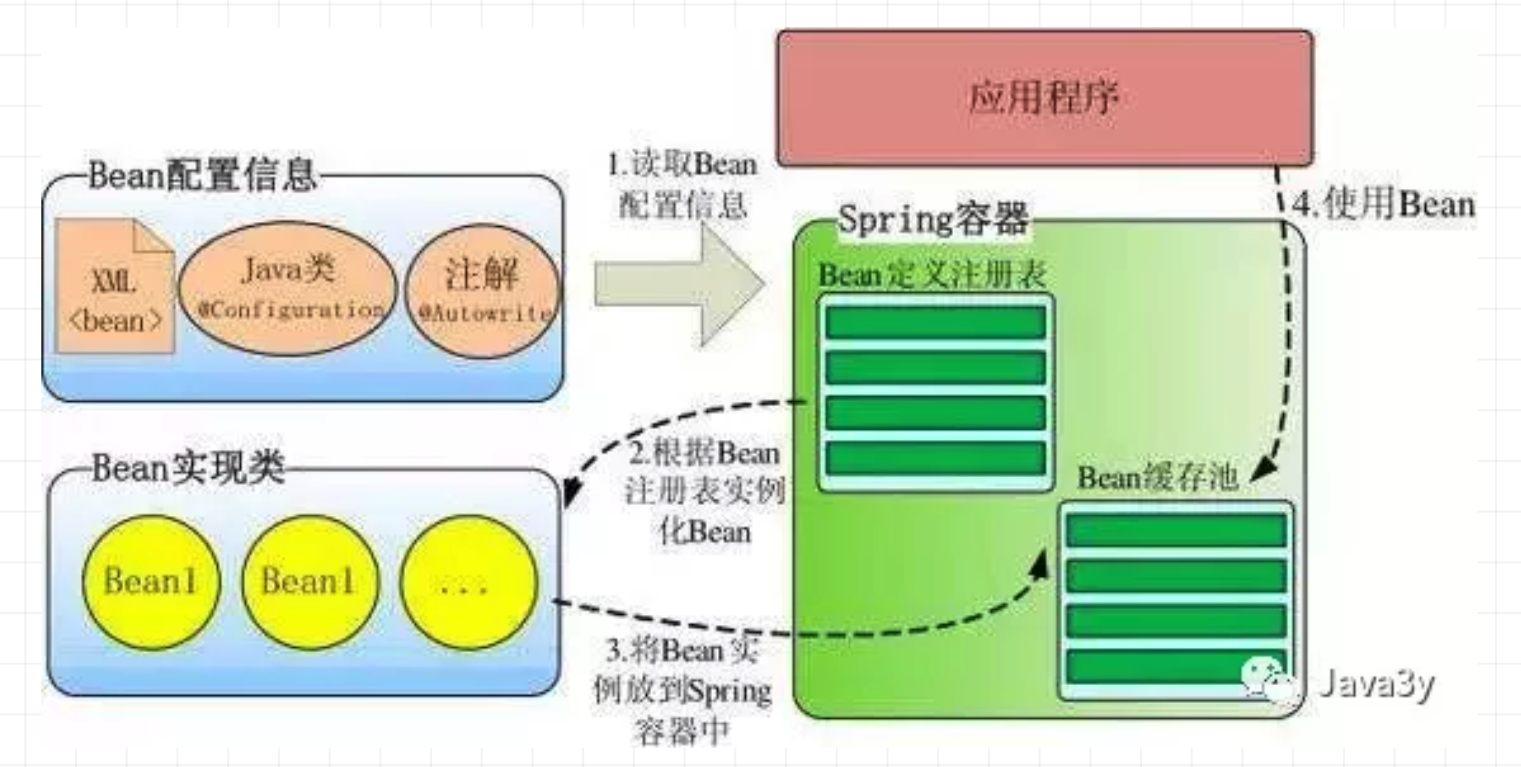
- 根据Bean配置信息在容器内部创建Bean定义注册表;
- 根据注册表加载、实例化bean、建立Bean与Bean之间的依赖关系;
- 将这些准备就绪的Bean放到Map缓存池中,等待应用程序调用。
IoC容器装配Bean
装配Bean方式
Spring4.x开始IoC容器装配Bean有4种方式:
- XML配置
- 注解
- JavaConfig
- 基于Groovy DSL配置(这种很少见)
总的来说:我们以XML配置+注解来装配Bean得多,其中注解这种方式占大部分!
依赖注入方式
依赖注入的方式有3种方式:
- 属性注入,或者是说,通过
setter()方法注入 - 构造函数注入
- 工厂方法注入
总的来说使用属性注入是比较灵活和方便的,这是大多数人的选择!
通过XML装配Bean
IBookDao.java
/**
 * 图书数据访问接口
 */
public interface IBookDao {

    /**
     * 新增图书
     */
    String addBook(String bookName);
}
BookDao.java
/**
 * 图书数据访问实现类
 */
public class BookDao implements IBookDao {

    @Override
    public String addBook(String bookName) {
        return "新增图书 《" + bookName + "》 成功!";
    }
}
BookService
import org.springframework.context.ApplicationContext;
import org.springframework.context.support.ClassPathXmlApplicationContext;

/**
 * 图书业务类
 */
public class BookService {

    IBookDao iBookDao;

    public BookService() {
        // IoC容器
        ApplicationContext context = new ClassPathXmlApplicationContext("beans01.xml");
        // 从容器中获取id 为 bookdao 的bean
        iBookDao = context.getBean("bookdao", IBookDao.class);
    }

    public void storeBook(String bookName){
        System.out.println("图书上货");
        System.out.println(iBookDao.addBook(bookName));
    }
}
beans01.xml
<?xml version="1.0" encoding="UTF-8"?>
<beans xmlns="http://www.springframework.org/schema/beans"
       xmlns:xsi="http://www.w3.org/2001/XMLSchema-instance"
       xsi:schemaLocation="http://www.springframework.org/schema/beans http://www.springframework.org/schema/beans/spring-beans.xsd">

    <bean id="bookdao" class="com.ray.IoC01.BookDao"></bean>
</beans>
测试类
public class Test {

    @org.junit.Test
    public void testStoreBook(){
        BookService bookService = new BookService();
        bookService.storeBook("spring5.0.2中文官网文档");
    }
}
通过注解来装配Bean
上一个示例是使用传统的XML来实现IoC的配置定义(描述Bean 与 Bean 之间的关系)。
如果内容比较多则配置需花费很多时间,通过注解可以减轻工作量,但注解后修改要麻烦一些,偶合度会增加,应该根据需要选择合适的方法。
使用 @Autowired 自动装配 Bean
@Autowired 注解自动装配具有兼容类型的单个 Bean 属性:
- 构造器, 普通字段(即使是非 public), 一切具有参数的方法都可以应用@Authwired 注解;
- 默认情况下, 所有使用 @Authwired 注解的属性都需要被设置. 当 Spring 找不到匹配的 Bean 装配属性时, 会抛出异常, 若某一属性允许不被设置, 可以设置 @Authwired 注解的 required 属性为 false;
- 默认情况下, 当 IoC 容器里存在多个类型兼容的 Bean 时, 通过类型的自动装配将无法工作. 此时可以在 @Qualifier 注解里提供 Bean 的名称. Spring 允许对方法的入参标注 @Qualifiter 已指定注入 Bean 的名称;
- @Authwired 注解也可以应用在数组类型的属性上, 此时 Spring 将会把所有匹配的 Bean 进行自动装配.
- @Authwired 注解也可以应用在集合属性上, 此时 Spring 读取该集合的类型信息, 然后自动装配所有与之兼容的 Bean.
- @Authwired注解用在 java.util.Map 上时, 若该 Map 的键值为 String, 那么 Spring 将自动装配与之 Map 值类型兼容的 Bean, 此时 Bean 的名称作为键值
例子
1 使用 @Autowired 注解配置 Bean 代码示例
在 UserService 类中, 使用 Autowire 注解来装配一个 UserRepository
@Service
public class UserService {

    @Autowired
    private UserRepository userRepository;

    public void add(){
        System.out.println("UserService add...");
        userRepository.save();
    }
}
然后在 UserController 中, 使用 Autowire 注解来装配一个 UserService
@Controller
public class UserController {

    @Autowired
    private UserService userService;

    public void execute(){
        System.out.println("UserController execute...");
        userService.add();
    }
}
然后通过 ApplicationContext 去获取 UserController 的 bean 实例
public class AnnotationDemo {
    public static void main(String[] args) {
        ApplicationContext actx = new ClassPathXmlApplicationContext("config/annotation-beans.xml");

        UserController userController = (UserController) actx.getBean("userController");
        System.out.println(userController);
        userController.execute();
    }
}
得到结果如下:
org.lovian.spring.bean.annotation.controller.UserController@101df177
UserController execute...
UserService add...
User Repository saved.
我们可以看到通过调用 UserController 的 execute 方法,每一层的方法依次都被调用了,说明通过 Autowire 注解配置的 bean 都被 IoC 容器所管理并且自动装配了。
2 通过构造器方式和@Autowired来装配 bean
但是,直接把 @Autowired 注解配置到字段属性上已经不是 Spring team 所推荐的:
Spring Team Recommands :Always use constructor based dependency injection in your beans. Always use assertions for mandatory dependencies".
所以我们将上面的装配方式做一下修改,通过构造器的方式来配置,代码如下:
UserService类
@Service
public class UserService {

    private UserRepository userRepository;

    @Autowired
    public UserService(UserRepository userRepository) {
        this.userRepository = userRepository;
    }

    public void add(){
        System.out.println("UserService add...");
        userRepository.save();
    }
}
UserController类
@Controller
public class UserController {

    private UserService userService;

    @Autowired
    public UserController(UserService userService) {
        this.userService = userService;
    }

    public void execute(){
        System.out.println("UserController execute...");
        userService.add();
    }
}
然后我们再执行一遍 main 函数就可以发现, 得到的结果和之前直接在字段上使用 @Autowired 的结果是一样的。
3 如果自动装配的 Bean 不存在
有一种情况,当使用了 @Autowired 注解来配置 bean, 但是这个 bean 实际上并不存在于 IoC 容器中, 那么这是就需要在 @Autowired 上 使用 required = fasle属性。
修改 UserRepositoryImpl 类:
@Repository(value = "userRepository")
public class UserRepositoryImpl implements UserRepository {

    @Autowired(required = false)
    private TestObject testObject;

    public void save() {
        System.out.println("User Repository saved.");
        System.out.println(testObject);
    }
}
这样 IoC 容器会把容器中的 bean 装配给 userRepository,然后我们修改配置文件,将 testObject 类从 IoC 容器中过滤掉:
    <context:component-scan base-package="org.lovian.spring.bean.annotation">
        <context:exclude-filter type="regex" expression="org.lovian.spring.bean.annotation.TestObject"/>
    </context:component-scan>
然后执行 main 方法,得到结果如下:
org.lovian.spring.bean.annotation.controller.UserController@12028586
UserController execute...
UserService add...
User Repository saved.
null
可以看到,testObject bean 打印结果为 null, 也就是说, 即使 IoC 容器中没有这个 Bean, 也并不影响程序的运行,bean 就被初始化成 null。
4 如果有两个相同接口的实现类
我们从上面的例子可以看出来, Sping IoC 容器会自动扫描指定包中的class,但是如果一个接口,有两个实现类,比如说,UserRepository 接口有两个实现类 UserRepositoryImpl 和 UserJdbcRepository, 那么在 UserService 中,@Autowired 是怎么装配的。
- 通过
@Autowired修饰的字段名字或者构造函数的参数名指定 bean - 通过
@Qualifier指定 bean
我们先增加一个 UserJdbcRepository的实现类
import org.springframework.stereotype.Repository;

@Repository
public class UserJdbcRepository implements UserRepository{

    public void save() {
        System.out.println("UserJdbcRepository saved....");
    }
}
那么在 UserService 中,我们要装配 UserRepository:
@Service
public class UserService {

    private UserRepository userRepository;

    @Autowired
    public UserService(UserRepository userJdbcRepository) {
        this.userRepository = userJdbcRepository;
    }

    public void add(){
        System.out.println("UserService add...");
        userRepository.save();
    }
}
注意这里的构造器的参数名是 userJdbcRepository, 而不是 userRepository,那么打印结果是:
org.lovian.spring.bean.annotation.controller.UserController@11c20519
UserController execute...
UserService add...
UserJdbcRepository saved....
可以发现这里 IoC 容器给 UserService 装配的 UserRepository 的实例是 UserJdbcRepository 的 bean。如果这里参数名用 userRepository 的话,那么 IoC 容器将给其装配名字叫 userRepository 的 Bean。
同理,如果是用 @Autowired 来修饰字段的话,那么字段的名字和 bean 的名称做匹配
@Service
public class UserService {

    @Autowired
    private UserRepository userJdbcRepository;

    public void add(){
        System.out.println("UserService add...");
        userJdbcRepository.save();
    }
}
这样,IoC 容器给 UserService 装配的也是 UserJdbcRepository 的实例。
还可以通过 @Qualifier来指定要装配的 bean 的名称:
@Service
public class UserService {

    @Autowired
    @Qualifier("userJdbcRepository")
    private UserRepository userRepository;

    public void add(){
        System.out.println("UserService add...");
        userRepository.save();
    }
}
以及用@Qualifier修饰构造函数中的参数:
@Service
public class UserService {

    private UserRepository userRepository;

    @Autowired
    public UserService(@Qualifier("userJdbcRepository") UserRepository userRepository) {
        this.userRepository = userRepository;
    }

    public void add(){
        System.out.println("UserService add...");
        userRepository.save();
    }
}
这样装配的结果都是把 UserJdbcRepository 装配给 UserService
小结
使用零配置和注解虽然方便,不需要编写麻烦的XML文件,但并非为了取代XML,应该根据实例需要选择,或二者结合使用,毕竟使用一个类作为容器的配置信息是硬编码的,不好在发布后修改。
除了@Component外,Spring提供了3个功能基本和@Component等效的注解,分别对应于用于对DAO,Service,和Controller进行注解。
注解说明
| 注解 | 说明 |
|---|---|
| @Service | 用于注解业务层组件(通常定义的service层就用这个) |
| @Controller | 用于注解控制层组件 |
| @Repository | 用于注解数据访问层组件(即Dao组件) |
| @Component | 泛指组件,当不好归类时,可以使用该注解 |
ApplicationContextAware
ApplicationContextAware is an interface provided by the Spring Framework that allows a bean to access the Spring ApplicationContext — essentially giving the bean awareness of the container it lives in.
📌 Why Use It?
Sometimes you need access to the Spring container to:
- Get other beans dynamically
- Access context-level configuration
- Access environment properties
- Publish events
This should be used sparingly because it introduces tight coupling to the Spring framework and breaks Inversion of Control (IoC).
How It Works
- You implement ApplicationContextAware in your class.
- Spring calls the method setApplicationContext(…) after the bean is created and dependencies are injected.
- Your bean now has access to the full ApplicationContext.
Example
@Component
public class SpringContextHolder implements ApplicationContextAware {

    private static ApplicationContext context;

    @Override
    public void setApplicationContext(ApplicationContext applicationContext) throws BeansException {
        SpringContextHolder.context = applicationContext;
    }

    public static <T> T getBean(Class<T> clazz) {
        return context.getBean(clazz);
    }

    public static Object getBean(String beanName) {
        return context.getBean(beanName);
    }
}
Now you can call:
MyService service = SpringContextHolder.getBean(MyService.class);
Spring IOC容器
Spring IOC容器是实现IOC的核心,通常使用BeanFactory或ApplicationContext来管理Bean。BeanFactory是IOC容器的基本形式,提供基本的IOC功能;ApplicationContext是BeanFactory的扩展,并提供更多企业级功能。
Reference
- Spring IoC知识点一网打尽!- https://mp.weixin.qq.com/s?__biz=MzI4Njg5MDA5NA==&mid=2247484247&idx=1&sn=e228e29e344559e469ac3ecfa9715217&chksm=ebd74256dca0cb40059f3f627fc9450f916c1e1b39ba741842d91774f5bb7f518063e5acf5a0#rd
- Spring入门这一篇就够了 - https://mp.weixin.qq.com/s?__biz=MzI4Njg5MDA5NA==&mid=2247483942&idx=1&sn=f71e1adeeaea3430dd989ef47cf9a0b3&chksm=ebd74327dca0ca3141c8636e95d41629843d2623d82be799cf72701fb02a665763140b480aec&scene=21#wechat_redirect
- Spring 的本质系列(1) – 依赖注入 - https://mp.weixin.qq.com/s?__biz=MzAxOTc0NzExNg==&mid=2665513179&idx=1&sn=772226a5be436a0d08197c335ddb52b8&scene=21#wechat_redirect