注明:本 blog 仅作为技术研究讨论学习信息安全相关技术,请勿用于任何违法用途!并请严格遵命各国和地区法律!
翻墙思路
本方案基于gfwlist,gfwlist( https://github.com/gfwlist/gfwlist )中记录了已经被gfw封锁的域名(https://raw.githubusercontent.com/gfwlist/gfwlist/master/gfwlist.txt)。
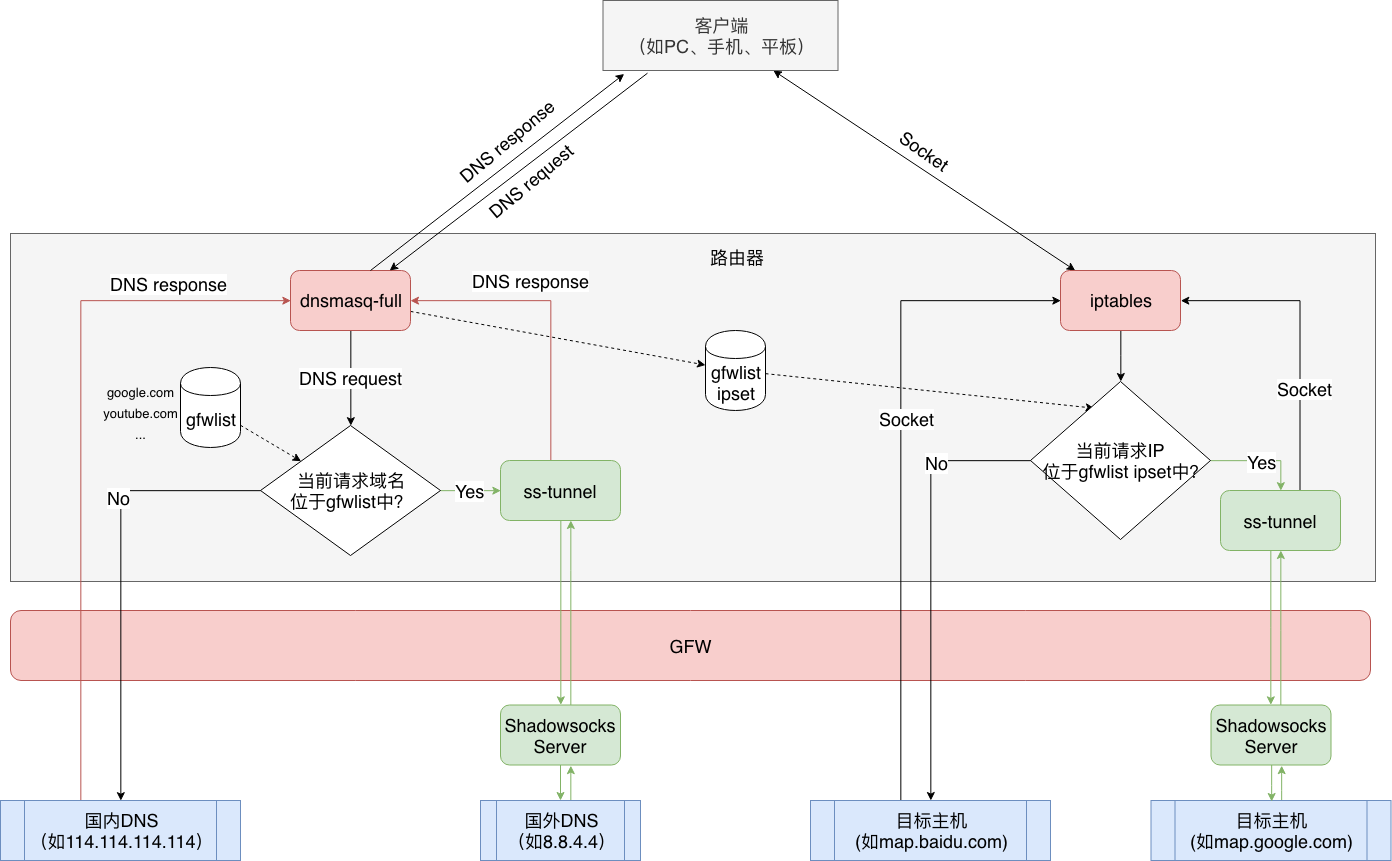
为了绕过GFW的DNS污染,访问处于gfwlist中列表的域名时,我们可以借助ss-tunnel通过 Shadowsocks Server 请求国外公共 DNS(如8.8.8.8,4.4.4.4)以获得干净的DNS解析结果。当然,我们也可以在国外或不被GFW投毒的地方架设DNS服务器,通过访问自己的这个DNS服务器,以获得干净的DNS解析结果。
在访问处于gfwlist中列表的域名时,在获取干净的DNS解析结果后,我们还需要通过ss-redir来与这个目标主机建立Socket连接,以逃避GFW的TCP RST重置。
gfwlist中的域名站点走代理,不在List中的域名不走代理。本质上依然是根据目标主机的IP来进行判断。dnsmasq-full可以将解析域名得到的IP加到一个ipset中,最终利用这个ipset来判断走不走代理。实际是完成了gfwlist(域名列表)到dnsmasq的ipset规则再到IP地址的转换。
本方案的优点明确,只有被墙的站点才走代理。但是,虽然gfwlist每天都在不停的更新,但是gfwlist并不能100%涵盖被墙站点,而且有些国外站点直连速度远不如走代理,特别是你代理服务器速度较快,希望通过代理加速国外访问时,此方案就存在一定的不足。
作为本方案的弥补,我选择在PC上安装SwitchyOmega。当访问被墙而又不在gfwlist列表中网站,或者直接访问非常非常慢的国外站点时,使用手动切换为全局走ss的策略。
因此,对于在gfwlist中的网站走ss(黑名单机制),通过http://ftp.apnic.net/apnic/stats/apnic/delegated-apnic-latest 实现一定在国内的网站直接访问(白名单机制)。
分析
iptables只能根据IP地址定义规则进行转发,不能识别域名,而dnsmasq-full不仅可以实现域名-IP的映射,还可以把这个映射关系存储在ipset中,所以使用dnsmasq-full+ipset就可以实现iptables对域名的转发,可以实现很多功能。
具体来说,当dnsmasq-full接收到一个DNS查询请求,首先匹配配置文件中的域名列表(对应于gfwlist),如果匹配成功某域名,就把IP的查询结果存储在一个ipset集合中,
此后iptables就可以使用ipset中的这个IP集合,即若客户端访问这个集合中的某个IP时,就进行相应的处理(比如DROP或者REDIRECT)。
在我们的翻墙场景中,比如用户访问www.google.com ,dnsmasq-full查询gfwlist,发现这个域名在其中,则在(通过ss-tunnel)进行DNS解析后(绕过了GFW的DNS污染),把其对应的IP存入ipset中。当此后用户尝试与www.google.com 对应的IP建立连接时,iptables将这个TCP连接重定向到ss中,最终绕过了GFW的TCP RST攻击。
刷入最新的OpenWrt
这里踩坑了,本来我的小米路由器mini一致使用PandoraBox固件(PandoraBox-ralink-mt7620-xiaomi-mini-squashfs-sysupgrade-r1024-20150608)。下载地址:http://downloads.openwrt.org.cn/PandoraBox/Xiaomi-Mini-R1CM/stable/ 。而由于PandoraBox不支持
opkg-key命令(在下面会使用到),shadowsocks不能自动安装。最终折腾上了最新的OpenWrt。
首先路由器型号需要在OpenWrt支持的列表中:http://wiki.openwrt.org/toh/start/ (可以ctrl+F搜索匹配型号),并记录所用路由器CPU的型号。
下载并安装OpenWrt
从downloads.openwrt.org,下载最新的OpenWrt ROM,当前(2019.1.29)最新的OpenWrt版本为18.06.1。
下载地址:https://downloads.openwrt.org/releases/18.06.1/targets/ramips/mt7620/openwrt-18.06.1-ramips-mt7620-miwifi-mini-squashfs-sysupgrade.bin。
并刷入这个OpenWrt固件到路由器中。
查询信息
查看OpenWrt版本
[root@PandoraBox:/root]#cat /proc/version
Linux version 3.14.44 (lintel@PandoraBox-Server) (gcc version 4.8.3 (PandoraBox/Linaro GCC 4.8-2014.04 r969) ) #7 Mon Jun 8 22:23:15 CST 2015
查看CPU信息
我使用的是小米路由器mini,其CPU为MTK MT7620A 单核580MHz。
[root@PandoraBox:/mnt/sda1]#cat /proc/cpuinfo
system type		: MediaTek MT7620
machine			: Xiaomi mini Board
processor		: 0
cpu model		: MIPS 24KEc V5.0
BogoMIPS		: 385.84
wait instruction	: yes
microsecond timers	: yes
tlb_entries		: 32
extra interrupt vector	: yes
hardware watchpoint	: yes, count: 4, address/irw mask: [0x0ffc, 0x0ffc, 0x0ffb, 0x0ffb]
isa			: mips1 mips2 mips32r2
ASEs implemented	: mips16 dsp
shadow register sets	: 1
kscratch registers	: 0
core			: 0
VCED exceptions		: not available
VCEI exceptions		: not available
查看当前路由器的架构
$ opkg print-architecture | awk '{print $2}'
安装Shadowsocks及依赖应用
建议所有安装与配置操作都在控制台下完成,如通过OpenWrt的luci操作,有可能出现未获得预期效果后不好调试的问题。
说明
shadowsocks-libev:官方原版,包含 ss-local,ss-redir,ss-tunnel}
-
ss-local对外提供 SOCKS5 代理 -
ss-local 是 Shadowsocks 客户端程序,主要用于将本地的应用程序流量通过 Shadowsocks 隧道进行加密和代理。它通常在本地监听一个端口(如 1080 端口),并作为 SOCKS5 代理服务器使用。所有通过这个代理服务器的流量都会被加密并转发到远程的 Shadowsocks 服务器
-
ss-redir建立透明代理- ss-redir 是专门用于透明代理的工具,常用于路由器或防火墙配置。与 ss-local 不同的是,ss-redir 可以接收由操作系统(通常是通过 iptables 规则)重定向的流量,并将这些流量通过 Shadowsocks 隧道加密并转发到远程服务器。它能够处理未经应用层代理配置的 TCP 流量,并将其透明地代理出去
-
ss-rules生成代理规则 -
ss-tunnel提供 UDP 转发,通常用于将特定类型的流量(如 DNS 查询)通过 Shadowsocks 隧道转发到远程服务器
shadowsocks-libev-spec:针对 OpenWrt 的优化版本,包含 ss-{redir,rules,tunnel}。从 v1.5.2 开始可以使用 LuCI 配置界面。
SSL依赖说明
shadowsocks-libev-spec依赖于SSL,根据依赖的 SSL 库可分为 OpenSSL 和 PolarSSL 两种版本:
OpenSSL版依赖libopenssl, 支持加密方式多, 体积大PolarSSL版依赖libpolarssl, 体积小, 加密方式少
两种版本使用上并无差异,根据ROM中预装的 SSL 库选择即可。
添加第三方源(openwrt-dist)
添加 openwrt-dist.pub 到opkg的 keys 中。只有这样,第三方的包才能通过签名验证:
$ wget http://openwrt-dist.sourceforge.net/openwrt-dist.pub
$ opkg-key add openwrt-dist.pub
获取路由器对应的架构(architecture):
$ opkg print-architecture | awk '{print $2}'
请根据自己的CPU架构(可以执行 opkg print-architecture 查看),将厦门的{architecture}替换成相应的文本。
添加以下源到 /etc/opkg/customfeeds.conf:
src/gz openwrt_dist http://openwrt-dist.sourceforge.net/packages/base/{architecture}
src/gz openwrt_dist_luci http://openwrt-dist.sourceforge.net/packages/luci
更新最新opkg源信息:
$ opkg update
卸载dnsmasq并安装dnsmasq-full
这里踩坑了!!之前我安装的是最新的dnsmasq(2.80)版本,通过dnsmasq -v也能看到其已经支持了ipset。
然而,若在/etc/dnsmasq.d/dnsmasq_gfwlist_ipset.conf 中放入ipset=/xx.com/gfwlist时,则会出现"dnsmasq: recompile with HAVE_IPSET defined to enable ipset directives"的错误。显然在重新对dnsmasq进行编译前,dnsmasq仍然不能有效支持ipset。
最终决定卸载dnsmasq并安装dnsmasq-full。
执行:
$ opkg remove dnsmasq && opkg install dnsmasq-full
注意,由于dnsmasq默认负责路由器的DNS解析和DHCP分配工作。因此在卸载了dnsmasq后,opkg install 可能会因为无法获得DNS解析工作而无法正常执行。
一个解决办法可以是,进入OpenWrt的GUI界面,进入[Network] - [Interfaces] - [WAN Edit],进入[Advanced Settings],修改Use custom DNS servers为114.114.114.114。
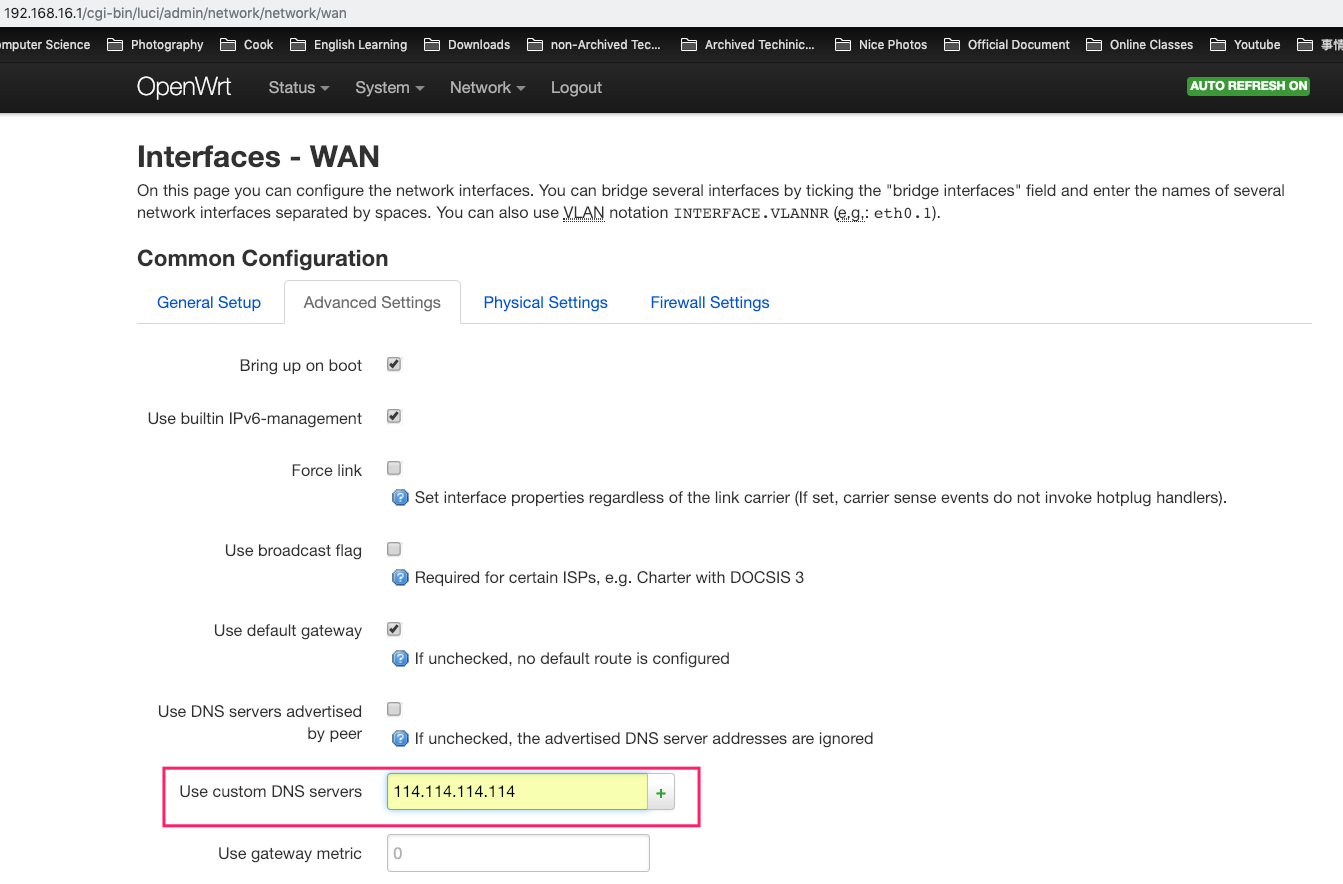
在路由器的控制台中ping一下baidu.com(ping baidu.com),若可以正常ping通,则说明当前DNS工作正常。opkg install也当然可以正常工作。
还有一个方法,在网络正常的机器上,执行 ping 到一个源(比如,downloads.openwrt.org或者mirrors.ustc.edu.cn)。在获得其IP后,修改 /etc/opkg/distfeeds.conf将其域名替换为对应IP,以避免无法获得DNS解析而导致的opkg install无法正常执行的情况。
安装shadowsocks-libev-spec
$ opkg install shadowsocks-libev luci-app-shadowsocks
$ opkg install ipset libpthread
# ChinaDNS在此方案中不会被使用到
$ opkg install ChinaDNS luci-app-chinadns
以上为直接从第三方源(openwrt-dist)下载并安装shadowsocks-libev及其依赖。
但事实上,有可能在已经添加了第三方源(openwrt-dist)后,进行opkg update时,提示以下连接错误:
$ opkg update
Downloading http://openwrt-dist.sourceforge.net/packages/base/mipsel_24kc/Packages.gz
Failed to establish connection
*** Failed to download the package list from http://openwrt-dist.sourceforge.net/packages/base/mipsel_24kc/Packages.gz

Downloading http://openwrt-dist.sourceforge.net/packages/luci/Packages.gz
Failed to establish connection
*** Failed to download the package list from http://openwrt-dist.sourceforge.net/packages/luci/Packages.gz
个人主观推测,有可能是GFW对openwrt-dist.sourceforge.net的访问进行的干扰。因此,你也可以直接访问https://dl.bintray.com/aa65535/opkg/shadowsocks-libev/或者https://github.com/shadowsocks/openwrt-shadowsocks/releases下载最新的二进制版(binary)。当然,你也可以下载源代码来直接编译。
然后通过scp命令从本机将.ipa拷贝到路由器上,再通过opkg install shadowsocks-libev_3.2.5-1_mipsel_24kc.ipk完成安装。
配置Shadowsocks
配置文件
配置 /etc/shadowsocks.json ,格式如下:
{
    "server": "...",
    "server_port": 21122,
    "local_address": "0.0.0.0",
    "local_port": 1080,
    "password": "...",
    "method": "chacha20-ietf-poly1305",
    "mode": "tcp_and_udp",
    "fast_open": true
}
请自行修改好服务器IP、端口号、密码、加密方式。
新建执行文件
新建文件: /etc/init.d/shadowsocks :
#!/bin/sh /etc/rc.common

START=95

SERVICE_DAEMONIZE=1
CONFIG=/etc/shadowsocks.json
DNS=8.8.8.8:53
TUNNEL_PORT=5353

start() {
	# 由于在每次路由器重启后,ipset都会被清空,因而创建一个 iphash 类型的 set, the equivalent command is ipset create gfwlist hash:ip
	ipset -N gfwlist iphash
	iptables -t nat -A PREROUTING -p tcp -m set --match-set gfwlist dst -j REDIRECT --to-port 1080
	iptables -t nat -A OUTPUT -p tcp -m set --match-set gfwlist dst -j REDIRECT --to-port 1080
	iptables -t nat -A OUTPUT -p udp --dport 443 -j REDIRECT --to-ports 1080
	iptables -t nat -A PREROUTING -p udp --dport 443 -j REDIRECT --to-ports 1080

	# Proxy Mode
	service_start /usr/bin/ss-redir -c $CONFIG -b 0.0.0.0 -u
	# Tunnel
	service_start /usr/bin/ss-tunnel -c $CONFIG -b 0.0.0.0 -u -l $TUNNEL_PORT -L $DNS
}

stop() {
  # Solve "Set cannot be destroyed: it is in use by a kernel component"
	service firewall stop
	ipset destroy gfwlist

	# Proxy Mode
	service_stop /usr/bin/ss-redir
	# Tunnel
	service_stop /usr/bin/ss-tunnel

	# Restart the firewall
	service firewall start
}
修改文件权限:
$ chmod +x /etc/init.d/shadowsocks
然后启动shadowsocks,并设置开机运行:
$ /etc/init.d/shadowsocks enable
$ /etc/init.d/shadowsocks start
最后检查一下是否正常启动了:
$ netstat -lnp | grep ss-redir
如果未能正确启动,尝试手动执行,看看报什么错:
$ ss-redir -c /etc/shadowsocks.json -b 0.0.0.0 -v
开启 TCP Fast Open (TCP快速打开,缩略为TFO)
要求: 系统内核版本≥3.7,shadowsocks-libev≥3.0.4,shadowsocks服务端开启tcp fast open。
通过echo "net.ipv4.tcp_fastopen = 3" > /etc/sysctl.conf修改 /etc/sysctl.conf ,以加入如下一行:
net.ipv4.tcp_fastopen = 3
执行如下命令使之生效:
$ sysctl -p
TCP Fast Open
What is TFO?
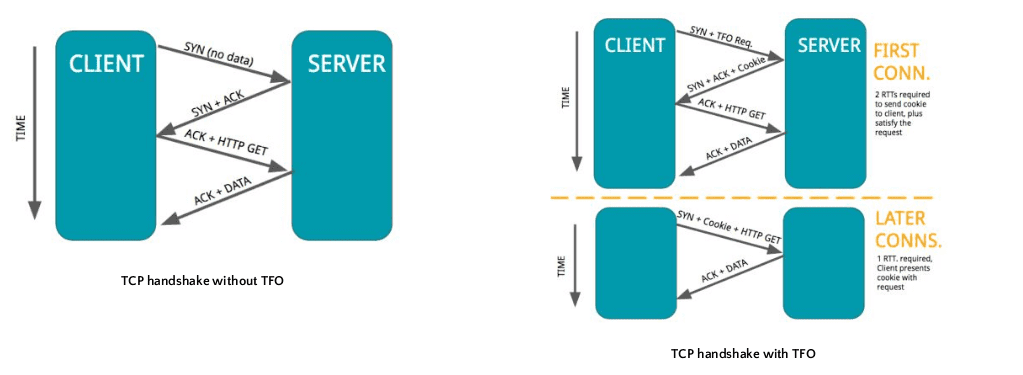
TFO stands for *TCP Fast Open*. It is a transport layer solution for avoiding one full RTT between client and server. It avoids TCP-3 way handshake for repeated connections. TFO is proposed by a team from Google and described in RFC 7413.
In a normal TCP connection, one RTT wastes in connection establishments then from the third packet onwards the real communication starts. TFO says that the client can send GET requests in the first packet itself without wasting 1 RTT. But there are some conditions for doing that:
- It must not be a ‘new’ connection
- TFO works only for repeat connections because of the requirement of a cryptographic cookie. For the first time when the client interacts with the server then it has to perform 3 way handshake. In that handshake, the server shares a cryptographic cookie with the client. For the next connection onwards, the client just piggybacks the GET request and cookie in the SYN packet itself. Then server authenticates the client using a cookie accepts the connection request and sends the data in the ACK packet.
- The total amount of data piggybacked with the SYN packet must be within specified limits.
- What is the specified limit? A total of 1460 bytes can be piggybacked into the packet for IPv4. Therefore, the size of one segment becomes 1460 B.
- Only certain types of HTTP requests can be sent using TFO
- GET request is supported. TFO does not support POST requests because if it allows writing operations on the server then hackers can perform malicious activities which can cause severe harm to the server.
Working of TFO
TCP Client and Server both must support TFO in order to use it. Now the question arises how do the client and server let each other know that they support TFO? The answer lies in the TCP header.
The ‘Options’ field in the TCP header is used for TFO.
- TCP Client uses it for requesting a TFO Cookie
- TCP Server uses it for sending a TFO Cookie
In the options field, the *Kind* variable stores a value of 34 for the cookie. The length of the cookie is 16 bytes. When a client sends the SYN packet to the server then it sets the Kind = 34 in the options field. When the server sees the kind value equal to 34 it understands that client supports TFO and requests for cookies. The server generates a unique cookie and encrypts it using the IP address of the client so that each client has a unique cookie. In the options filed server sends the cookie to the client.
So, using the options field client and server let each other know that they support TFO and share cookies.
Look at the diagram carefully and observe the connection establishment with and without TFO.
配置ipset、iptables和dnsmasq-full
配置ipset和iptables
如果希望深入了解iptables,可以访问【Linux】iptables 防火墙。
在控制台输入以添加如下规则(–to-port后的1080是我设置的路由器提供shadowsocks服务的本地端口,你需要根据具体情况修改):
# 在ipset中建立一个名为gfwlist的ip哈希表
$ ipset -N gfwlist iphash

# 在 nat table 创建一个叫 SHADOWSOCKS 的 chain
$ iptables -t nat -N SHADOWSOCKS

# 若tcp请求位于gfwlist中的ip,则重定向到shadowsocks走代理
$ iptables -t nat -A PREROUTING -p tcp -m set --match-set gfwlist dst -j REDIRECT --to-port 1080
$ iptables -t nat -A OUTPUT -p tcp -m set --match-set gfwlist dst -j REDIRECT --to-port 1080
$ iptables -t nat -A OUTPUT -p udp --dport 443 -j REDIRECT --to-ports 1080
$ iptables -t nat -A PREROUTING -p udp --dport 443 -j REDIRECT --to-ports 1080

# x.x.x.x为shadowsocks服务器地址
$ iptables -t nat -A shadowsocks -d x.x.x.x -j RETURN

$ iptables -t nat -A shadowsocks -d 0.0.0.0/8 -j RETURN
$ iptables -t nat -A shadowsocks -d 10.0.0.0/8 -j RETURN
$ iptables -t nat -A shadowsocks -d 127.0.0.0/8 -j RETURN
$ iptables -t nat -A shadowsocks -d 169.254.0.0/16 -j RETURN
$ iptables -t nat -A shadowsocks -d 172.16.0.0/12 -j RETURN
$ iptables -t nat -A shadowsocks -d 192.168.0.0/16 -j RETURN
$ iptables -t nat -A shadowsocks -d 224.0.0.0/4 -j RETURN
$ iptables -t nat -A shadowsocks -d 240.0.0.0/4 -j RETURN
配置dnsmasq-full
执行
$ echo "conf-dir=/etc/dnsmasq.d" >> /etc/dnsmasq.conf
以在 /etc/dnsmasq.conf 的最后加入 conf-dir=/etc/dnsmasq.d
添加gfwlist
新建并进入目录 /etc/dnsmasq.d ,从 https://cokebar.github.io/gfwlist2dnsmasq/dnsmasq_gfwlist_ipset.conf 下载 dnsmasq_gfwlist_ipset.conf 后放入该目录。
cokebar大神写了一个将gfwlist转换成包含ipset的dnsmasq-full格式的工具(https://github.com/cokebar/gfwlist2dnsmasq)。
我们也可以根据自己的情况自行修改这个文件,格式如下:
#使用不受污染干扰的DNS解析该域名 可以将此IP改为自己使用的DNS服务器
server=/google.com/127.0.0.1#5353
#将解析出来的IP保存到名为gfwlist的ipset表中
ipset=/google.com/gfwlist
设置默认的DNS
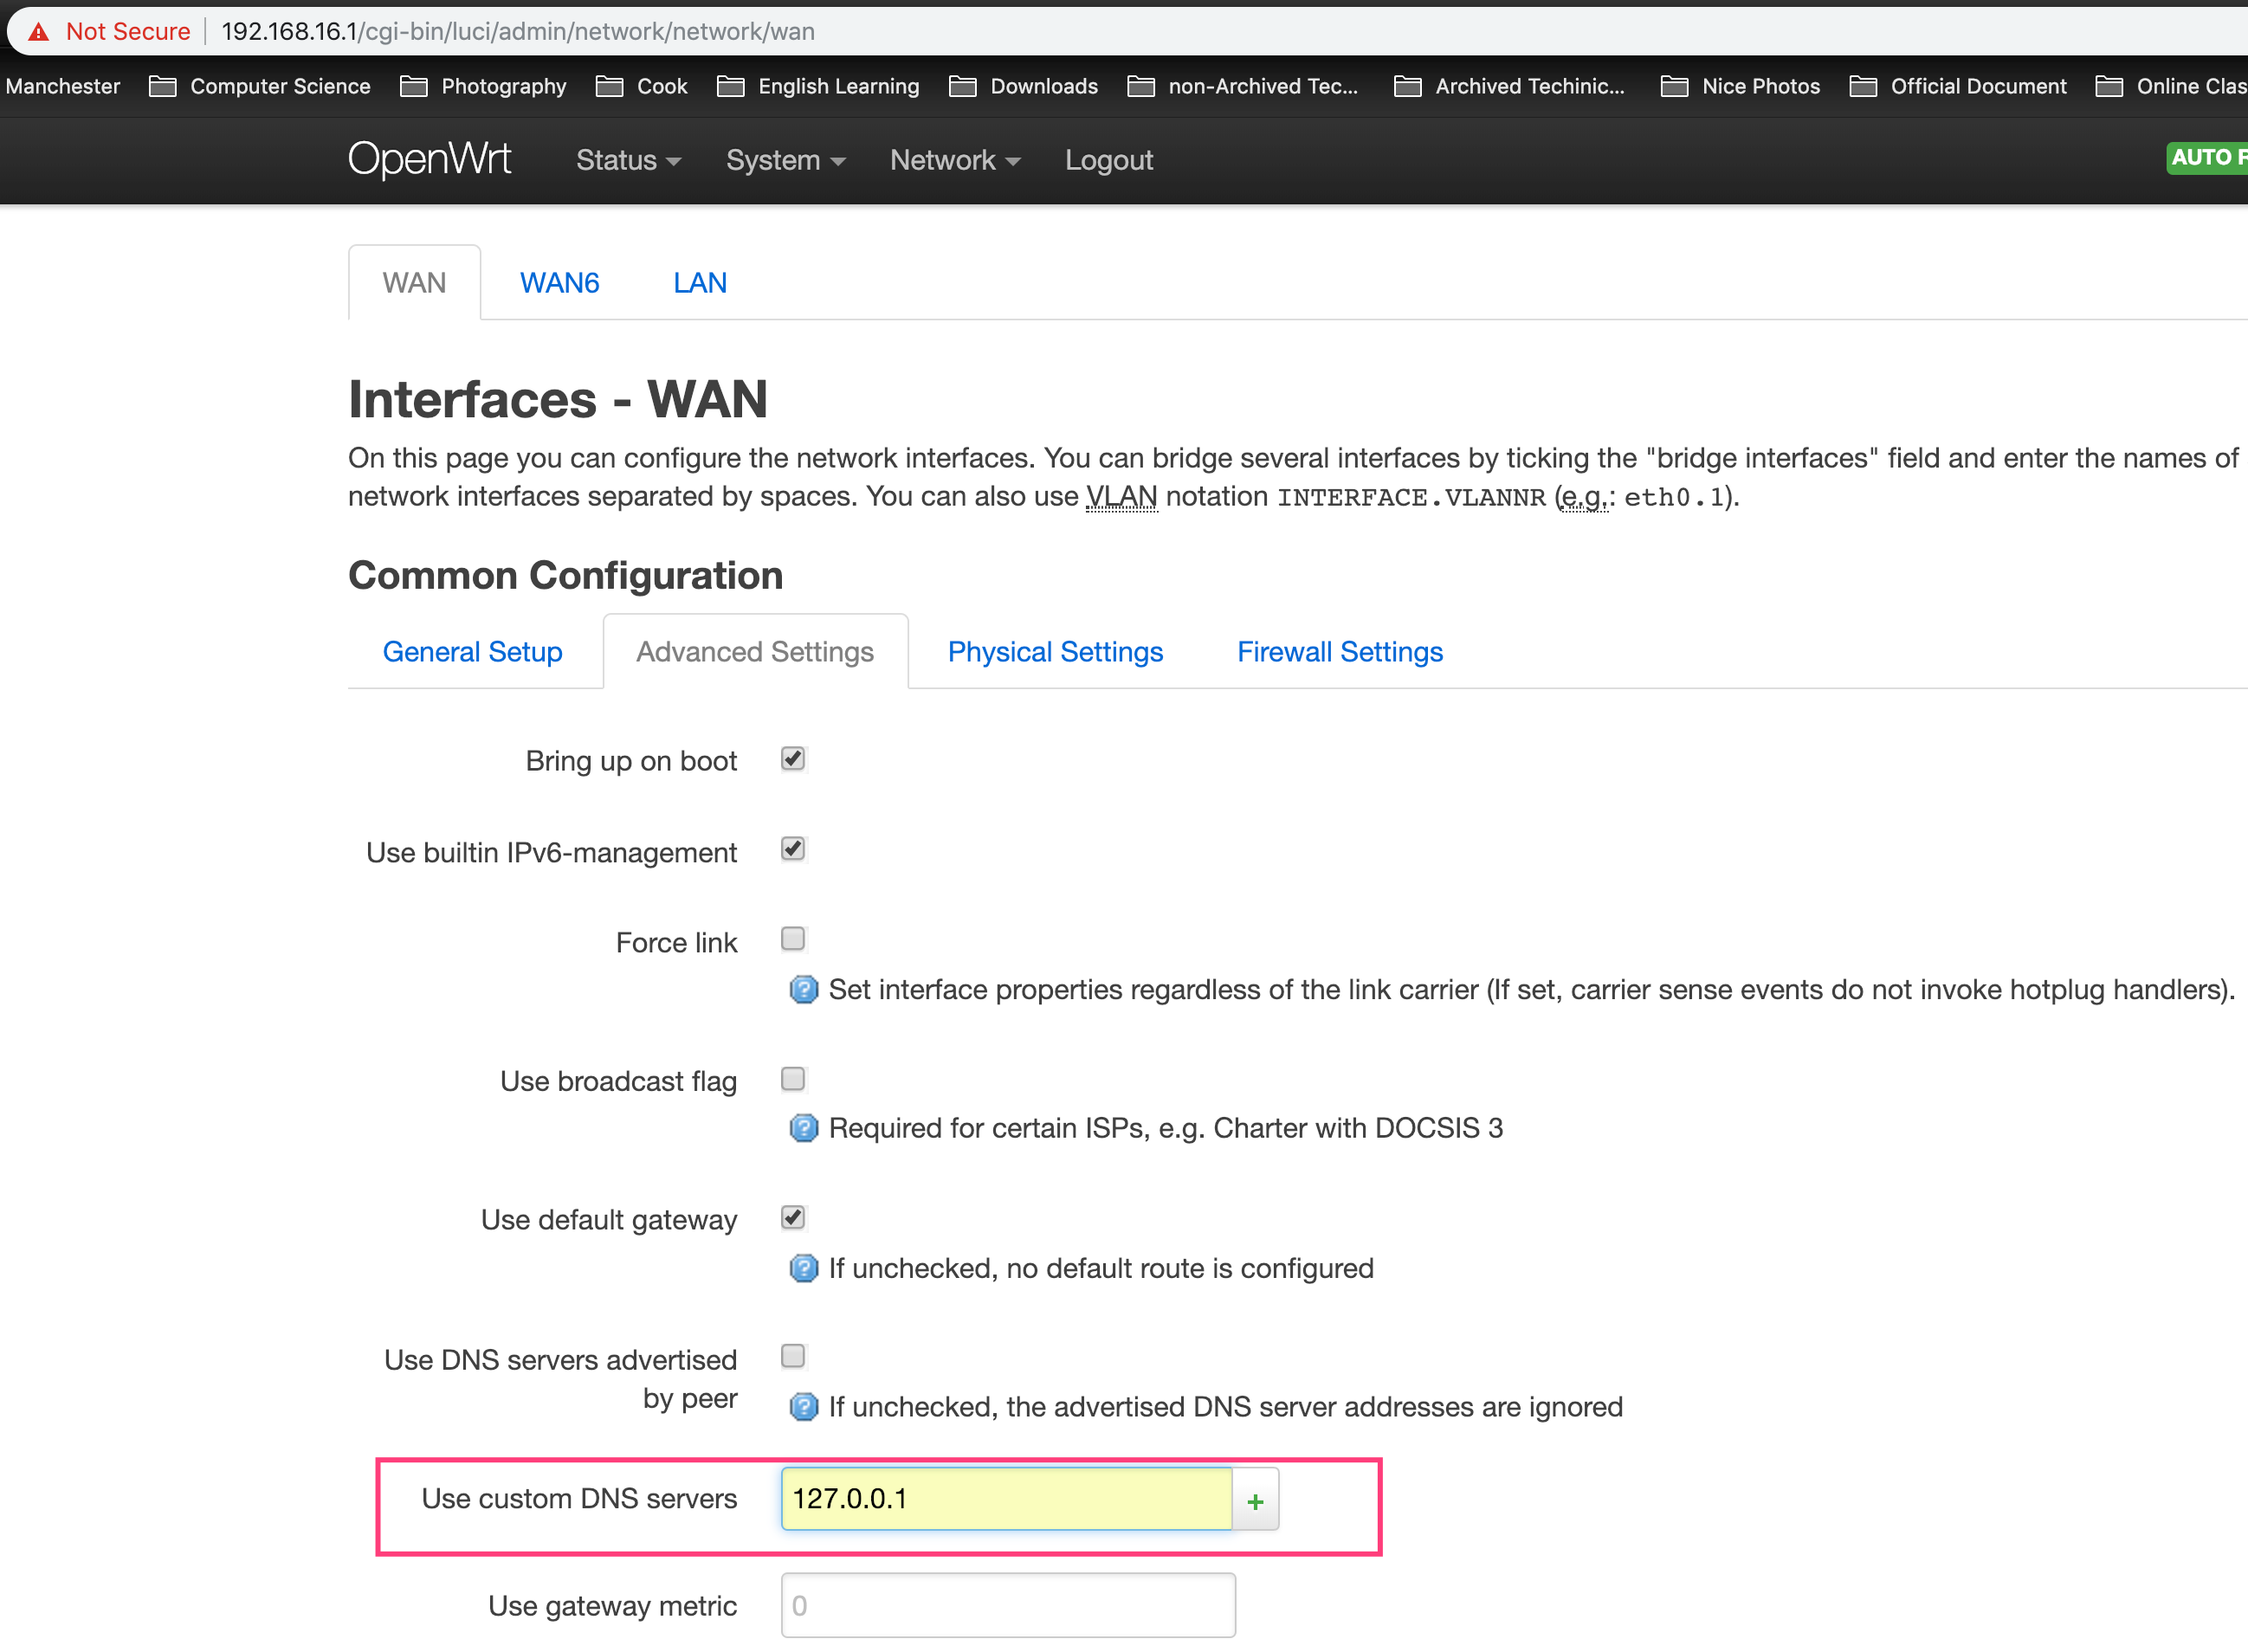
进入OpenWrt的GUI界面,进入[Network] - [Interfaces] - [WAN Edit],进入[Advanced Settings],修改Use custom DNS servers为127.0.0.1。
这意味着,连接该OpenWrt路由器的所有设备发出的DNS请求都会由该路由器的dnsmasq来响应(当然,前提是设备没有手动去修改默认的DNS服务器IP,而使用路由器默认提供的DNS服务器IP)。
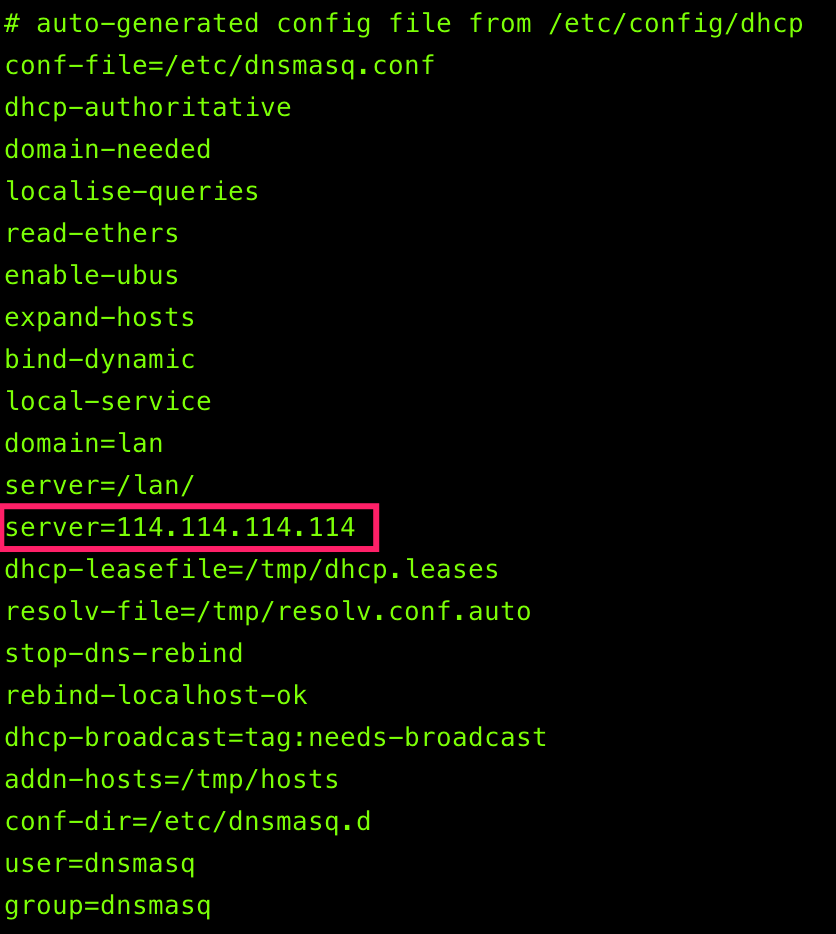
在[Network] - [DHCP and DNS]中,设置DNS forwardings为114.114.114.114。注意,此为路由器默认查询的DNS服务器,你可以根据你的实际情况选择一个较快的DNS服务器(在我的情况中,我认为114.114.114.114最快)。
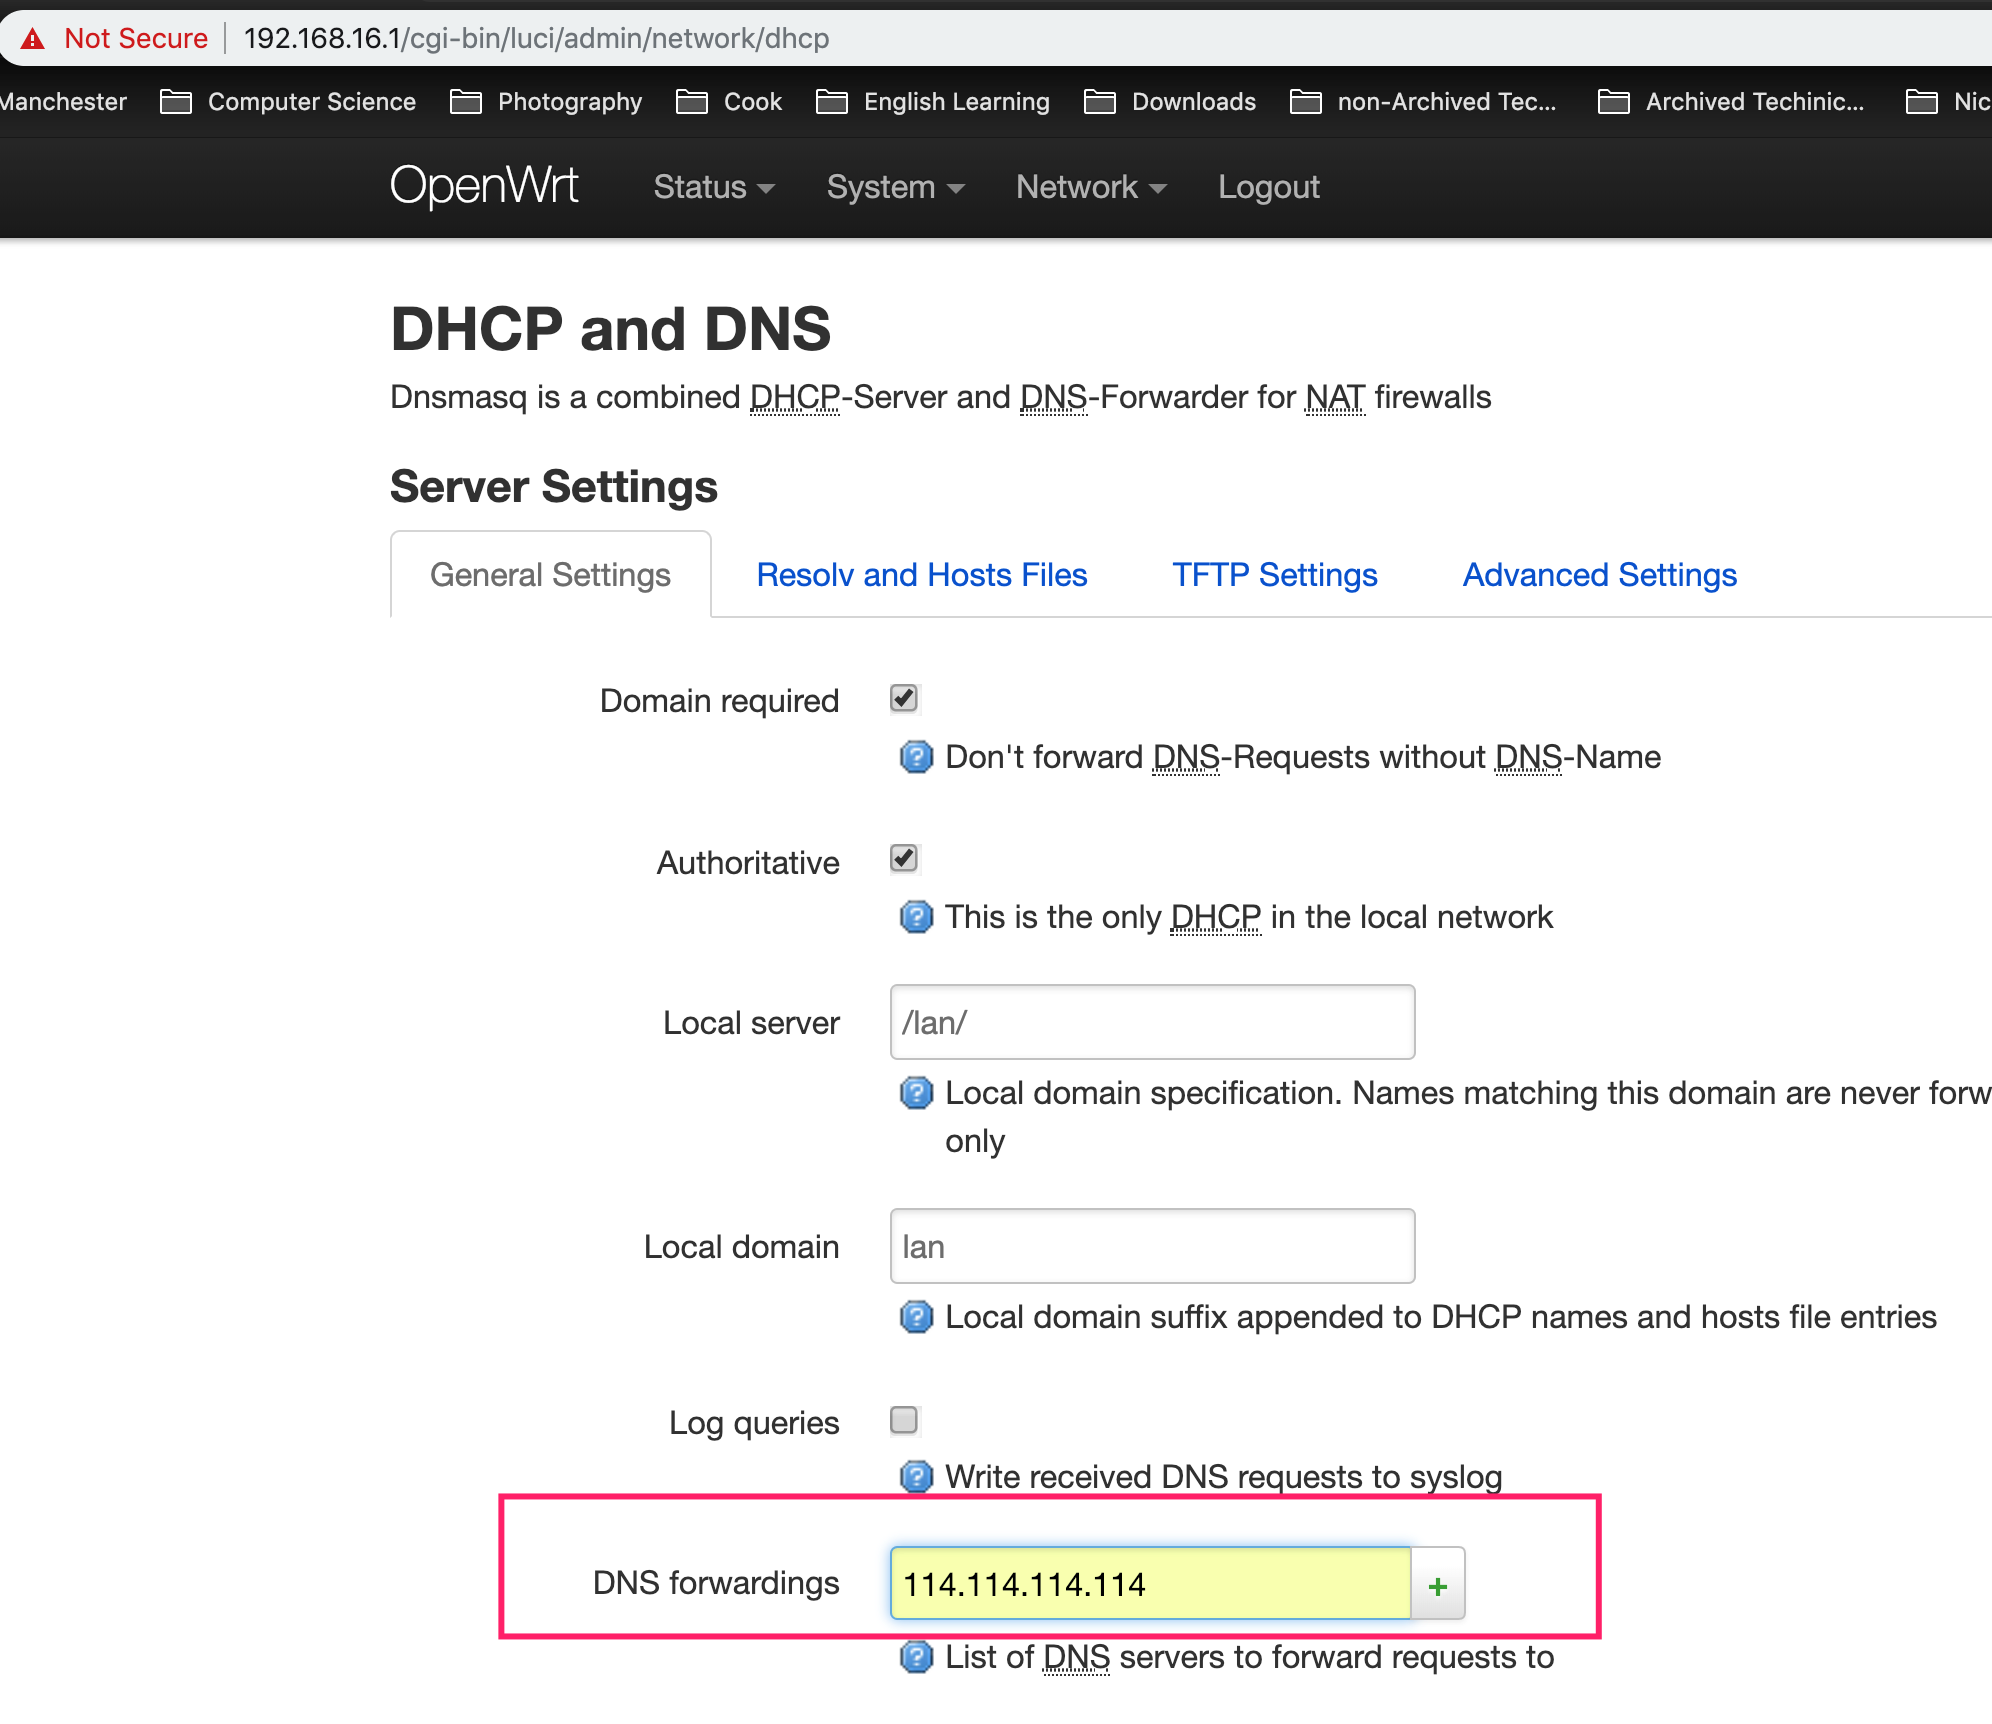
当这个配置修改生效后,通过 cat /var/etc/dnsmasq.conf.* 可以看到对应的 dnsmasq 的配置文件也发生了变化,如下图:
自动更新gfwlist
gfwlist2dnsmasq需要通过SSL下载gfwlist,而OpenWrt安装的busybox wget,并不支持SSL,因此我们需要安装libustream-mbedtls、 ca-certificates和ca-bundle。除此之外,gwflist使用BASE64编码,因此base64需要被安装:
$ opkg update
$ opkg install libustream-mbedtls coreutils-base64
$ opkg install ca-certificates ca-bundle
下载gfwlist2dnsmasq.sh:
$ wget https://raw.githubusercontent.com/cokebar/gfwlist2dnsmasq/master/gfwlist2dnsmasq.sh
为gfwlist2dnsmasq.sh增加执行权限:
$ chmod 777 /root/gfwlist2dnsmasq.sh
执行crontab –e建立一个定期执行任务,并将以下代码复制。
0 1 * * * sh /root/gfwlist2dnsmasq.sh -p 5353 -s gfwlist -o /root/dnsmasq_gfwlist_ipset_`date "+%Y-%m-%d"`.conf \
&& rm -rf /etc/dnsmasq.d/* \
&& cp /root/dnsmasq_gfwlist_ipset_`date "+%Y-%m-%d"`.conf /etc/dnsmasq.d/ \
&& /etc/init.d/dnsmasq restart
常见诊断
防火墙设置
- 使用
service firewall stop命令关闭服务器的防火墙排查是否防火墙挡住了请求。 - 使用
iptables -t nat -L -n查看nat表中的所有规则。
dnsmasq配置
dnsmasq --test 查看dnsmasq配置是否正确。
/etc/init.d/dnsmasq restart重启dnsmasq服务。
使用top查看当前dnsmasq是否启动,且正常使用的配置文件路径。由于默认情况下,Openwrt允许我们通过Luci在界面上配置dnsmasq,因此Luci会自动生成一个dnsmasq配置文件(默认位于/var/etc/dnsmasq.conf.*)。通过top可以看到这个生成的配置文件的准确路径

ipset
ipset list gfwlist查看ipset中我们定义的gfwlist中包含的所有记录。
Shadowsocks
Shadowsocks是否已经启动
检查ss是否正常运行netstat -anptl |grep ss|grep LISTEN:

Shadowsocks输出log
使用-v以让Shadowsocks记录log到指定文件:
$ /usr/bin/ss-redir -c /etc/shadowsocks.json -b 0.0.0.0 -u -v 1>>/var/log/ss-redir &
$ /usr/bin/ss-tunnel -c /etc/shadowsocks.json -b 0.0.0.0 -u -l 5353 -L 8.8.8.8:53 -v 1>>/var/log/ss-tunnel.log &
检查Shadowsocks中的ss-tunnel是否提供正确的DNS解析
你可以通过以下方式,在连接到Openwrt的主机上测试,是否可以正常通过ss-tunnel连接到Shadowsocks Server以获得未被污染的DNS解析结果:
首先在Openwrt上手动启动ss-tunnel:
$ /usr/bin/ss-tunnel -c /etc/shadowsocks.json -b 192.168.16.1 -u -l 5353 -L 8.8.8.8:53 -v 1>>/var/log/ss-tunnel.log &
在主机上向Openwrt上的ss-tunnel请求DNS解析服务,注意我的Openwrt IP为192.168.16.1,ss-tunnel运行在5353端口下,你要根据实际情况修改:
$ dig @192.168.16.1 -p 5353 www.google.com
以下是ss-tunnel的日志:
 2019-06-19 10:45:00 INFO: initializing ciphers... chacha20-ietf-poly1305
 2019-06-19 10:45:00 INFO: listening at 192.168.16.1:5353
 2019-06-19 10:45:00 INFO: UDP relay enabled
 2019-06-19 10:45:04 INFO: [udp] server receive a packet
 2019-06-19 10:45:04 INFO: [53] [udp] cache miss: 8.8.8.8:53 <-> 192.168.16.222:49491
 2019-06-19 10:45:09 INFO: [udp] server receive a packet
 2019-06-19 10:45:09 INFO: [53] [udp] cache hit: 8.8.8.8:53 <-> 192.168.16.222:49491
 2019-06-19 10:45:14 INFO: [udp] server receive a packet
 2019-06-19 10:45:14 INFO: [53] [udp] cache hit: 8.8.8.8:53 <-> 192.168.16.222:49491
DNS配置
增加以下内容到/etc/dnsmasq.conf的尾部:
# For debugging purposes, log each DNS query as it passes through dnsmasq.
log-queries

# Log to this syslog facility or file. (defaults to DAEMON)
log-facility=/var/log/dnsmasq.log
重启dnsmasq:
$ /etc/init.d/dnsmasq restart
使用以下命令可以实时查看dnsmasq的工作日志:
$ tail -f /var/log/dnsmasq.log
Openwrt的dig安装
$ opkg update
$ opkg install bind-dig
$ dig baidu.com
可用于检测当前路由器上的DNS服务是否正常。
shadowsocks测速
https://lvii.gitbooks.io/outman/content/speed_test.html
Reference
- Shaowsocks + GfwList 实现 OpenWRT / LEDE 路由器自动翻墙 - https://cokebar.info/archives/962
- https://github.com/softwaredownload/openwrt-fanqiang
- OpenWrt-dist - http://openwrt-dist.sourceforge.net/
- OpenWrt Xiaomi Mi WiFi Mini - https://openwrt.org/toh/xiaomi/mini
- 安装dnsmasq-full的时候先卸载了openwrt自带的dnsmasq,一直连接不上 - https://github.com/bettermanbao/openwrt-shadowsocksR-libev-full/issues/20