Achievement
Step by step guide to deploy your Hugo website to Amazon Web Services using:
- a private S3 bucket
- Cloudfront CDN
- SSL certificates (URLs with HTTPS)
- accessing a URL with WWW will redirect us to its non-WWW version, e.g.: https://www.example.com -> https://example.com
- accessing a URL with HTTP will redirect to its HTTPS version, e.g.: http://example.com -> https://example.com
- URLs can only be accessed through Cloudfront’s CDN, there is no direct access to the S3 bucket objects. For example, for the /sitemap.xml object:
- https://s3.amazonaws.com/example.com/sitemap.xml -> Code: AccessDenied
- https://example.com/sitemap.xml
- handling pretty URLs (no .html in URLs)
- Accessing a non existing page, will load Hugo’s custom error /404.html with 404 HTTP status.
Knowledge
AWS Route S3
Amazon S3 does not support HTTPS access to the website. If you want to use HTTPS, you can use Amazon CloudFront to serve a static website hosted on Amazon S3.
AWS CloudFront
Create a CloudFront Distribution(Set up Your CDN)
CDN for example.com
Using Cloudfront we use their CDN, enforce only access the bucket throught Cloudfront and HTTPS usage, and handle pretty URLs in combination with a Lambda Edge function.
-
Click Create distribution
-
In the Delivery method for your content page, select the Web/Get Started button
-
Enter ONLY the following data:
- in the Origin Settings section, for Origin Domain Name, enter the Amazon S3 website endpoint for your bucket, for example,
example.com.s3-website.us-west-1.amazonaws.com. - Restrict Bucket Access: Select
Yes; more options will appear- Origin Access Identity: Select or create an Access Identity
- Grant Read Permissions on Bucket: Select Yes, Update Bucket Policy so Amazon automatically handle your S3 bucket permissions
- In Default Cache Behavior Settings section:
- *Viewer Protocol Policy: Select
Redirect HTTP to HTTPS - Compress objects automatically: Select
Yesto Compress Content when possible
- *Viewer Protocol Policy: Select
- In Distribution Settings section:
- Leave Price Class set to Use All Edge Locations (Best Performance).
- Alternate Domain Names (CNAMEs): enter
example.com.
- In Default Root Object:
index.html. - SSL Certificate
- Select Custom SSL Certificate (example.com)
- And press the
Request or Import a Certificate with ACMbutton.- You will be redirected to
AWS Certificate Managerto create a new certificate, in this page add the two domain names:example.comwww.example.com- Then click
Nextand validate your certificate.
- You will be redirected to
- And press the
- After you have the certificate, go back to Cloudfront settings page and select your newly created certificate from the list at Distribution Settings/SSL Certificate/Custom SSL Certificate.
- Select Custom SSL Certificate (example.com)
- in the Origin Settings section, for Origin Domain Name, enter the Amazon S3 website endpoint for your bucket, for example,
-
Click Create distribution at the bottom of the page
-
Make CloudFront able to access to your S3 bucket by going to the Origins and Origin Group tab, edit the existing origin, in Grant Read Permissions on Bucket select Yes, Update Bucket Policy, and save changes, it will automatically generate the following policy:
{
    "Version": "2008-10-17",
    "Id": "PolicyForCloudFrontPrivateContent",
    "Statement": [
        {
            "Sid": "1",
            "Effect": "Allow",
            "Principal": {
                "AWS": "arn:aws:iam::cloudfront:user/CloudFront Origin Access Identity ..."
            },
            "Action": "s3:GetObject",
            "Resource": "arn:aws:s3:::example.com/*"
        }
    ]
}
Now when you visit the S3 Bucket Policy tab, it will be already generated with the values for your bucket.
This is a very important step or you will get a 404 error page when trying to access your site because CloudFront won’t be able to read your files, read more about it at Granting Permission to an Amazon CloudFront Origin Identity
CDN for www.example.com
Create another distribution for the www.example.com:
- Go to https://console.aws.amazon.com/cloudfront/
- Click Create distribution
- In the Delivery method for your content page, select the Web/Get Started button
- Enter ONLY the following data:
- Origin Domain Name: Click inside the text input and a list of your buckets will appear, select www.example.com.s3.amazonaws.com.
- In Default Cache Behavior Settings section:
- *Viewer Protocol Policy: Select
Redirect HTTP to HTTPS
- *Viewer Protocol Policy: Select
- In Distribution Settings section:
- Alternate Domain Names (CNAMEs): enter
www.example.com.
- Alternate Domain Names (CNAMEs): enter
- SSL Certificate:
- Select Custom SSL Certificate (example.com)
- Select your previously created certificate from the list at the Custom SSL Certificate input box.
- Select Custom SSL Certificate (example.com)
- Click Create distribution at the bottom of the page
Set up DNS via AWS S3
Now that you have successfully created a CloudFront distribution, update the alias record in Route 53 to point to the new CloudFront distribution.
配置example.com
- Go to your hosted zones in Route53 console
https://console.aws.amazon.com/route53/home?#hosted-zones: - Click Create Hosted Zone button and enter
example.com, point your domain to Route 53 DNS servers showed at Record Set NS type list. - Click Create Record Set button.
- Leave Name empty so we are setting up
example.com.. - Select Type:
A - IPv4 address - Select Alias: Yes
- In Alias target, select the example.com Cloudfront distribution
- Click Save record set
- Update your DNS nameservers (set by your domain provider) to point to the new name servers.
即将在AWS Route 53中显示的 type 为 NS 的值(即,在你的域名商网站那里,你需要配置你的domain 的Nameservers为这些)
dig 一下,直到确认 DNS Record 被成功更新了
配置 www.example.com
Now we create another one for the www version:
- Click Create Hosted Zone button and enter
example.com. - Click Create Record Set button.
- Enter Name:
www - Select Type:
A - IPv4 address - Select Alias: Yes
- In Alias target, select the
www.example.comCloudfront distribution.
- In Alias target, select the
- Click Save record set
Handle Simple URLs (such as www.example.com/about/ instead of www.example.com/about/index.html)
Background
Hugo by default generates web pages like <content-title>/index.html at its /public directory.
The default root object feature for CloudFront supports only the root of the origin that your distribution points to (such as http://www.example.com > http://www.example.com/index.html).
However, CloudFront does not return default root objects in subdirectories (such as http://www.example.com/about/). If you were to attempt to request this URL through CloudFront, CloudFront would do a S3 GetObject API call against a key that does not exist.
Of course, it is a bad user experience to expect users to always type index.html at the end of every URL (or even know that it should be there). Until now, there has not been an easy way to provide these simpler URLs (equivalent to the DirectoryIndex Directive in an Apache Web Server configuration) to users through CloudFront. Not if you still want to be able to restrict access to the S3 origin using an OAI. However, with the release of Lambda@Edge, you can use a JavaScript function running on the CloudFront edge nodes to look for these patterns and request the appropriate object key from the S3 origin.
To assign a default root object for your CloudFront distribution, be sure to upload the object to the origin that your distribution points to.
Docs at Why isn’t Amazon CloudFront returning my default root object from a subdirectory?
As we have our S3 bucket private, accessing a webpage like example.com/hello/ won’t request our example.com/hello/index.html. To handle this we use a Lambda@Edge function.
Solution
Solution 1 - Use a template Lambda@Edge Function
We use the function standard-redirects-for-cloudfront, to install it via the Serverless Application Repository:
-
Press the Deploy button to use the application standard-redirects-for-cloudfront.
-
It opens a description of the app, hit Deploy again to finish deploying it.
-
After it has been created, locate the button View CloudFormation stack or go directly to the Cloudformation Console

-
In the Resources tab, locate the AWS::IAM::Role and open the Physical ID, it will open up the IAM console
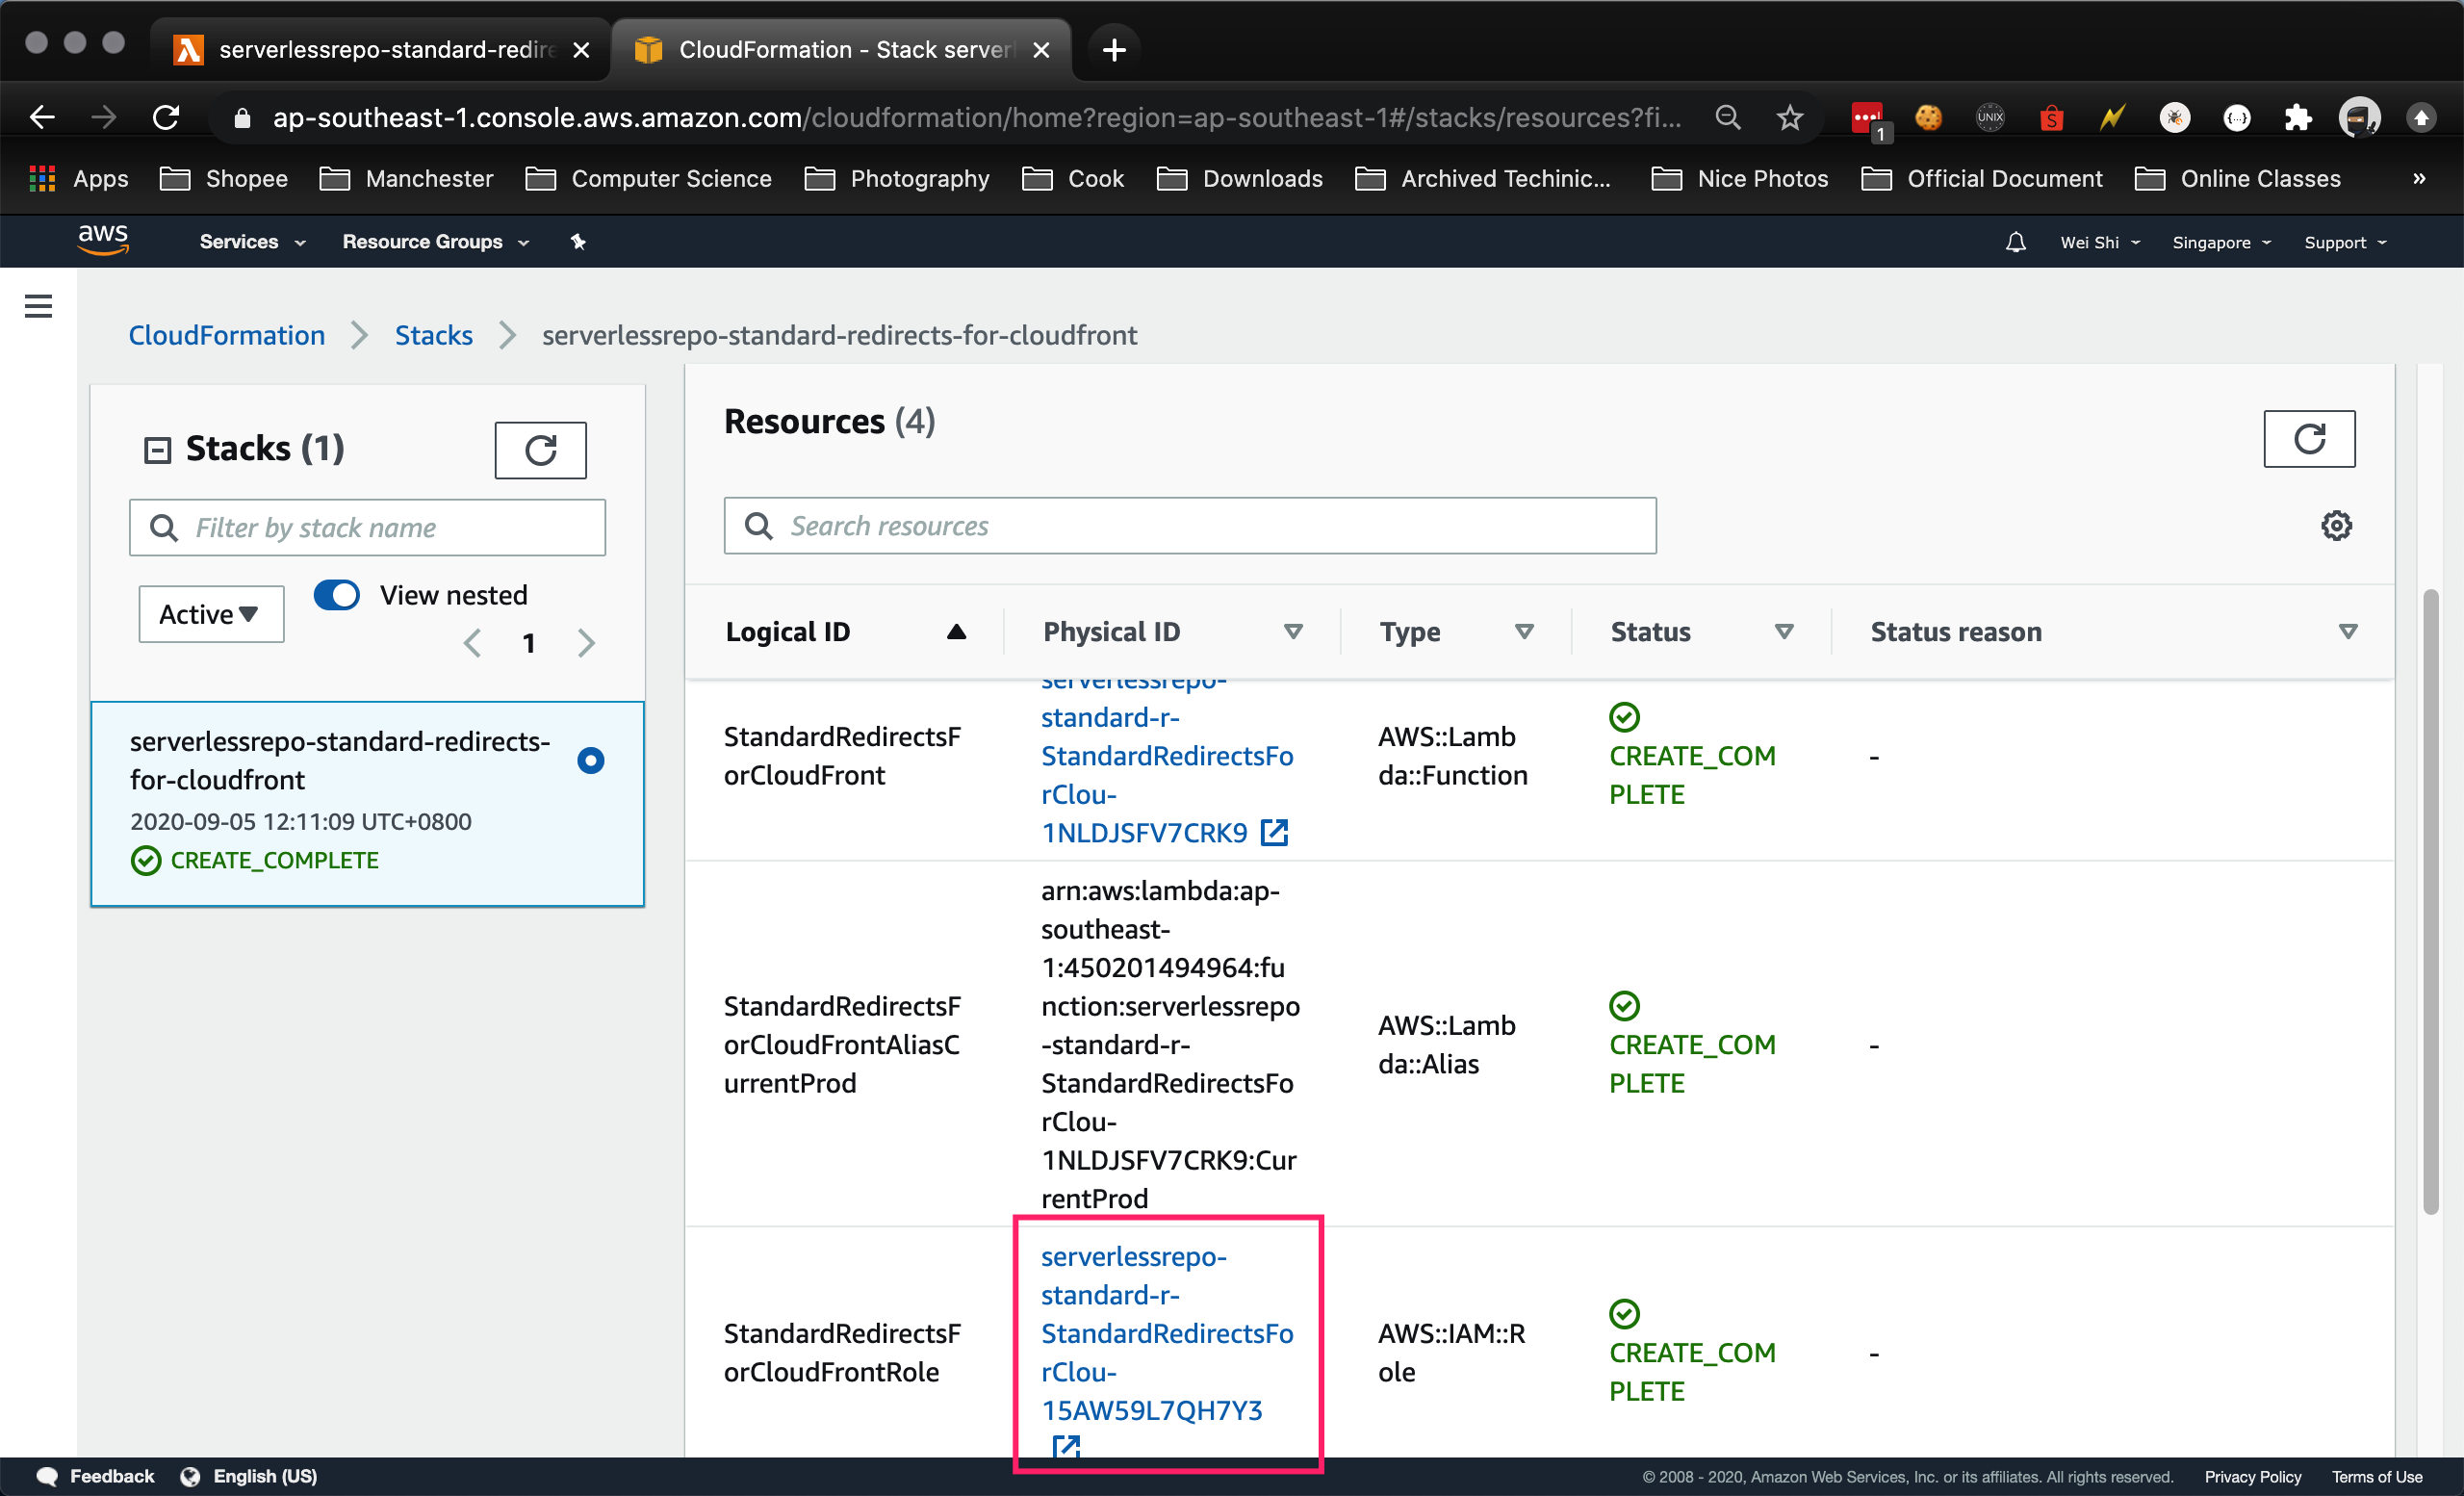
-
Go to Trust Relationship tab and choose Edit the trust relationship to allow CloudFront to execute this function as a Lambda@Edge function. (by adding
"edgelambda.amazonaws.com"), set the policy to:{ "Version": "2012-10-17", "Statement": [ { "Effect": "Allow", "Principal": { "Service": [ "lambda.amazonaws.com", "edgelambda.amazonaws.com" ] }, "Action": "sts:AssumeRole" } ] } -
Go back to the Cloudformation’s Stack Detail page and in the Output tab, locate the key StandardRedirectsForCloudFrontVersionOutput and note down its Value (it will look something like:
arn:aws:lambda:us-east-1:XXXXXXXXXXX:function:aws-serverless-repository-StandardRedirectsForClou-XXXXXXXXXXXX:2). We will use it in the next steps as this is the ARN (Amazon Resource Name) for the Lambda function that we will use in Cloudfront.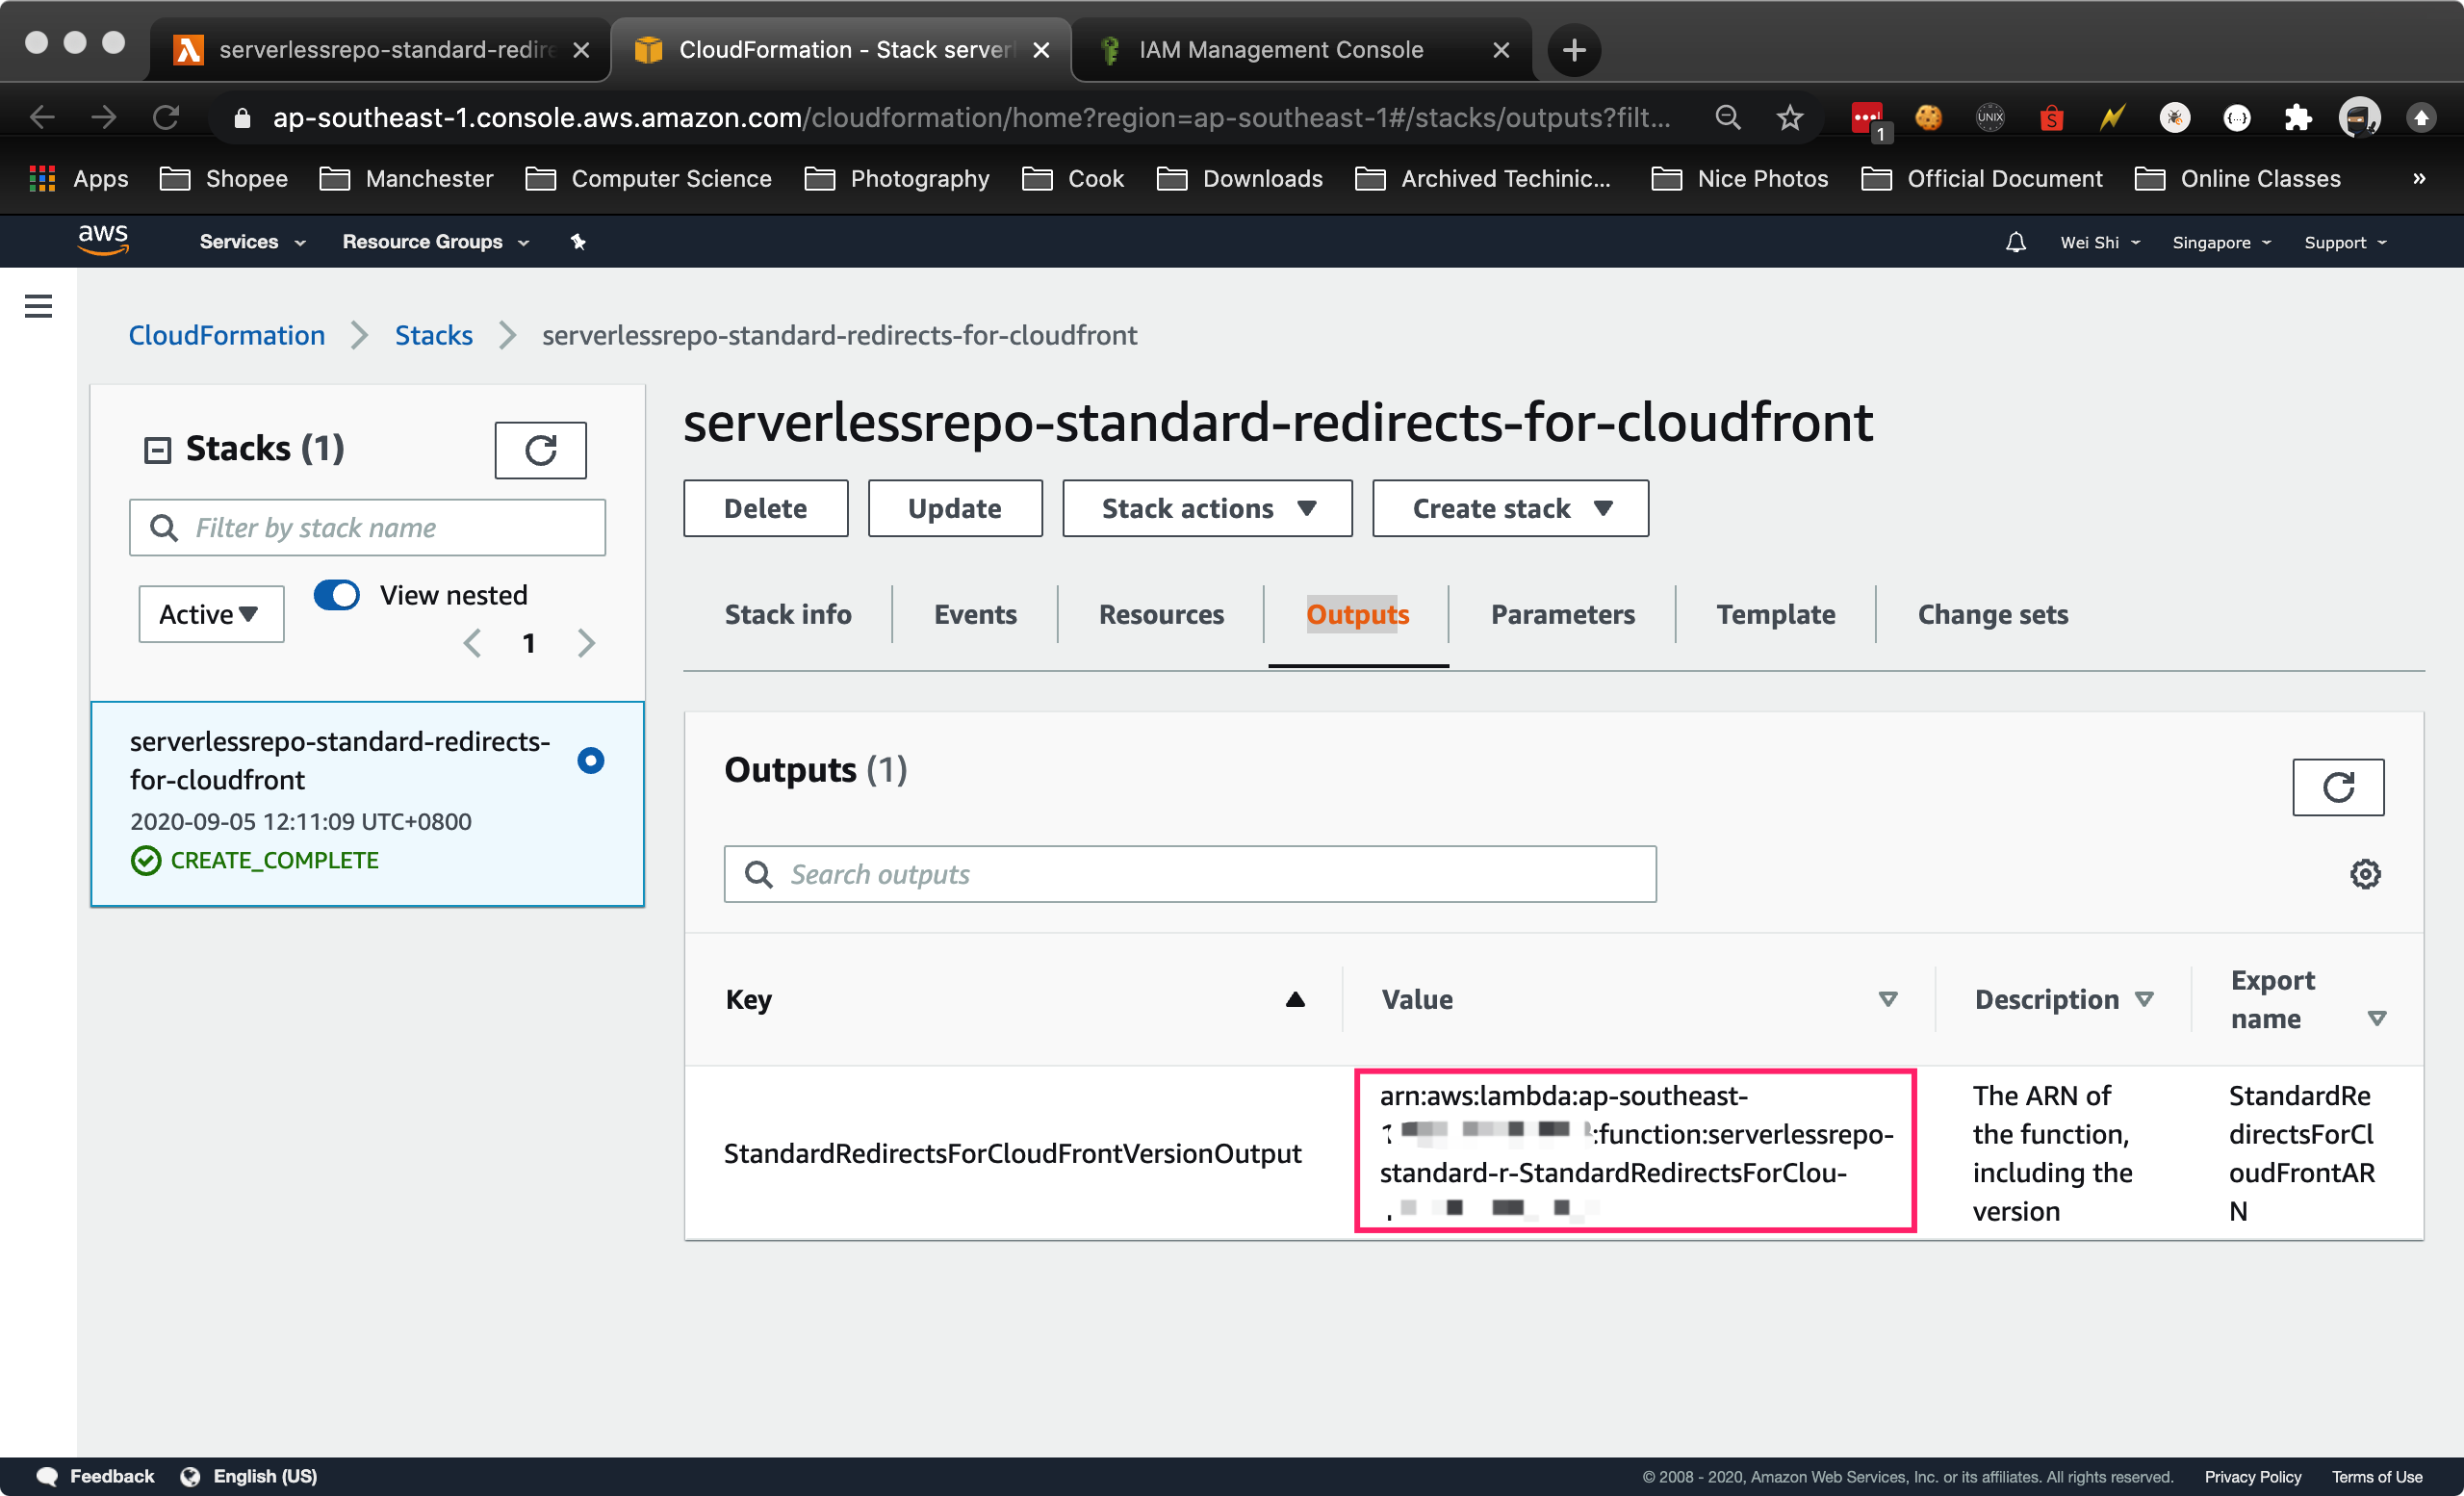
-
Go back to the CloudFront console, select the
example.comdistribution -
Go to the Behaviour tab and edit the default Behavior.
-
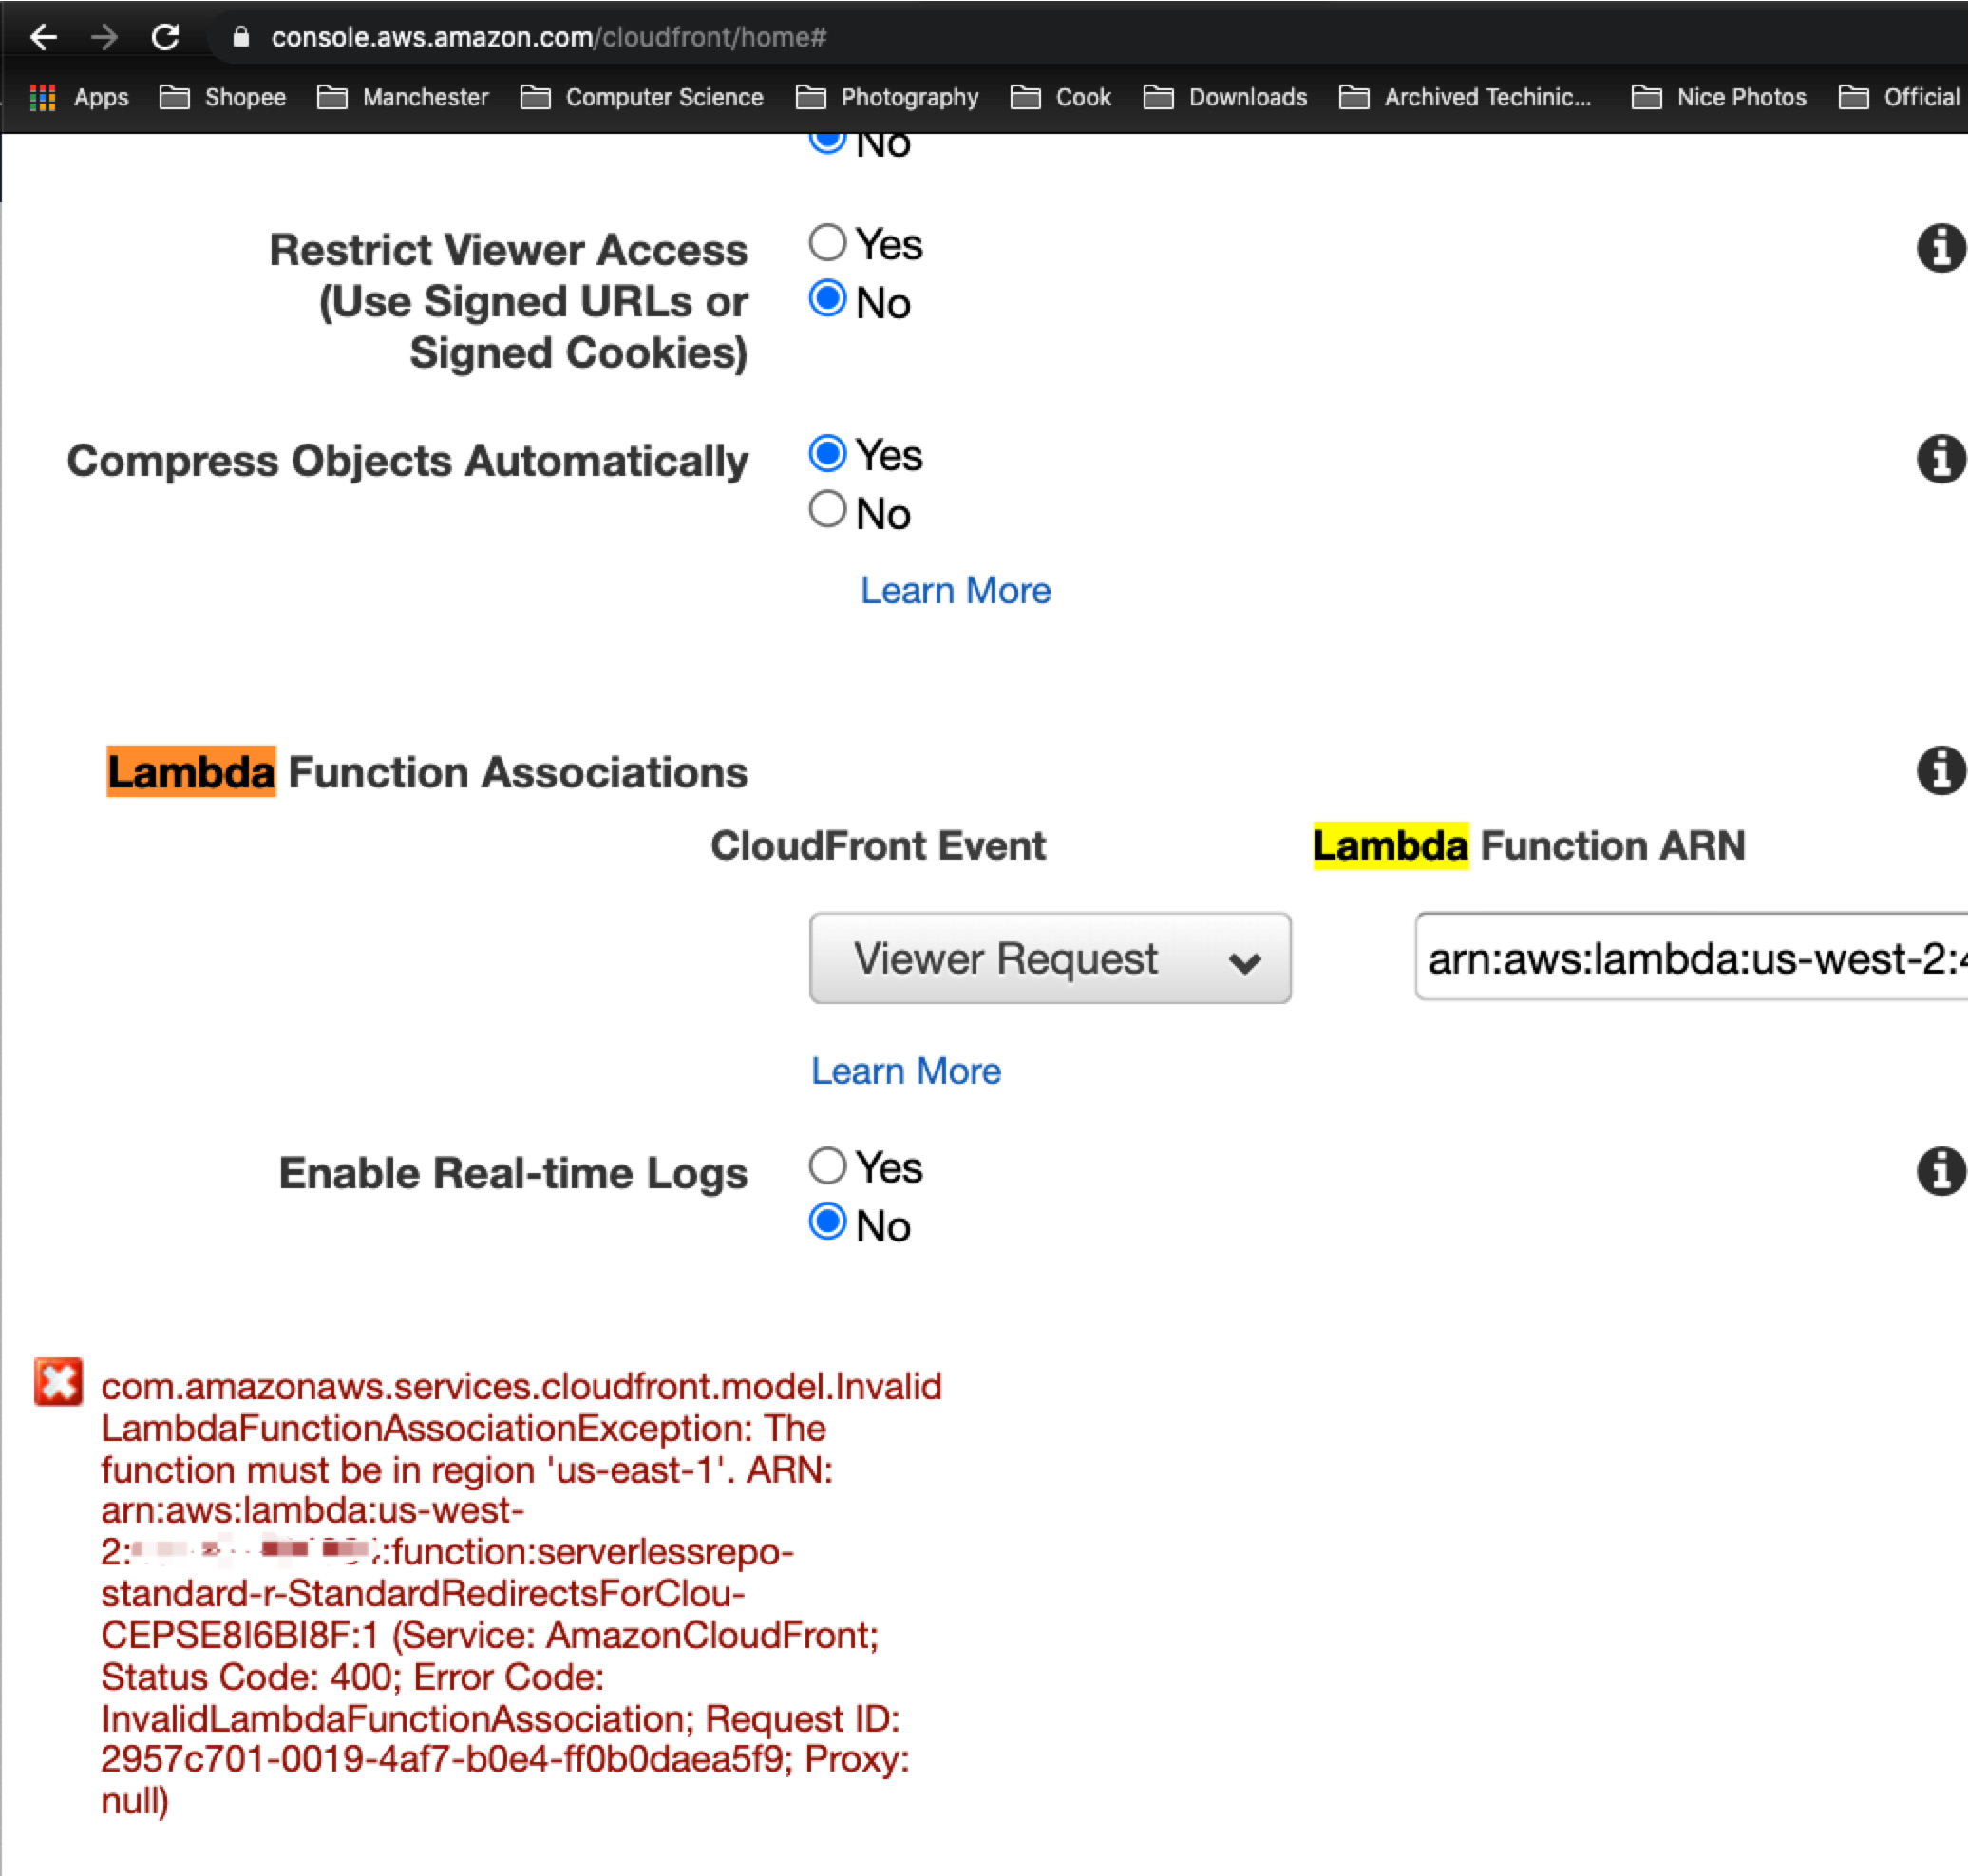
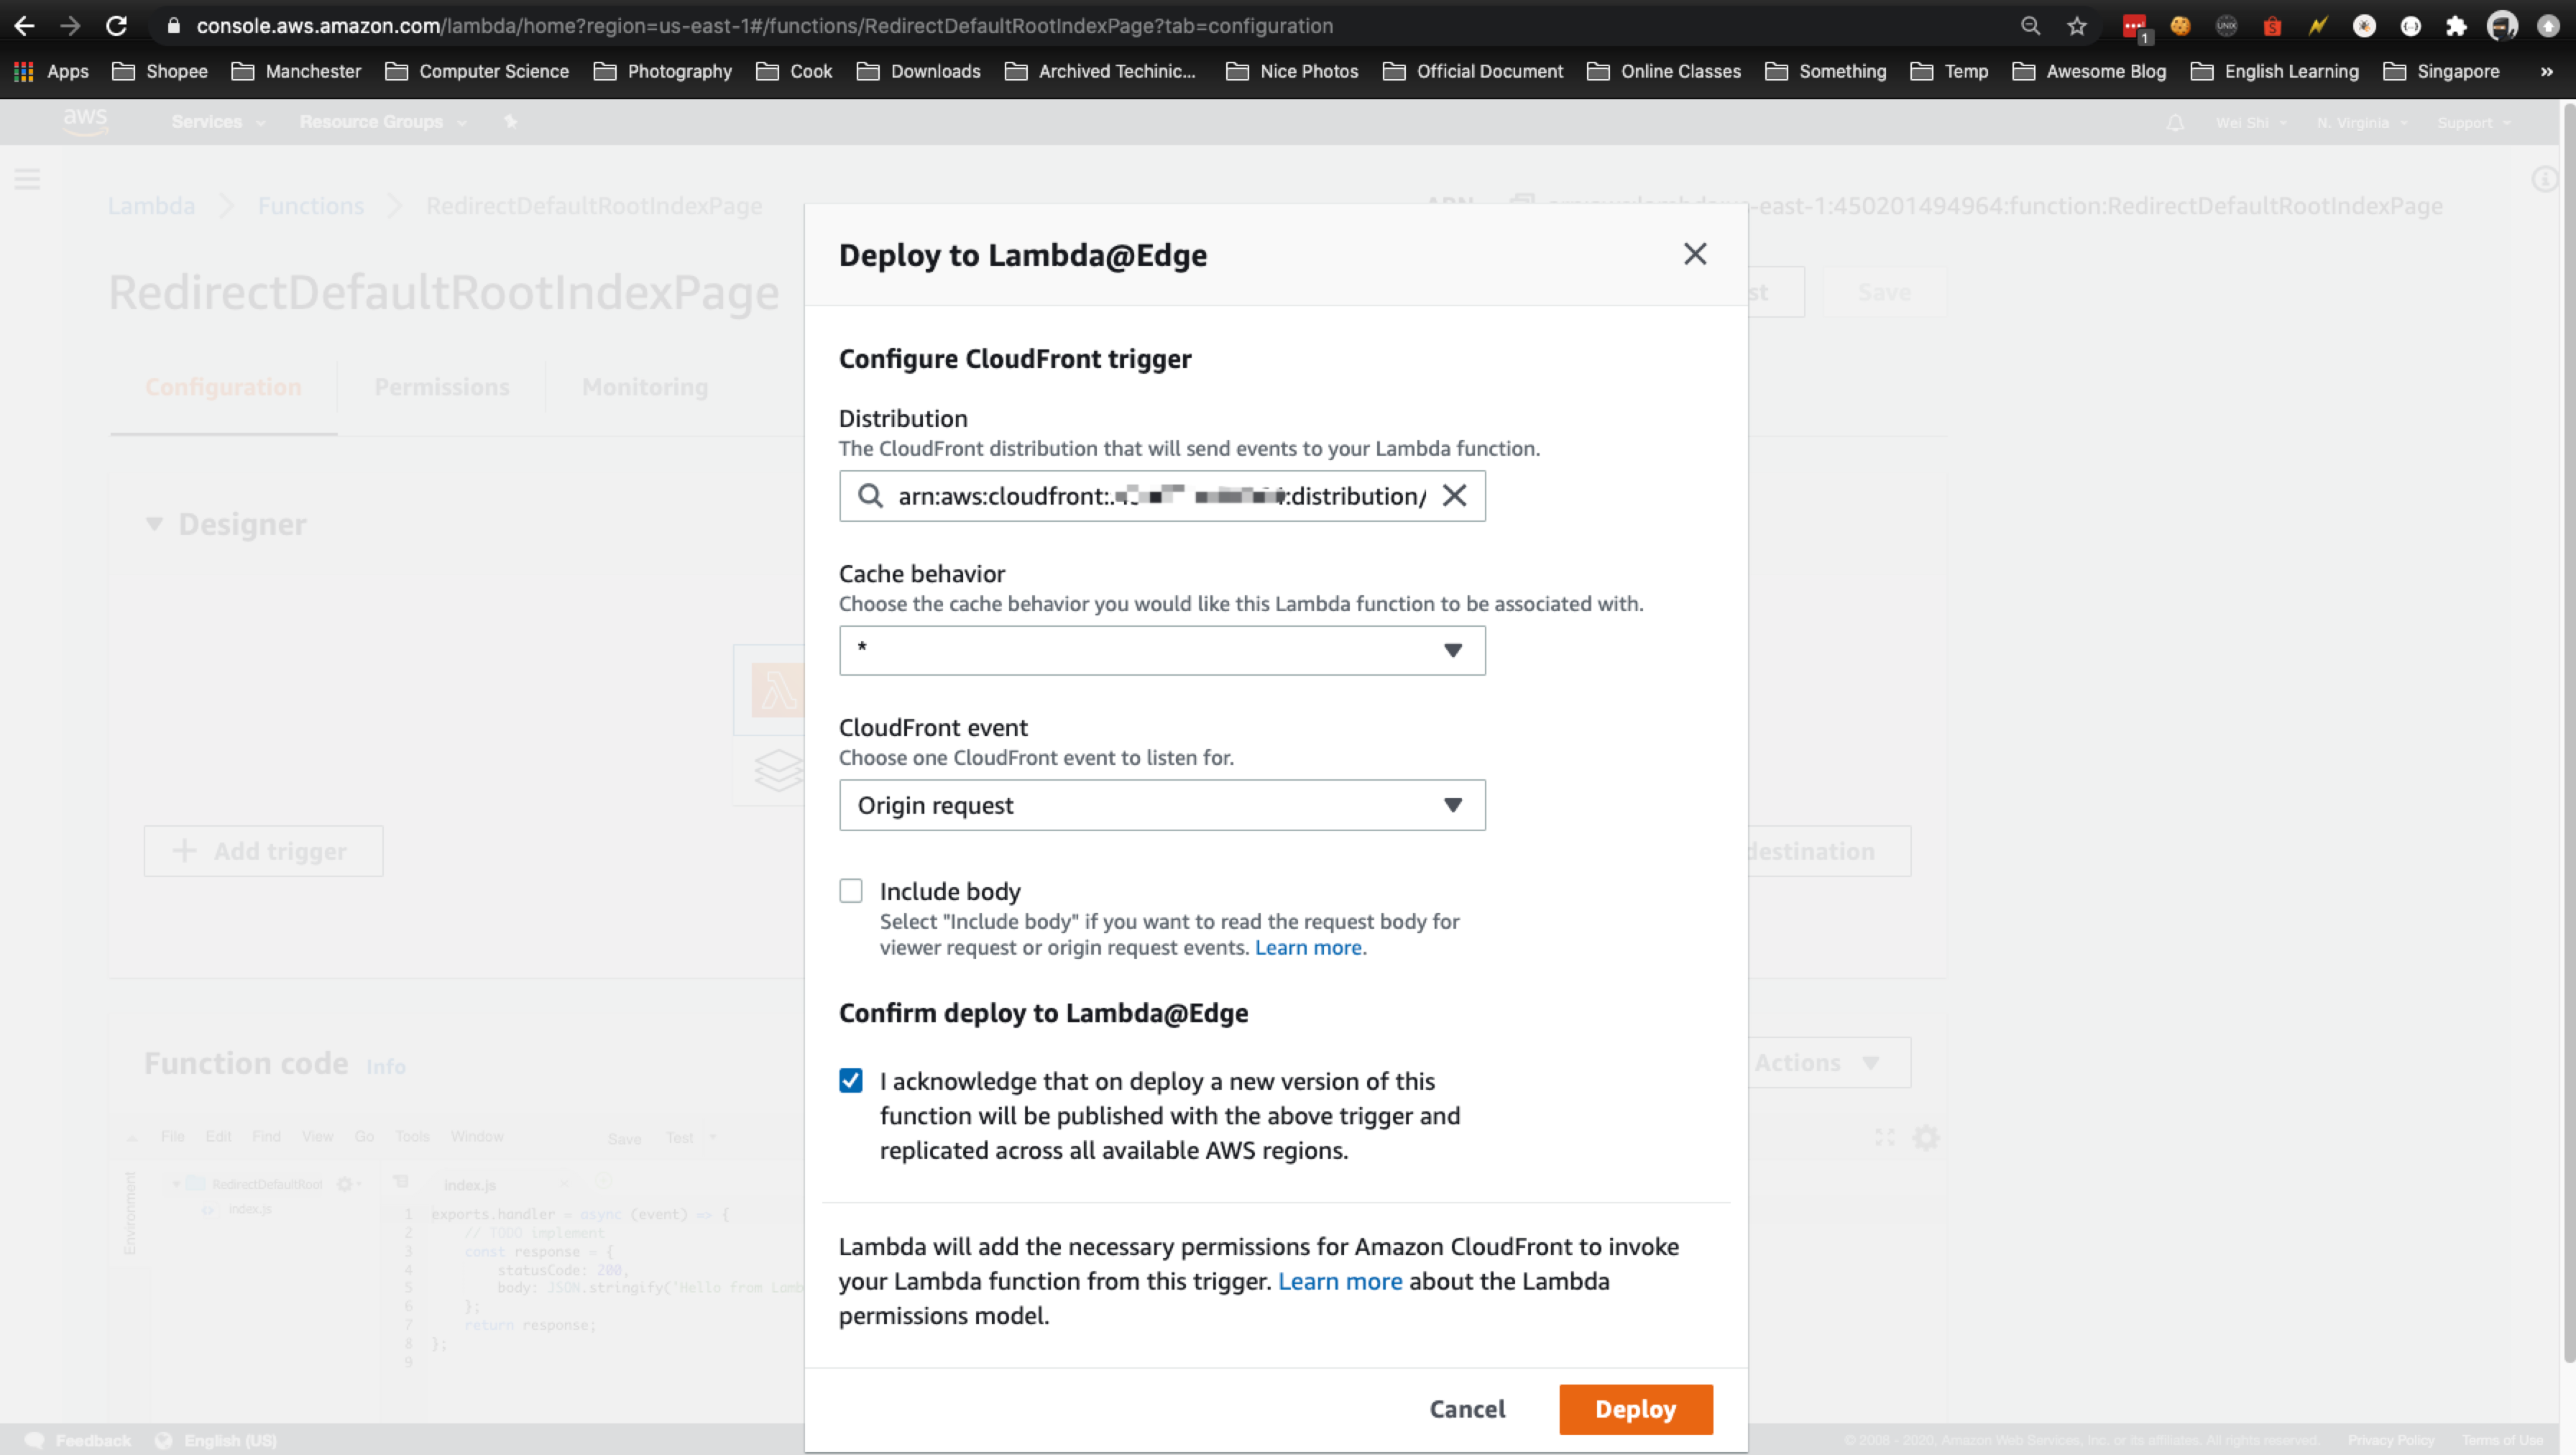
Now we use the Lambda function, in Lambda Function Association select Origin Request in Event Type and enter the Lambda function’s StandardRedirectsForCloudFrontVersionOutput ARN value from the previous step.
Note
If you want to use CloudFront Triggers for Lambda Functions, the region of your S3 bucket must be US East (N. Virginia) Region, as you can add CloudFront Triggers only for Lambda Functions in the US East (N. Virginia) Region(from https://docs.aws.amazon.com/AmazonCloudFront/latest/DeveloperGuide/lambda-requirements-limits.html ).
And if the region of the Lambda Functions is different from the region of the S3 bucket, we are not allowed to create that Lambda Function (shwo the error below).
-
Wait for the CloudFront distribution to deploy.
Solution2 - Make it from scratch
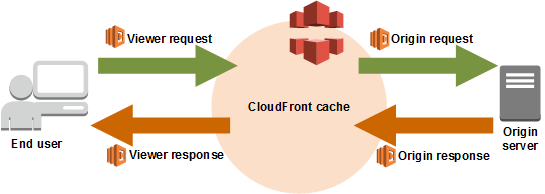
In this example, you use the compute power at the CloudFront edge to inspect the request as it’s coming in from the client. Then re-write the request so that CloudFront requests a default index object (index.html in this case) for any request URI that ends in ‘/’.
When a request is made against a web server, the client specifies the object to obtain in the request. You can use this URI and apply a regular expression to it so that these URIs get resolved to a default index object before CloudFront requests the object from the origin. Use the following code:
'use strict';
exports.handler = (event, context, callback) => {

    // Extract the request from the CloudFront event that is sent to Lambda@Edge
    var request = event.Records[0].cf.request;

    // Extract the URI from the request
    var olduri = request.uri;

    // Match any '/' that occurs at the end of a URI. Replace it with a default index
    var newuri = olduri.replace(/\/$/, '\/index.html');

    // Log the URI as received by CloudFront and the new URI to be used to fetch from origin
    console.log("Old URI: " + olduri);
    console.log("New URI: " + newuri);

    // Replace the received URI with the URI that includes the index page
    request.uri = newuri;

    // Return to CloudFront
    return callback(null, request);

};
In the Lambda console, choose Create function. On the next screen, skip the blueprint selection and choose Author from scratch, as you’ll use the sample code provided.
Next, configure the trigger. Choosing the empty box shows a list of available triggers. Choose CloudFront and select your CloudFront distribution ID (created earlier). For this example, leave Cache Behavior as ***** and CloudFront Event as Origin Request. Select the Enable trigger and replicate box and choose Next.
如果遇到这个错误

Error page
If we try to access a URL that doesn’t exist on our S3 bucket, like https://example.com/not-existing-page we will get a 403 Forbidden error code because Cloudfront tries to access a object2 that doesn’t exists, so to properly handle this, we should return a 404 error response to the request.
Setting up the error page on S3 wouldn’t have any effect because this is an error that should be handled by Cloudfront.
To do this, we configure CloudFront to respond to requests using Hugo’s custom error page located at /layouts/404.html, when your origin returns an HTTP 403 permission denied.
- Go to Cloudfront console: https://console.aws.amazon.com/cloudfront
- Select your
example.comdistribution - Choose the Error Pages tab.
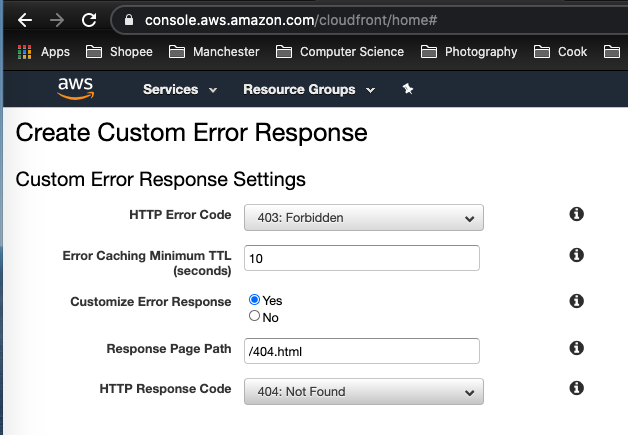
- Press Create Custom Error Response button.
- In HTTP Error Code, select:
403: Forbidden - Customize Error Response:
Yes - Response Page Path:
/404.html - HTTP Response Codeo:
404: Not Found
Reference
-
https://docs.aws.amazon.com/AmazonS3/latest/dev/website-hosting-custom-domain-walkthrough.html
-
https://docs.aws.amazon.com/AmazonS3/latest/dev/website-hosting-cloudfront-walkthrough.html
-
https://simpleit.rocks/golang/hugo/deploying-a-hugo-website-to-aws-the-right-way/#3-set-up-dns
-
https://stackoverflow.com/questions/49488095/validating-domain-for-aws-acm-in-godaddy
-
CloudFront Subdirectory denied
- https://aws.amazon.com/blogs/compute/implementing-default-directory-indexes-in-amazon-s3-backed-amazon-cloudfront-origins-using-lambdaedge/
- https://docs.aws.amazon.com/AmazonCloudFront/latest/DeveloperGuide/DefaultRootObject.html
- https://docs.aws.amazon.com/AmazonS3/latest/dev/IndexDocumentSupport.html
- https://docs.aws.amazon.com/AmazonCloudFront/latest/DeveloperGuide/lambda-requirements-limits.html
- https://docs.aws.amazon.com/lambda/latest/dg/lambda-edge.html
- https://serverlessrepo.aws.amazon.com/applications/arn:aws:serverlessrepo:us-east-1:621073008195:applications~standard-redirects-for-cloudfront
- https://github.com/aws/serverless-application-model/issues/635
- https://stackoverflow.com/questions/61635935/why-lambdaedge-has-to-be-in-us-east-1-region