西维蜀黍

【Compile】交叉编译器(Cross Compiler)

本地编译

本地编译可以理解为,在当前编译平台下,编译出来的程序只能放到当前平台下运行。平时我们常见的软件开发,都是属于本地编译:

比如,我们在 x86 平台上,编写程序并编译成可执行程序。这种方式下,我们使用 x86 平台上的工具,开发针对 x86 平台本身的可执行程序,这个编译过程称为本地编译。

交叉编译(Cross compiler)

交叉编译可以理解为,在当前编译平台下,编译出来的程序能运行在体系结构不同的另一种目标平台上,但是编译平台本身却不能运行该程序:

比如,我们在 x86 平台上,编写程序并编译成能运行在 ARM 平台的程序,编译得到的程序在 x86 平台上是不能运行的,必须放到 ARM 平台上才能运行。

为什么会有交叉编译

之所以要有交叉编译,主要原因是:

  • Speed: 目标平台的运行速度往往比主机慢得多,许多专用的嵌入式硬件被设计为低成本和低功耗,没有太高的性能
  • Capability: 整个编译过程是非常消耗资源的,嵌入式系统往往没有足够的内存或磁盘空间
  • Availability: 即使目标平台资源很充足,可以本地编译,但是第一个在目标平台上运行的本地编译器总需要通过交叉编译获得
  • Flexibility: 一个完整的Linux编译环境需要很多支持包,交叉编译使我们不需要花时间将各种支持包移植到目标板上
  ...


【Linux】Ubuntu 安装 Docker

Installation

Method 1 - Convenience Script

$ curl -fsSL https://get.docker.com -o get-docker.sh
$ sudo sh get-docker.sh
<...>

If you would like to use Docker as a non-root user,

Approach 1

$ sudo sh -eux <<EOF
# Install newuidmap & newgidmap binaries
apt-get install -y uidmap
EOF

$  dockerd-rootless-setuptool.sh install

# Verify that you can run docker commands without sudo.
$ docker run hello-world

Approach 2

you should now consider adding your user to the “docker” group with something like:

$ sudo usermod -aG docker ${USER}

# 将当前用户切换到docker组中,且立即生效
$ newgrp docker

# Verify that you can run docker commands without sudo.
$ docker run hello-world
  ...


【Linux】Shell

判断 - if

#!/bin/bash
# Basic if statement
if [ $1 -gt 100 ]; then
  echo Hey that\'s a large number.
  pwd
fi
  ...


【Linux】Shell - 变量

定义变量

定义变量时,变量名不需要加美元符号($),如:

variableName="value"

注意,变量名和等号之间不能有空格,这可能和你熟悉的所有编程语言都不一样。同时,变量名的命名须遵循如下规则:

  • 首个字符必须为字母(a-z,A-Z)。
  • 中间不能有空格,可以使用下划线(_)。
  • 不能使用标点符号。
  • 不能使用 bash 里的关键字(可用 help 命令查看保留关键字)。

Bash 没有数据类型的概念,所有的变量值都是字符串。

下面是一些自定义变量的例子。

# 不使用任何引号
$ myGender=man
# 使用单引号
$ myName='Wei Shi'
# 使用双引号
$ myUrl="http://test.com"
# 可以将一个数字赋值给变量(但是这个变量仍然是一个字符串变量)
$ myNum=100
  ...


【Linux】makefile

Make的概念

Make这个词,英语的意思是"制作"。Make命令直接用了这个意思,就是要做出某个文件。比如,要做出文件a.txt,就可以执行下面的命令。

$ make a.txt

但是,如果你真的输入这条命令,它并不会起作用。因为Make命令本身并不知道,如何做出a.txt,需要有人告诉它,如何调用其他命令完成这个目标(这个人就是我们)。

比如,假设文件 a.txt 依赖于 b.txt 和 c.txt ,是后面两个文件连接(cat命令)的产物。那么,make 需要知道下面的规则。

# makefile 文件内容
a.txt: b.txt c.txt
    cat b.txt c.txt > a.txt

也就是说,make a.txt 这条命令的背后,实际上分成两步:第一步,确认 b.txt 和 c.txt 必须已经存在,第二步使用 cat 命令 将这个两个文件合并,输出为新文件。

像这样的规则,都写在一个叫做Makefile的文件中,Make命令依赖这个文件进行构建。Makefile文件也可以写为makefile, 或者用命令行参数指定为其他文件名:

$ make -f rules.txt
# 或者
$ make --file=rules.txt

上面代码指定make命令依据rules.txt文件中的规则,进行构建。

总之,make只是一个根据指定的Shell命令进行构建的工具。它的规则很简单,你规定要构建哪个文件、它依赖哪些源文件,当那些文件有变动时,如何重新构建它。

  ...


【MySQL】Out of range value for columns

Reproduce

drop table if exists test_tinyint;
create table test_tinyint (
    num tinyint
) engine=innodb charset=utf8;

insert into test_tinyint values(-100);
insert into test_tinyint values(255);

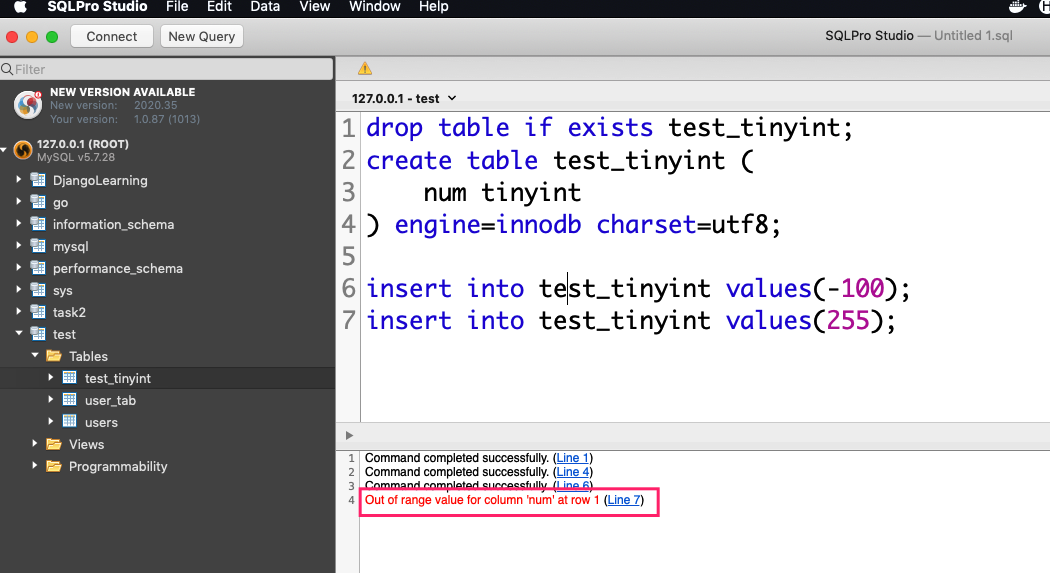
执行第7行的代码时候报错"Out of range value for column ’num’ at row 7",这其实是因为(Signed 的) TINYINT 的范围是 -128 到 127,而 255 超过了这个范围。

如果把第3行的num字段定义改为"num tinyint unsigned",第7行的插入就不会报错了。但是第6行的插入-100又报错了,因为无符号整型是无法表示负数的。

Reference

  ...


【Engineering】连接池(Connection Pool)

Configs

Unused timeout / IdleTimeout

为了让 middleware(比如 Redis)主动清理长时间空闲的客户端连接,回收资源,您可以设置timeout参数来限制客户端连接的空闲时间。

默认设置下,即使某个客户端已经空闲了很长时间,Redis也不会主动断开与该客户端的连接。但在业务核心应用中,建议配置timeout参数以使Redis具有主动回收资源的能力。否则,如果客户端出现异常,连接池资源将无法及时回收,可能因空闲连接占满连接池导致服务崩溃。核心应用出现这样的问题可能引发整个业务的混乱,后果严重。

timeout参数值的取值范围为[0,100000],默认为0(表示无限制),单位为秒(s)。在实际运行中,为了提高性能,Redis不一定会精确地按照timeout参数值的时间来断开符合条件的空闲连接,例如设置timeout参数值为10s,但空闲连接可能在12s后,服务器中新增很多连接时才会被断开。如需降低这个延迟,可适当增大hz参数的值,提高负责断开超时连接等定时任务的运行频率。

Connection timeout / PoolTimeout

Specifies the interval, in seconds, after which a connection request times out and a ConnectionWaitTimeoutException is thrown.

This value indicates the number of seconds that a connection request waits when there are no connections available in the free pool and no new connections can be created. This usually occurs because the maximum value of connections in the particular connection pool has been reached.

  ...


【MySQL】Connections Number Setting

MySQL 当前允许最大并发连接数(max connection)

max connection is a threshold specified in MySQL: the maximum permitted number of simultaneous client connections (if exceed, apps will get “Too many connections” error from MySQL).

If clients encounter Too many connections errors when attempting to connect to the mysqld server, all available connections are in use by other clients.

The permitted number of connections is controlled by the max_connections system variable. To support more connections, set max_connections to a larger value.

Command-Line Format --max-connections=#
System Variable max_connections
Scope Global
Dynamic Yes
SET_VAR Hint Applies No
Type Integer
Default Value 151
Minimum Value 1
Maximum Value 100000

mysqld actually permits max_connections + 1 client connections. The extra connection is reserved for use by accounts that have the CONNECTION_ADMIN privilege (or the deprecated SUPER privilege). By granting the privilege to administrators and not to normal users (who should not need it), an administrator can connect to the server and use SHOW PROCESSLIST to diagnose problems even if the maximum number of unprivileged clients are connected.

查看 MySQL 的最大并发连接数设置:

$ mysql –u root –p
mysql> SHOW VARIABLES LIKE 'max_connections';
+-----------------+-------+
| Variable_name   | Value |
+-----------------+-------+
| max_connections | 151   |
+-----------------+-------+

修改

Approach 1 - via Command

You can change the setting to e.g. 200 by issuing the following command without having to restart the MySQL server (obviously it will only work if the user you are logged in as has sufficient permissions to do this):

set global max_connections = 200;

This will take effect immediately, but will be forgotten the next time MySQL is restarted. To make the change permanent you need to edit the my.cnf configuration file.

Approach 2 -Via Config

$ vi /etc/my.cnf

There will be a section that looks like this: (may be slightly different)

[mysqld]
local-infile=0
datadir=/var/lib/mysql
user=mysql
symbolic-links=0

max_connections = 100

Save the changes and type the following to restart mysqld:

$ /etc/init.d/mysqld restart

You will see:

Stopping mysql: [ OK ]
Starting mysql: [ OK ]

MySQL 同时被使用的连接数的历史最大值(max used connection)

max used connection is the maximum number of connections that have been in use simultaneously since the server started.

mysql> show global status like 'Max_used_connections';
+----------------------+-------+
| Variable_name    | Value |
+----------------------+-------+
| Max_used_connections | 2   |
+----------------------+-------+
1 row in set (0.00 sec)
  ...

【Redis】查看连接信息

查看 Redis 当前连接数/最大连接数

127.0.0.1:6379> info clients
#Clients
connected_clients:621
client_longest_output_list:0
client_biggest_input_buf:0
blocked_clients:0
127.0.0.1:6379>
方法2:config get maxclients 可以查询redis允许的最大连接数

127.0.0.1:6379> CONFIG GET maxclients
    ##1) "maxclients"
    ##2) "10000"

修改 Redis 最大连接数

方法1

在2.6之后版本,可以修改最大连接数配置,默认10000,可以在redis.conf配置文件中修改

...
# maxclients 10000
...

方法2

config set maxclients num 可以设置redis允许的最大连接数

127.0.0.1:6379> CONFIG set maxclients 10
OK
127.0.0.1:6379>

启动redis.service服务时加参数–maxclients 100000来设置最大连接数限制

方法3

启动redis.service服务时加参数–maxclients 100000来设置最大连接数限制

$ redis-server --maxclients 100000 -f /etc/redis.conf
  ...


【Redis】设置密码

设置密码

$ redis-cli -h 1.1.1.1 -p 11299
1.1.1.1:11299> config set requirepass "<your password>"

如果设置了密码,但是没有输入密码,在get时,就会出现下面错误

$ redis-cli -h 1.1.1.1 -p 11299
1.1.1.1:11299> get s
(error) NOAUTH Authentication required.

验证密码

密码验证成功

1.1.1.1:11299> auth <your password>
OK
  ...