macOS 快捷键
跳转光标
- 到行首:[ctrl + A] or [Command + 方向键左]
- 到行尾:[ctrl + E] or [Command + 方向键右]
- 按 word 移动:Alt (Option ⌥) + ←/→
- 将光标快速移动到整篇文本开头/结尾:Command + 方向键上/方向键下
快速选中文本
-
选中从当前位置到行首/行尾的所有内容:Command + Shift + ←/ →
-
可以选中一个单词:Option + Shift + 方向键左/右」
-
用鼠标点任意一个位置(即时你什么都看不见),按住shift,点另外一个位置,就自动选中这之间的内容了
删除内容
- 使用 Option ⌥ + ⌫ 或 Control + ⌫ 来向左按 word 删除
- 使用 Option ⌥ + Delete 或 Control+ Delete 来向右按 word 删除
- 使用 Command + ⌫ 来向左将从光标位置至行首部分全部删除
- 使用 Command + Delete 来向右将从光标位置至行尾部分全部删除
Control Mission Control
- 移动到左/右边的mission:Command + 方向键左/右
Software Install
App Store
- Xcode
- Blackmagic Disk Speed Test
- 控制外接显示器亮度
- Lunar - https://lunar.fyi/
- Add license
- Lunar - https://lunar.fyi/
- 截图
- Monosnap
From XX
-
调节不同软件的声音大小
- SoundSource
-
效率
- Alfred
- Moom: Mac 下最好的窗口控制器
-
iStat Menus
- 设置
-
Sublime
- 复制setting
-
Navicat Premium
-
PDF expert
-
Movist
-
PlistEdit Pro
Official Website
-
Zoom
-
Player
- Project IINA
- VLC
-
欧陆词典
-
Obsidian
-
TeXstudio
-
MacTex
-
VSCode
-
Programming
- iTerm
- 导入设置
- iTerm
-
搜狗输入法
-
文件同步 - Resilio Sync
-
Pycharm 2021.2.2
-
import setting
-
Crack
-
-
Goland 2021.2.2
-
import setting
-
Crack
-
-
Teamviewer
-
有道词典
-
阿里旺旺
-
ISO - balenaEtcher
GitHub
- 设置menu bar
Hardware
- AMD Power Gadget - https://github.com/trulyspinach/SMCAMDProcessor
- Cinebench
- Videopro
- GeekBench
Photography
- PS
- Davinci
- Lightroom - https://creativecloud.adobe.com/apps/download/lightroom
Optional
App Store
- ihosts:管理host
Misc
-
下载
- Flux
- motrix
-
draw.io-画图
-
VOX 听本地歌曲
-
Grammaly
-
VNC Viewer
-
XMind
-
bestTrace 看路由
-
查看二进制文件
- wxHexEditor-v0.23-MacIntel
- 0xED 看二进制
-
虚拟机
- Parallels Desktop
Setting
macOS Preference Setting
-
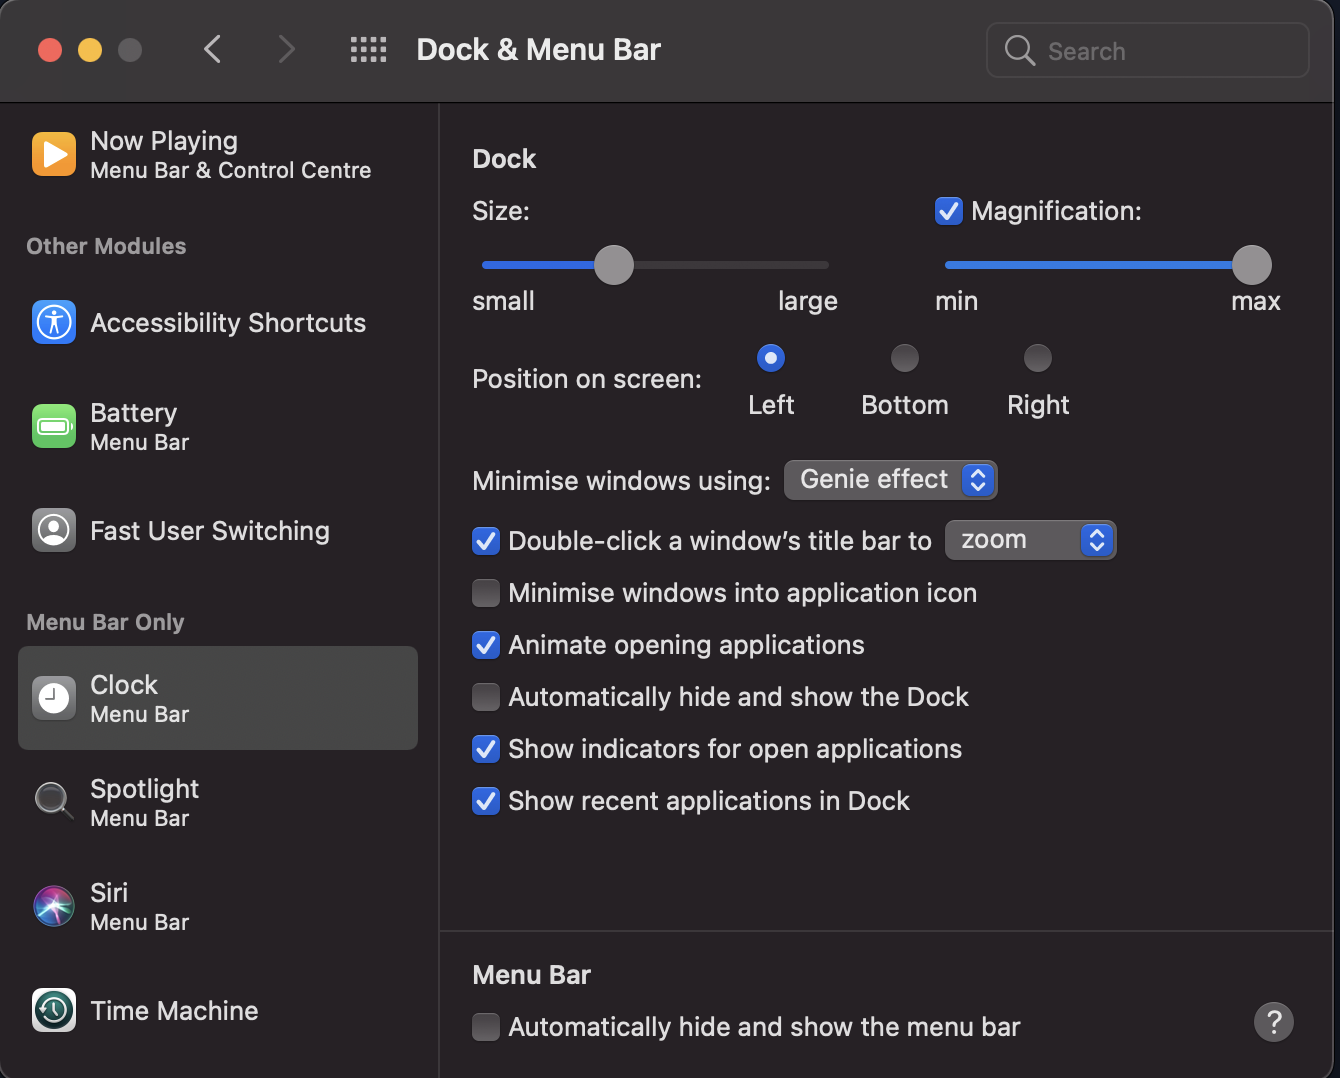
设置显示秒
-
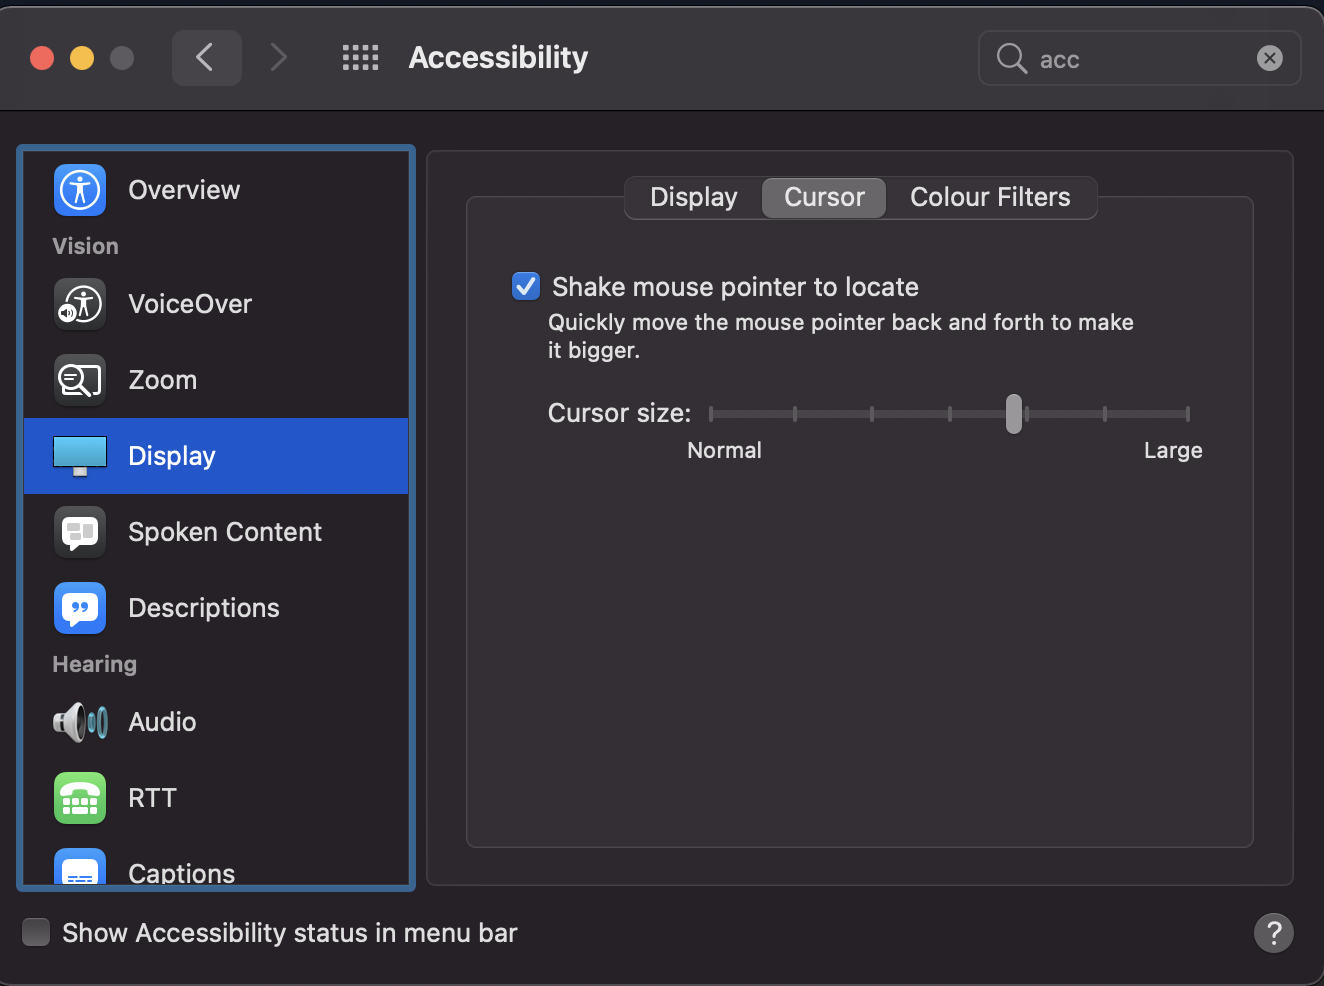
鼠标 Cusur 大小
-
键盘 - Keyboard Setting - 切换输入法
-
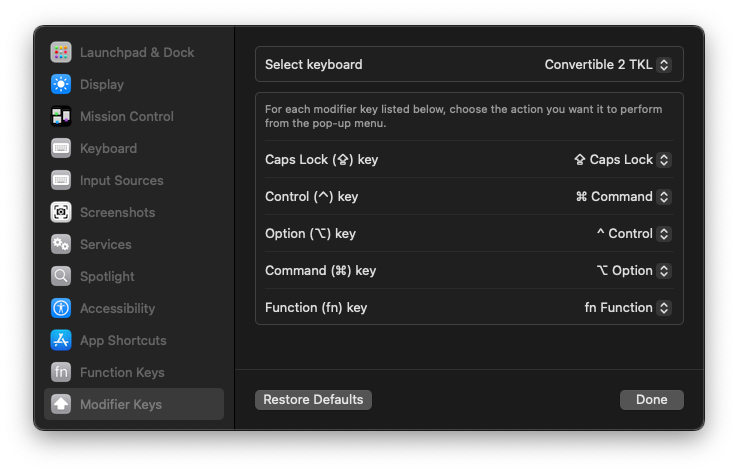
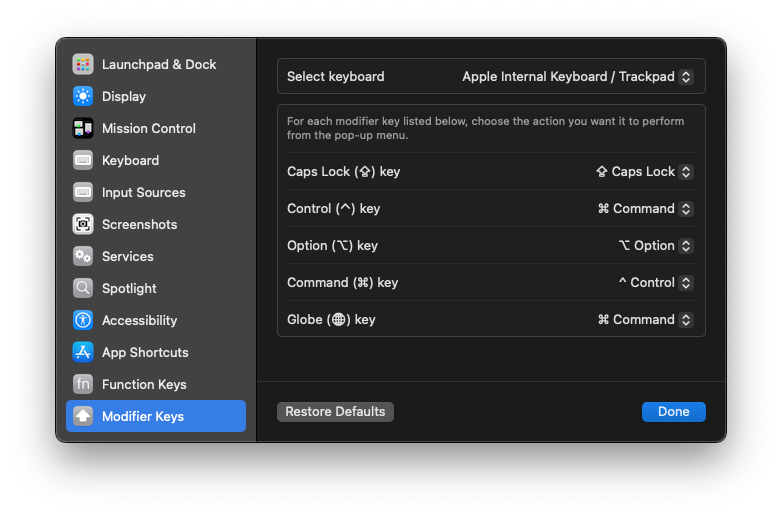
Keyboard - Modifier Keys
-
-
Keyboard
-
Keyboard - Shortcuts
-
Launchpad - Turn Dock Hiding On/Off: ⌘ (control) + B
Launchpad & Dock - Show Launchpad:  ^ (option) + E
Mission Control:
	Mission Control:  ⌥ (command) + tab
	Show Desktop:  ⌥ (command) + D
	Move left a space:  ⌘ (control) + left
	Move right a space:  ⌘ (control) + right
Keyboard
  Move focus to next window: ⌘(control) + `
Input Sources
  Select the previous inout source:  ^ (option) + 空格
Accessibility
	Zoom out: command + alt + -
	Zoom in: command + alt + =
Custom Shortcus
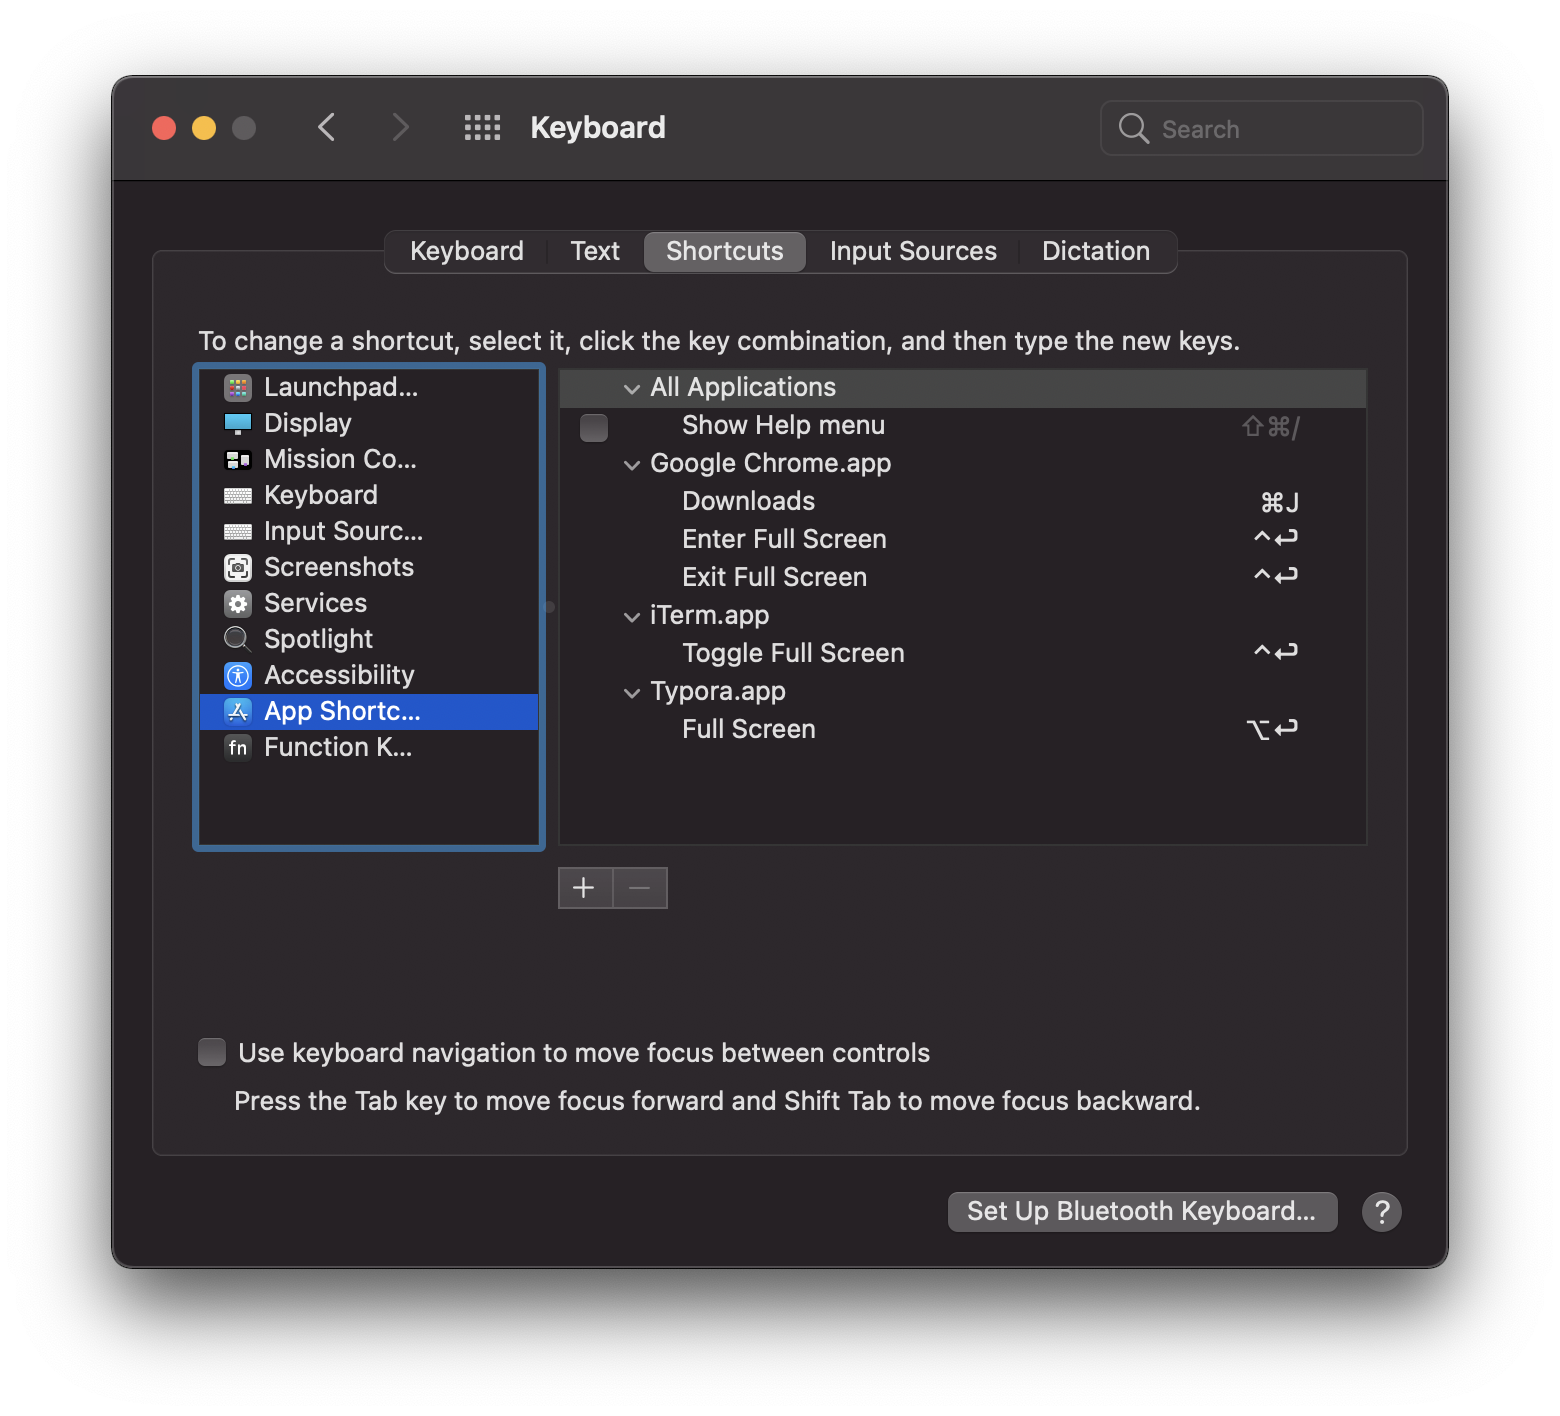
App Shortcut
 iTerm.app
 		Toggle Full Screen: control + enter
 Google Chrome.app
    Downloads: command + J
    Enter FullScreen: control + enter
    Exit Full Screen: control + enter


    Exit Full Screen
-
Custom Shortcus
Display
- 设置为P3色域
Software
Calendar
Bind google calender into Apple Calendar
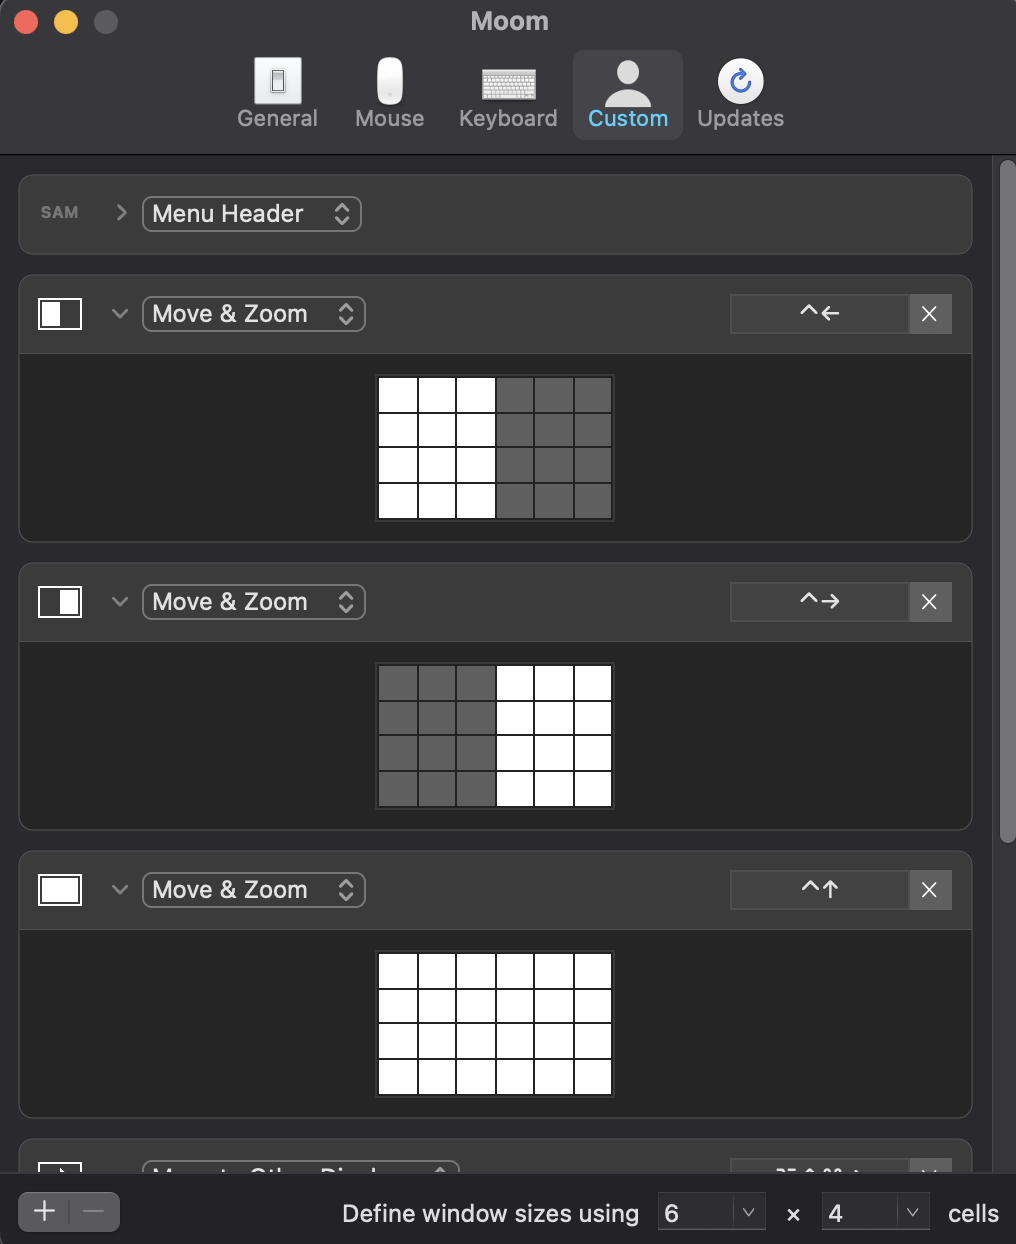
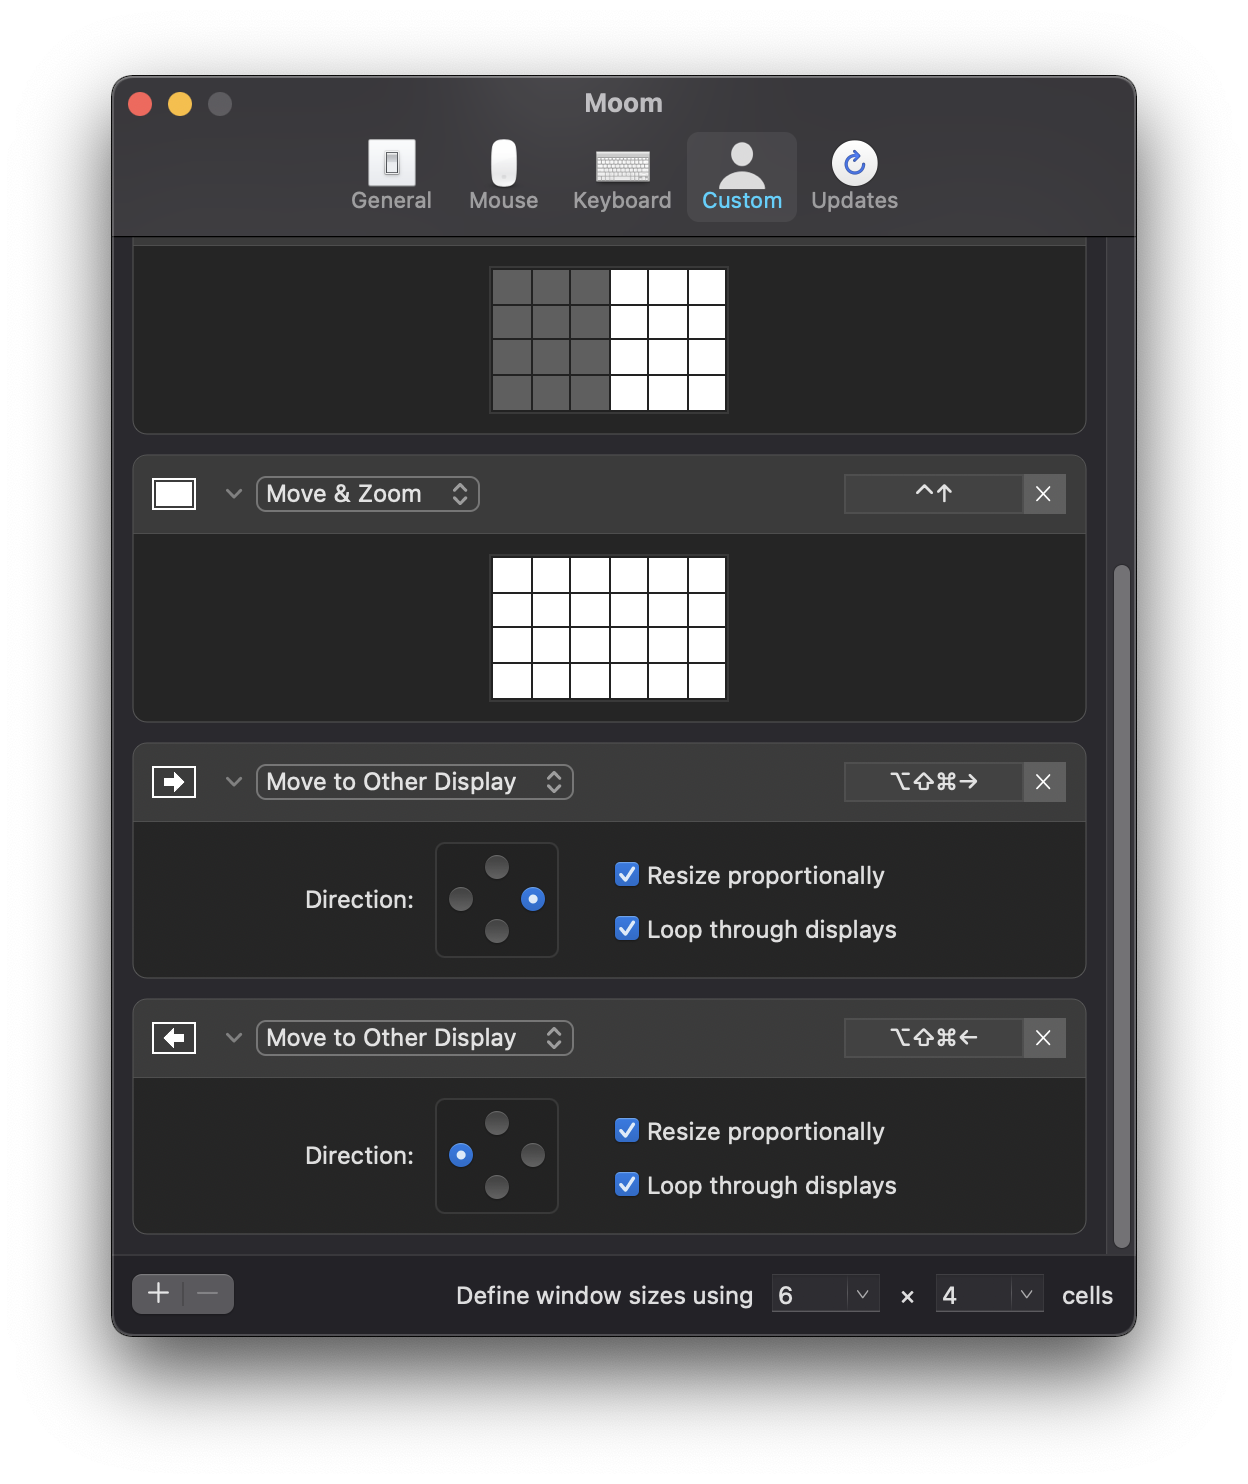
Windows Managment - Moom
Docker
Alfred
Sync Setting to new machine
Typora
- Input license
- Copy image to custom folder:
./assets - Copy themes
github.css
defaults write -app Typora AppleWindowTabbingMode -string always
NOTE: Quit Typora before running the above command in a terminal. New “open docs as tabs behaviour” will take effect when Typora is next launched.
You can change always to never or manual if you want to revert behaviour.
iTerm2
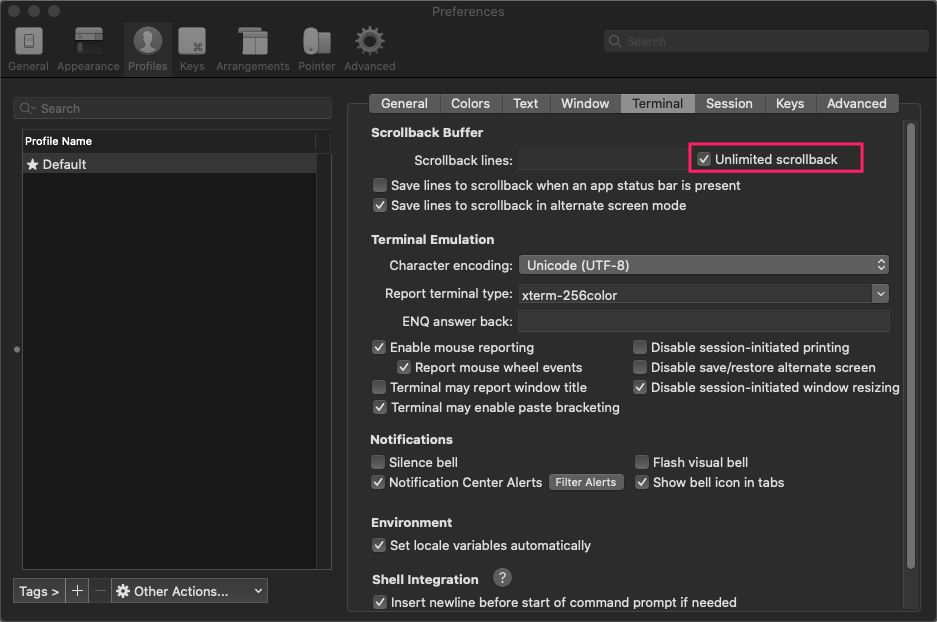
设置
无显示行数限制:
显示命令执行时间轴
普通玩家可能在开发过程中需要知道编译用了多久,iTerm2 自带时间轴,让你的使用变得准确
点击工具栏中的 view->showTimestamps 打开时间轴
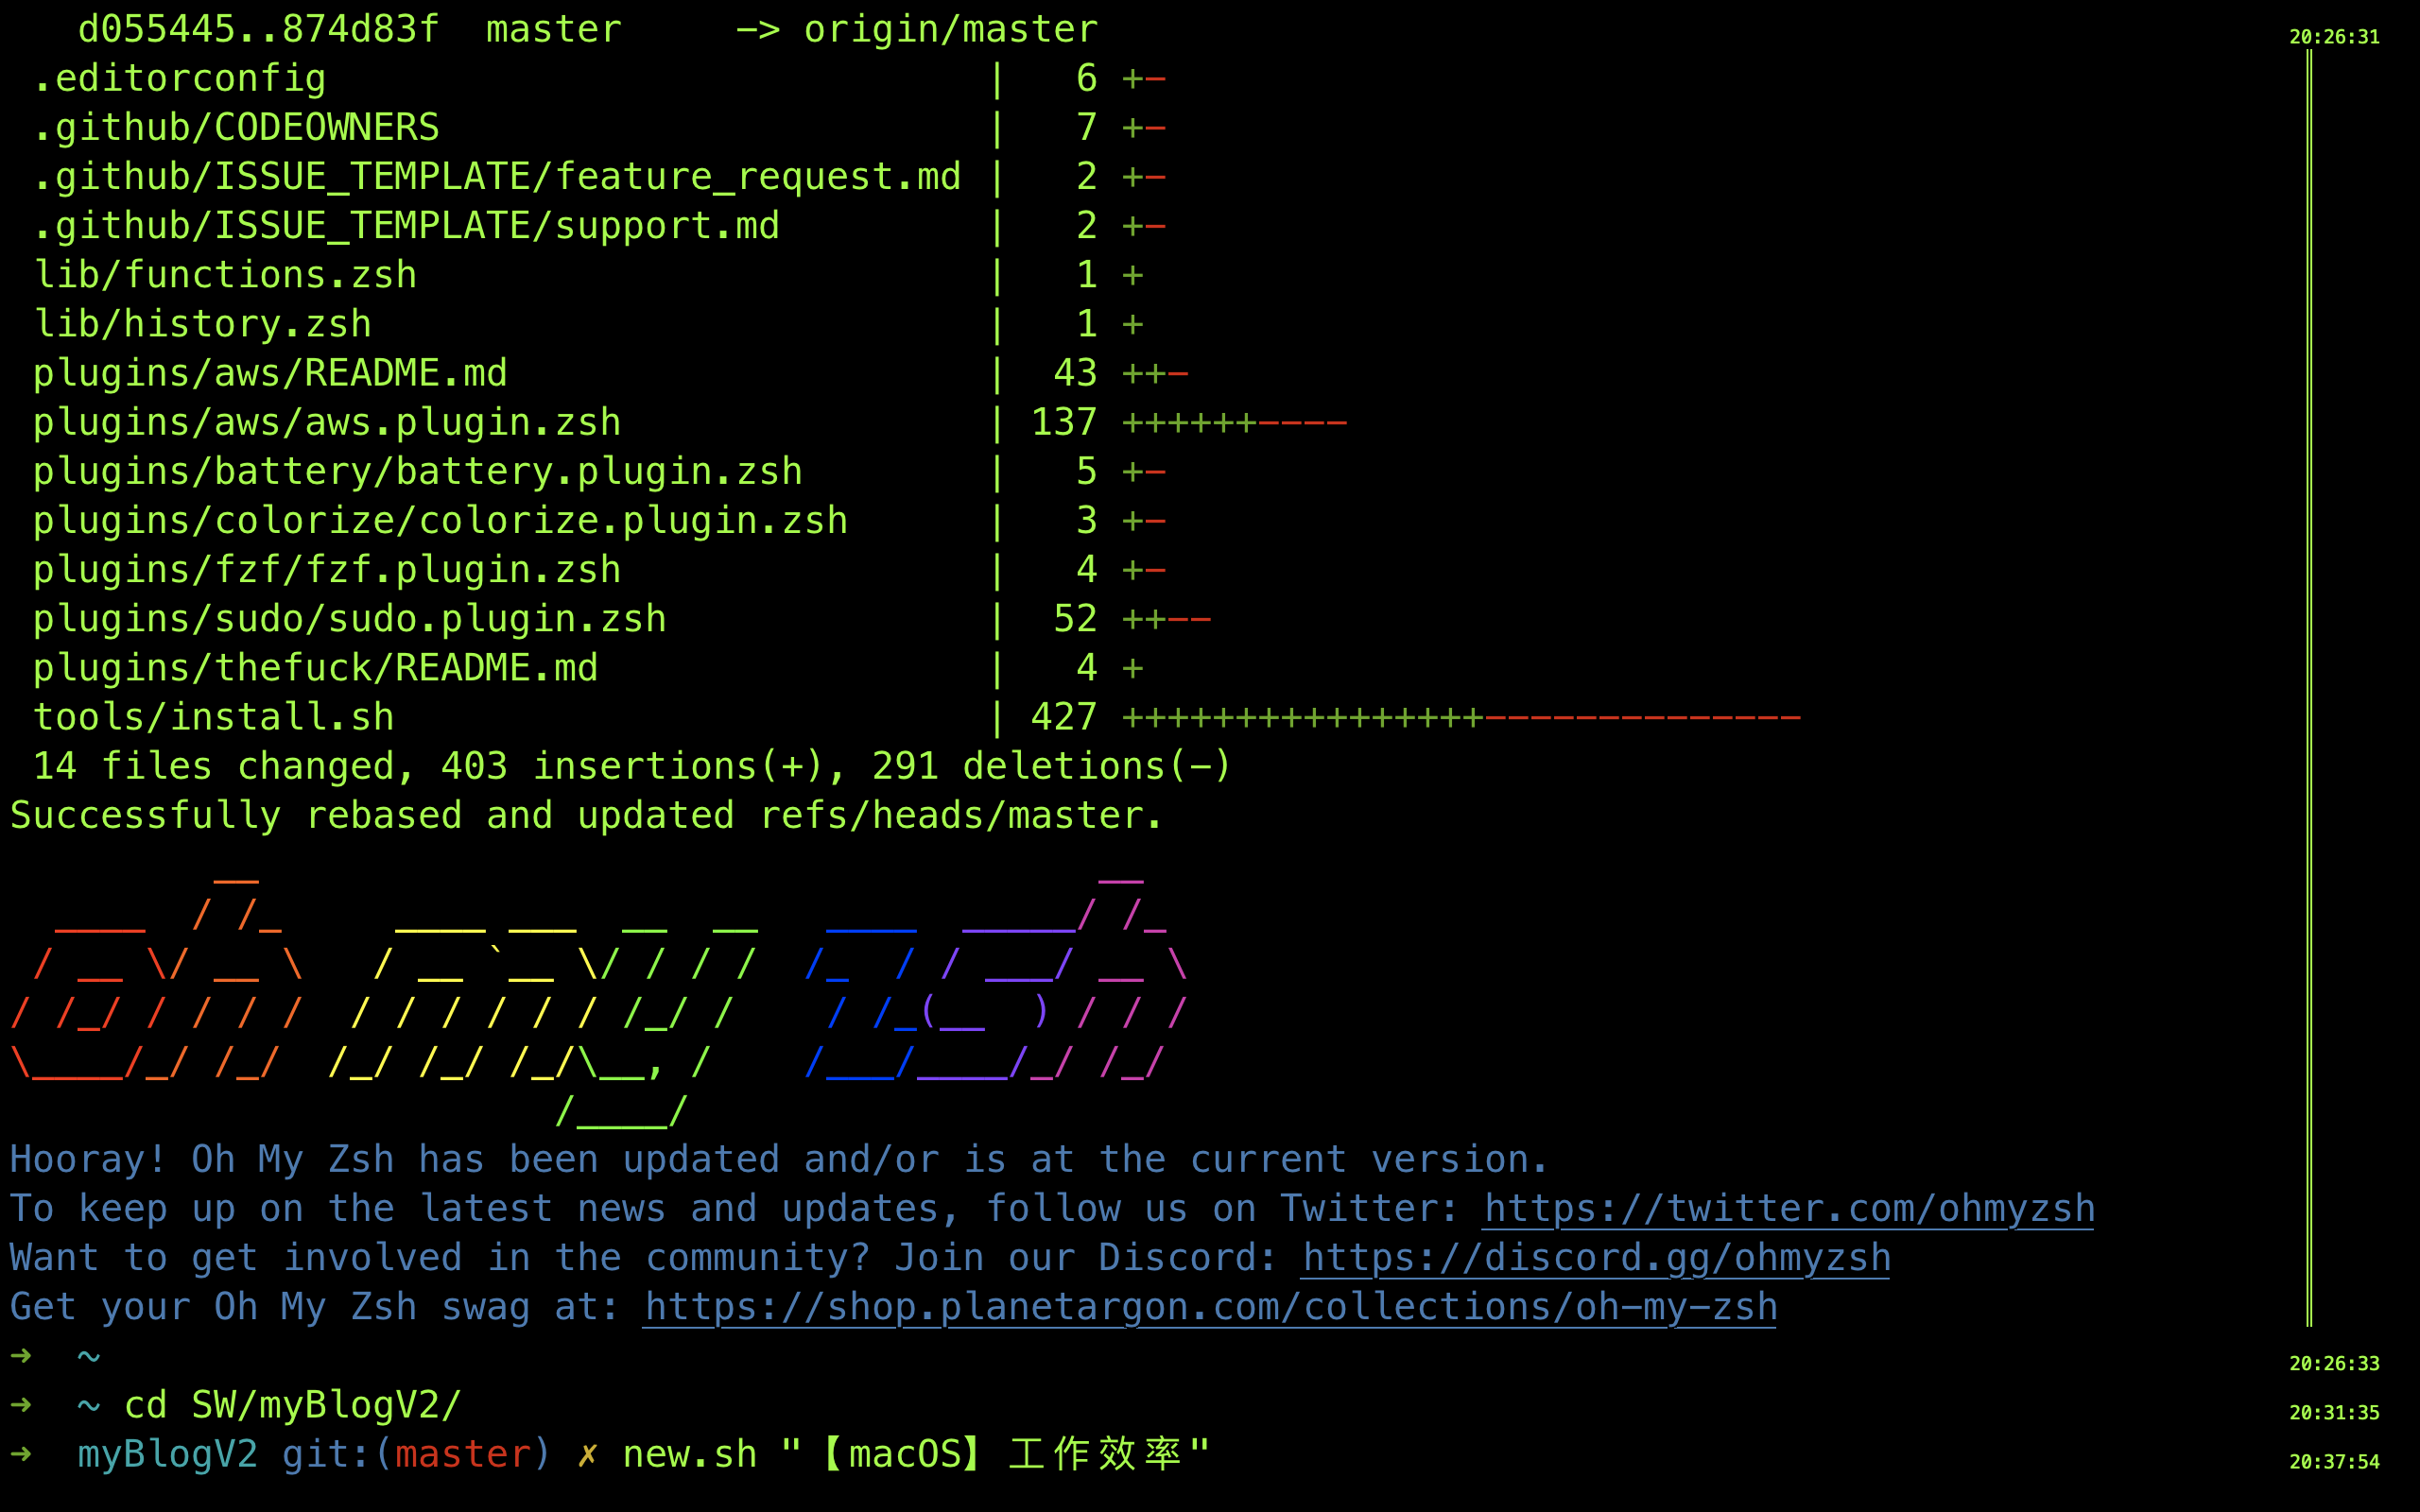
Show timestamps by default

将 iTerm2 自带 theme 修改为 Minimal ( Preferences-Appearance-General-Theme ) 以达到顶栏沉浸式的效果
Preference - Apprerance - General - Status bar lcoation - Bottom
可以在Profiles选项卡,Session页面最底部看到开启选项。Status bar enabled 选项,勾选上即可打开。点击右边的 Configure Status Bar 按钮可设置显示的内容。
可以看到能显示的内容非常多,把上方要显示的内容拖动到下方 Active Components 区域即添加。
在Preference页面中点击Appearance选项卡,可以设置Status bar的位置,修改 Status bar location,我这里改到Bottom底部。
brew
# install
$ /bin/bash -c "$(curl -fsSL https://raw.githubusercontent.com/Homebrew/install/HEAD/install.sh)"

# install software
$ brew update; brew install rename hugo htop s3cmd speedtest-cli curl git mysql redis hstr graphviz tree openconnect ccat node mercurial socat htop go zoxide s3cmd npm wget mactex socat mycli;
brew install lunar wechat zoom typora sourcetree Postman spotify Firefox;
brew install --cask iterm2 Wireshark;
备份
我最中意的 Homebrew 特性之一就是你可以像其它任何 用版本控制工具来备份点文件 一样备份你的安装记录。为了实现这个目的,Homebrew 提供 bundle(“捆扎”)子命令,它可以控制一个叫 dump(“倾倒”)的子命令生成一个 Brewfile。这个文件包含你目前所有安装的工具列表,可以重复使用。进入你想使用的目录然后运行命令,它会根据你所安装的软件生成 Brewfile:
$ cd ~/Development/dotfiles # This is my dotfile folder
$ brew bundle dump
$ ls Brewfile
Brewfile
当我换了一台机器,想要安装一样的软件时,进入含有 Brewfile 的文件夹,然后重新安装:
$ ls Brewfile
Brewfile
$ brew bundle
它会在我的新机器上安装所有列出的 “秘方”。
Oh-my-zsh
Install
$ sh -c "$(curl -fsSL https://raw.github.com/ohmyzsh/ohmyzsh/master/tools/install.sh)"
插件
# zsh-autosuggestions
$ git clone https://github.com/zsh-users/zsh-autosuggestions ~/.oh-my-zsh/custom/plugins/zsh-autosuggestions
# zsh-syntax-highlighting
$ git clone https://github.com/zsh-users/zsh-syntax-highlighting.git ~/.oh-my-zsh/custom/plugins/zsh-syntax-highlighting

# modify .zshrc
source ~/.oh-my-zsh/custom/plugins/zsh-autosuggestions/zsh-autosuggestions.zsh
source ~/.oh-my-zsh/custom/plugins/zsh-syntax-highlighting/zsh-syntax-highlighting.zsh

# one line
git clone https://github.com/zsh-users/zsh-autosuggestions ~/.oh-my-zsh/custom/plugins/zsh-autosuggestions;git clone https://github.com/zsh-users/zsh-syntax-highlighting.git ~/.oh-my-zsh/custom/plugins/zsh-syntax-highlighting; echo 'source ~/.oh-my-zsh/custom/plugins/zsh-autosuggestions/zsh-autosuggestions.zsh' >> ~/.zshrc; echo 'source ~/.oh-my-zsh/custom/plugins/zsh-syntax-highlighting/zsh-syntax-highlighting.zsh' >> ~/.zshrc; source ~/.zshrc

# autojump
$ brew install autojump
Add the following line to your ~/.bash_profile or ~/.zshrc file (and remember to source the file to update your current session):
[ -f (brew --prefix)/etc/profile.d/autojump.sh ] && . (brew --prefix)/etc/profile.d/autojump.sh
copy .zshrc Config
VPN
Git Config
复制 .ssh
SMB Config
s3cmd
复制 .s3cfg
HDPI
Navicat DB
开机挂载 SMB
Then navigate to the mountpoint in your finder and then drag it into the “Login Items” window that you previously opened. (The other items in this window have been purposely blurred for privacy reasons).

Terminal Tool
tldr - man
man 命令是好读文档的命令,但是man的文档有时候太长了,所以,你可以试试 tldr 命令,把文档上的一些示例整出来给你看。
$ npm install -g tldr
$ ln -s /usr/local/bin/tldr /usr/local/bin/man2
ref
z - smart cd
$ brew install zoxide

#Add this to your configuration (usually ~/.zshrc):
eval "$(zoxide init zsh)"

#  Install fzf (optional)
$ brew install fzf
hstr - 快速查询 terminal 历史command
# HSTR configuration - add this to ~/.zshrc
alias hh=hstr                    # hh to be alias for hstr
setopt histignorespace           # skip cmds w/ leading space from history
export HSTR_CONFIG=hicolor       # get more colors
bindkey -s "\C-r" "\C-a hstr -- \C-j"     # bind hstr to Ctrl-r (for Vi mode check doc)
Driver
- Aquantia
Misc
蓝牙卡顿
Solution1
- 下载苹果专为开发者提供的硬件调试工具 Hardware IO Tools
- 双击挂载镜像,打开其中的 Bluetooth Explorer,注意这时是不会出现任何窗口的。
- 在屏幕顶部「菜单栏」上找到并点击 Tools -> RSSI Sweeper
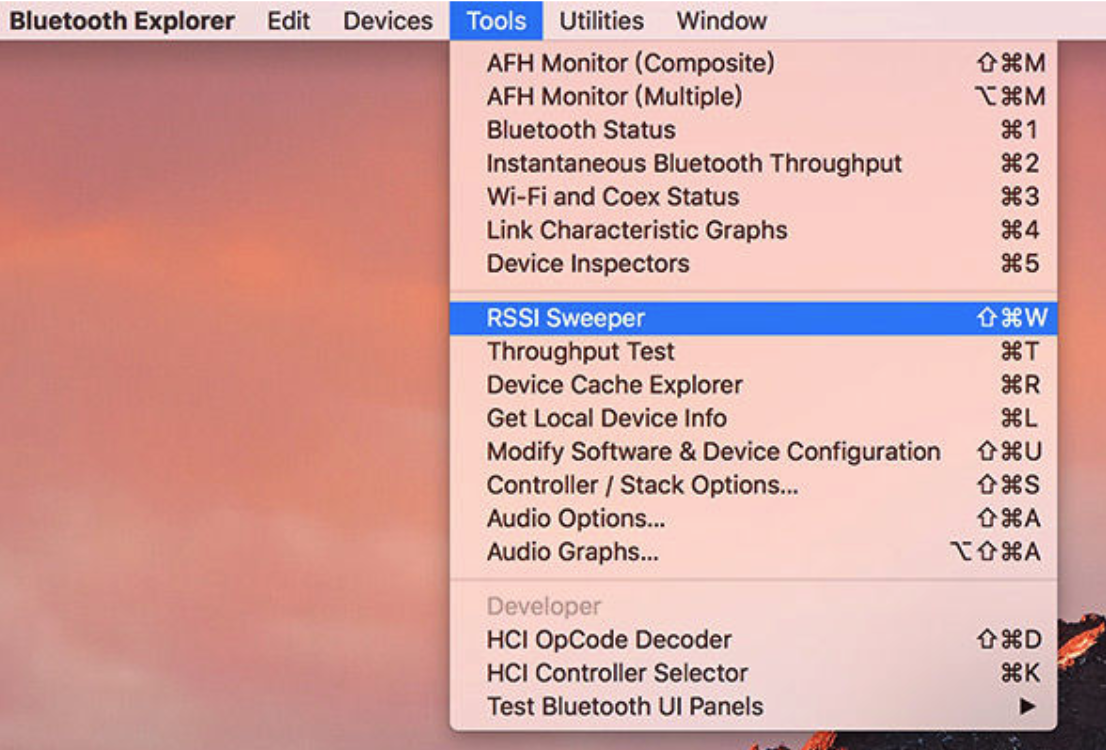
- 在弹出的窗口中点击 Start,之后你所有蓝牙设备都会断开连接,软件开始扫描整个频段(如下图)
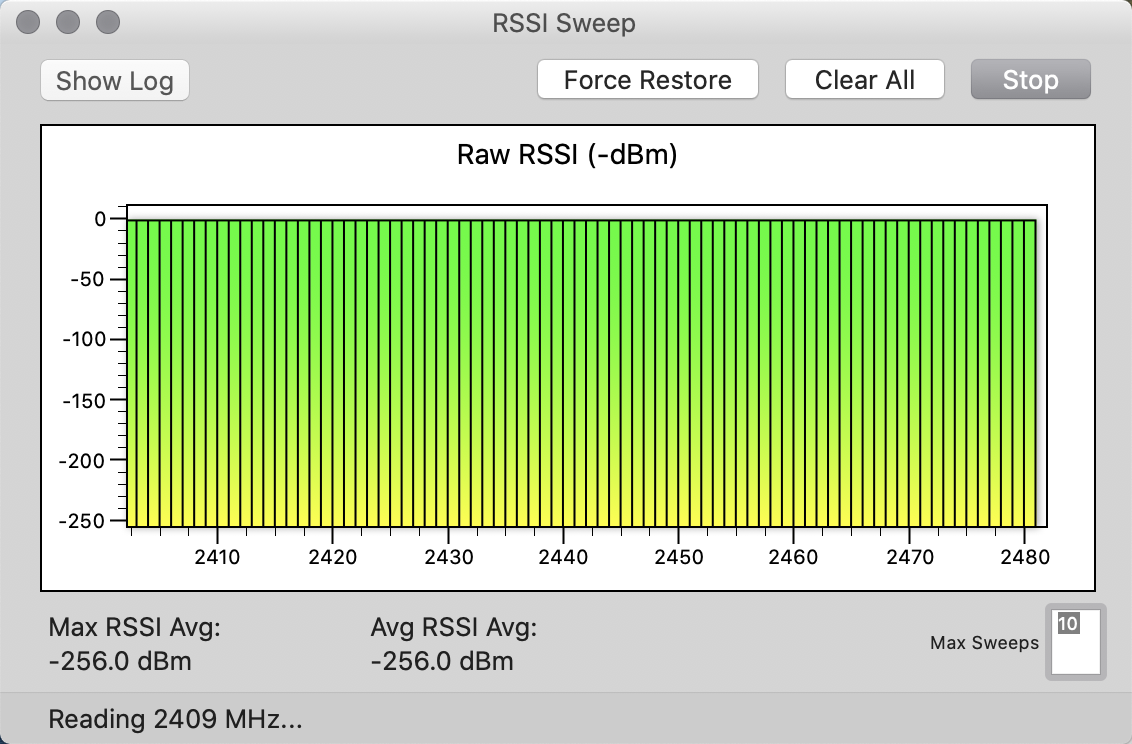
Solution2
By increasing the Bitpool settings used for Bluetooth, you can greatly improve the quality of Bluetooth audio in Mac OS. The higher the Bitpool is set to, the less compressed the sound transmitted will be.
Open Bluetooth Explorer - Audio Options
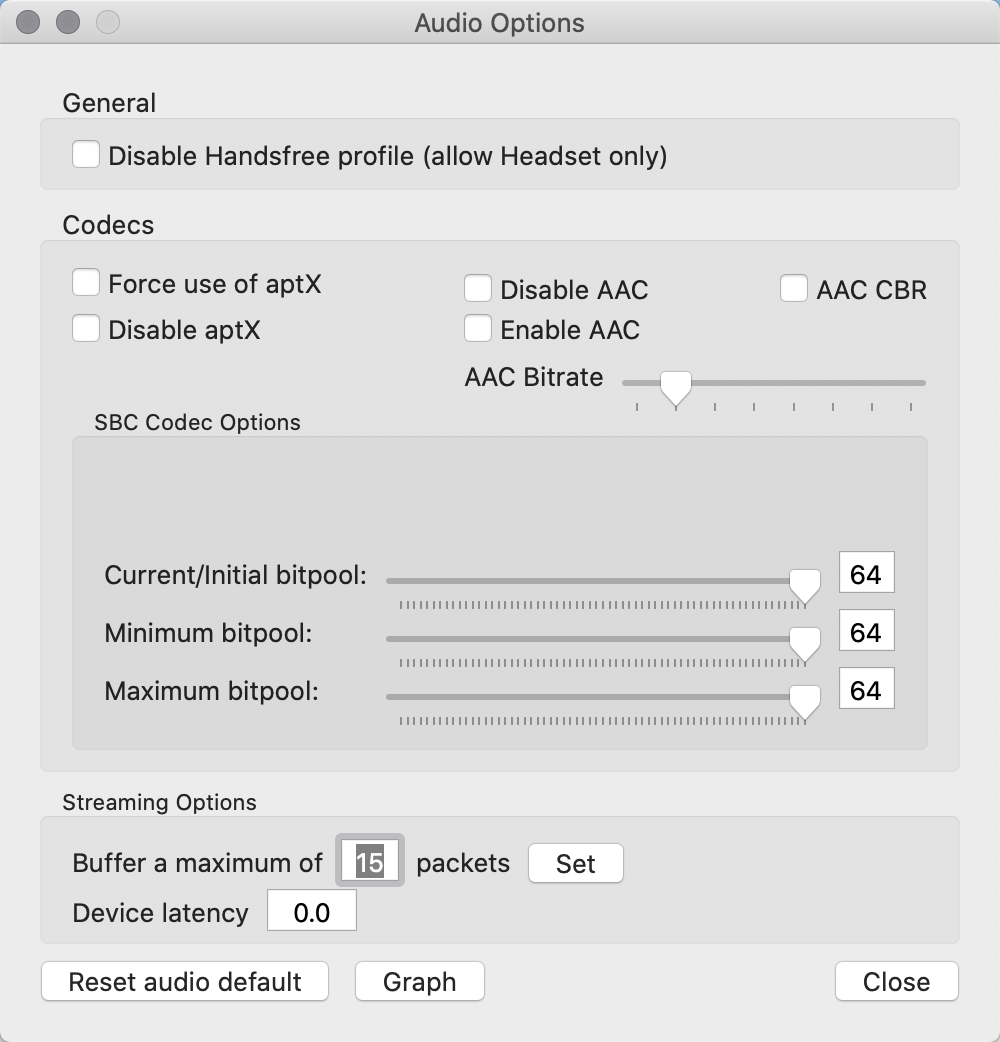
Increase the minimum bitpool to around 64 and the maximum bitpool to the maximum, 64. Tick the enable role switching option if it isn’t already enabled.
Finally, quit Bluetooth Explorer to save the settings. You might need to turn bluetooth off and on for the changes to take effect.
Alternatively you can do this quickly by pasting this command into terminal:
defaults write com.apple.BluetoothAudioAgent "Apple Bitpool Max (editable)" 80
defaults write com.apple.BluetoothAudioAgent "Apple Bitpool Min (editable)" 80
defaults write com.apple.BluetoothAudioAgent "Apple Initial Bitpool (editable)" 80
defaults write com.apple.BluetoothAudioAgent "Apple Initial Bitpool Min (editable)" 80
OS Setting
显示隐藏文件
$ defaults write com.apple.Finder AppleShowAllFiles true
$ killall Finder
设置默认为英文
https://support.apple.com/zh-cn/guide/mac-help/mh26684/mac
Disable Software Autostart On-boot
Open following location
/Library/LaunchAgents/
Delete
com.cisco.anyconnect.gui.plist
or, launch a Terminal Window, use following command to delete it
rm -f /Library/LaunchAgents/com.cisco.anyconnect.gui.plist
删除默认输入法
sudo open ~/Library/Preferences/com.apple.HIToolbox.plist
-
接着输入密码即可打开
com.apple.HIToolbox.plist文件。(打开.plist文件需要安装有Xcode或者PlistEdit Pro也行) -
依次点开
Root-AppleEnabledInputSources,会看到一列item,找到其中KeyboardLayout Name为U.S.的那一列,将整列item删掉,然后command + S保存。
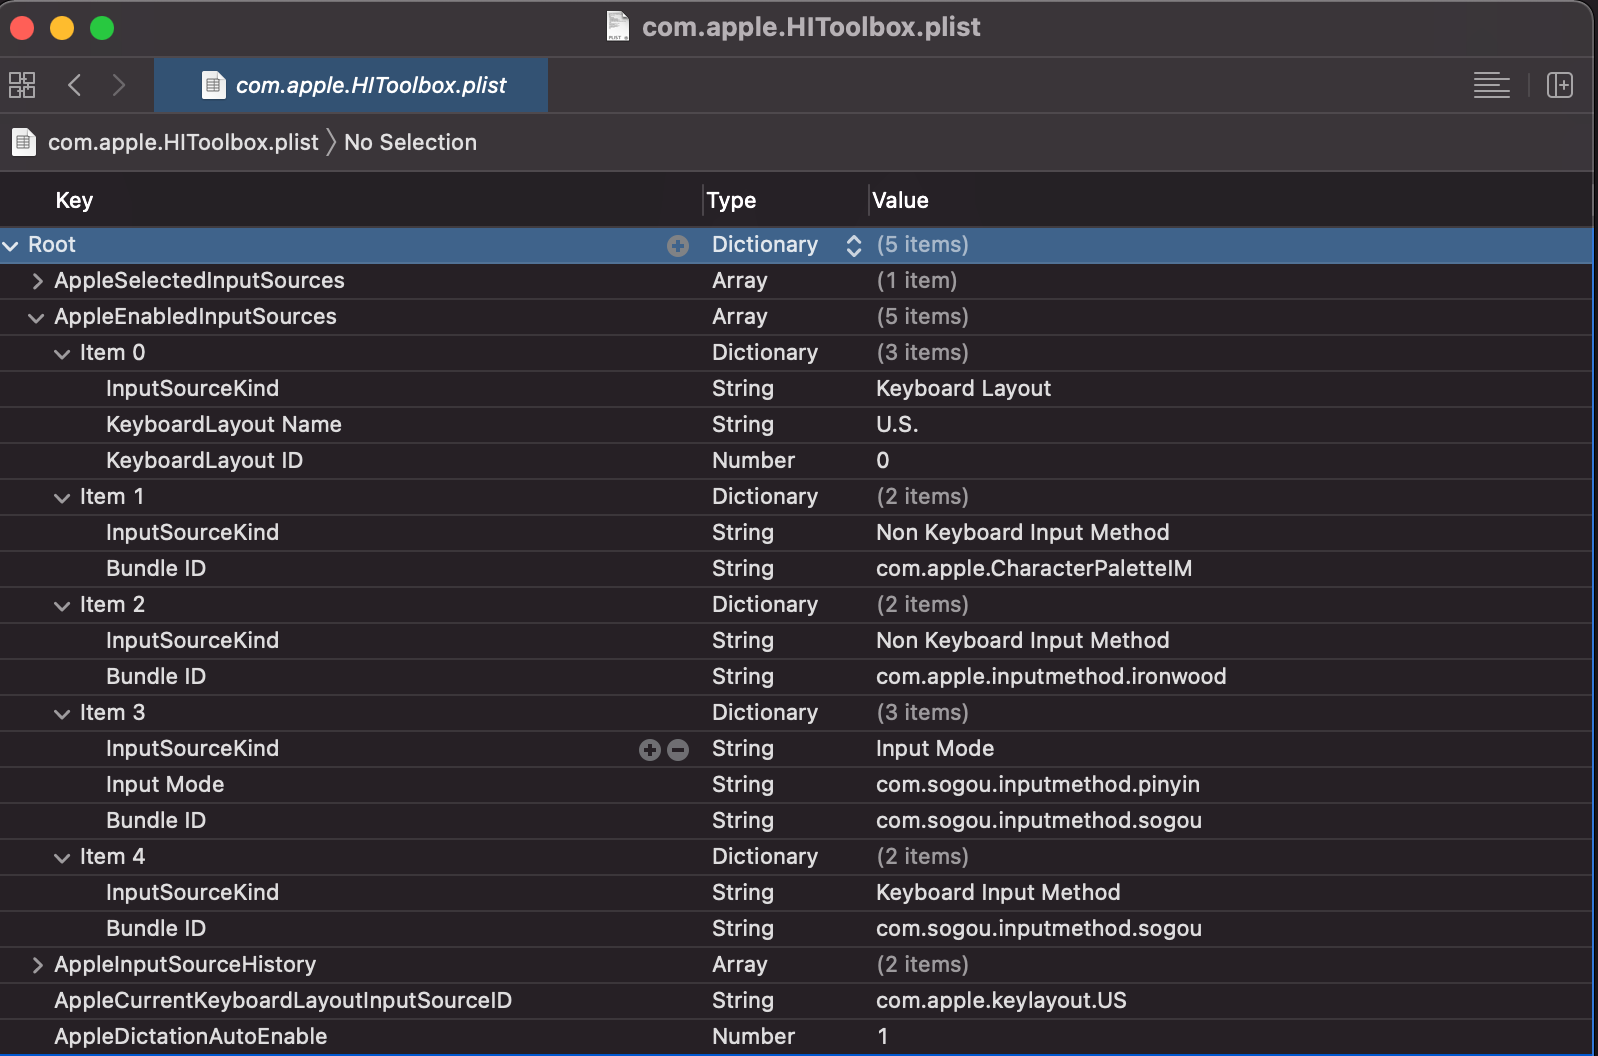
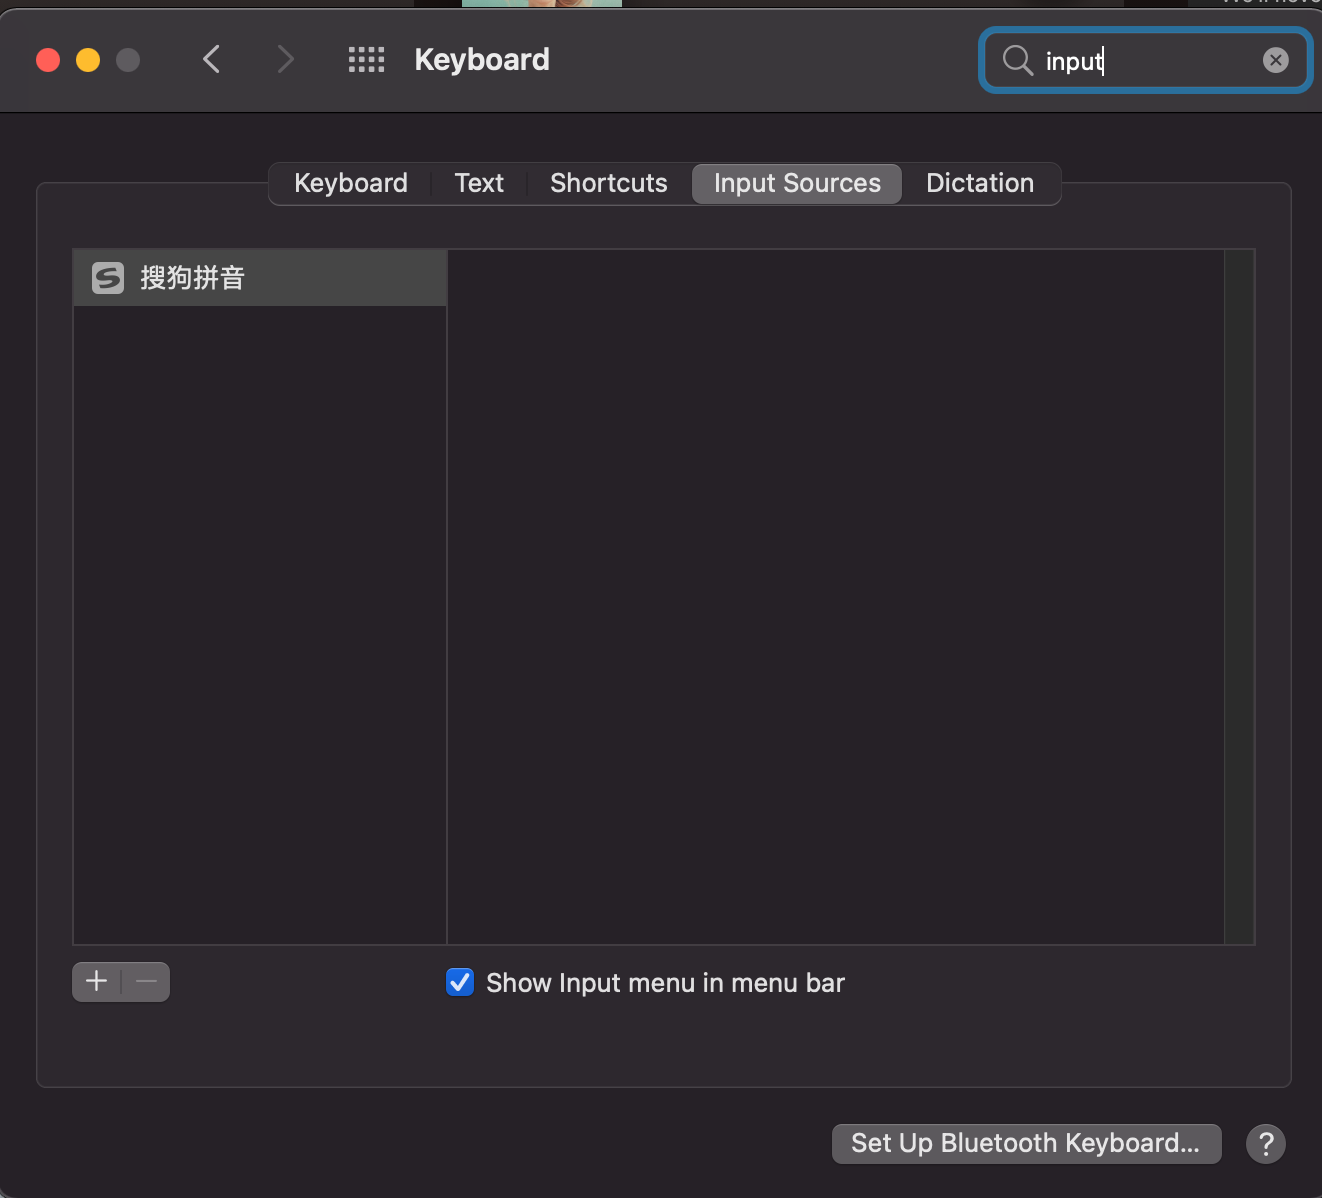
- 接着重启电脑,打开键盘设置,就可以看到系统自带的
U.S.输入法已经被删掉了。
Reference
- https://www.reddit.com/r/apple/comments/5rfdj6/pro_tip_significantly_improve_bluetooth_audio/
- https://bencollier.net/2011/04/improve-compressed-bluetooth-audio-on-mac/
- https://www.zhihu.com/question/28764379
- https://www.macrumors.com/how-to/enable-aptx-aac-bluetooth-audio-codecs-macos/#:~:text=Drag%20Bluetooth%20Explorer%20into%20your,(depending%20on%20your%20issue).
- https://zhuanlan.zhihu.com/p/28249327
- https://www.jianshu.com/p/0ba1292441b9
- https://www.csd.uwo.ca/~amulder/HowTo/smb-mounts-login/
